background image


27


3  Getting the Best Signal 

This chapter provides information on how to correctly handle the Dish Antenna and 
position it for the best possible signal reception. 
 

1.  Handling the Antenna 

When handling th e antenna it is always advised to be gentle when raising the 
antenna from is original position.  Due to the intricacies of moving parts within 
the antenna we recommend using caution when handling the antenna to avoid 
any unnecessary damage.   

Raising the A ntenna – Gently lift the dish of the 
antenna to your desired antenna angle. 

Rotating the Antenna – Take caution when 
rotating the face of the Dish.  The Dish face can 
rotate clockwise or counter-clockwise in a 90 
degree rotation.  (180 degree total from one extreme to the other) 
Be very careful to 

NOT OVER-EXTEND THE ROTATION LIMITS of the Dish. 


2.  Finding the Best Signal 
 

Associate your Wireless-G Dish Adapter to your local wireless network. 

Position the Dish antenna towards the Access Point and rotate it s lowly left and 
right in a 180 degree radius.   

Signal Strength LED Readout:  These are the 5 blue LEDs on the front of the 
Dish Adapter that convey real time signal strength percentages to the user. 
 

LED Readout Legend

1 LED – (0-20%)    Very Bad Connection   
2 LED – (20-40%)   Poor connection 
3 LED – (40-60%)   Fair Connection 
4 LED – (60-80%)   Good Connection 
5 LED – (80-100%)  Excellent Connection 


As you rotate the antenna from left to right, notice the LED readouts and find 
the antenna orientation that provides the best connection. 

Summary of Contents for HWU8DD

Page 1: ......

Page 2: ...clearly on the outside of the package and include your original proof of purchase IN NO EVEN SHALL HAWKING TECHNOLOGY S LIABILTY EXCEED THE PRICE PAID FOR THE PRODUCT FROM DIRECT INDIRECT SPECIAL INCIDENTAL OR CONSEQUENTIAL DAMAGES RESULTING FROM THE USE OF THE PRODUCT ITS ACCOMPANYING SOFTWARE OR ITS DOCUMENTATION Hawking Technology makes no warranty or representation expressed implied or statuto...

Page 3: ...eparation between the equipment and receiver 3 Connect the equipment into an outlet on a circuit different from that to which the receiver is connected 4 Consult the dealer or an experienced radio technician for help FCC Caution This device and its antenna must not be co located or operating in conjunction with any other antenna or transmitter This device complies with Part 15 of the FCC Rules Ope...

Page 4: ... 9 1999 on radio equipment and telecommunication terminal Equipment and the mutual recognition of their conformity R TTE The R TTE Directive repeals and replaces in the directive 98 13 EEC Telecommunications Terminal Equipment and Satellite Earth Station Equipment As of April 8 2000 Safety This equipment is designed with the utmost care for the safety of those who install and use it However specia...

Page 5: ...ings Advanced Settings 17 1 4 Wireless Security Settings 18 1 5 Setting WPA and WPA2 19 1 6 Using Profiles 20 1 7 Other Settings Power Consumption Settings 21 1 8 Software Access Point Mode 23 1 9 Advanced More Settings For AP Mode 25 1 10 Setting Wireless Security in AP Mode 25 1 11 Advanced Settings in AP Mode 26 1 12 MAC Address Filtering in AP Mode 26 3 GETTING THE BEST SIGNAL 27 4 TROUBLESHOO...

Page 6: ...hasa built in AES engine which ensures the highest degree of security and authenticity for digital information and is the most advanced solution defined by IEEE 802 11i for WiFi security The Hawking HWU8DD is a High Performance Hi Gain WiFi adapter that expands the possibilities of your wireless network connections 1 1 Features Complies with the IEEE 802 11b and IEEE 802 11g 2 4GHz standards Up to...

Page 7: ...k the items of your package The package should include the following items One Hi Gain Wireless G USB Dish Adapter One USB 2 0 Extension Cable One Quick Installation Guide One CD Driver Install Wizard Manual If any of the above items is missing contact your supplier as soon as possible WARNING CAUTION Handling the Antenna When handling the antenna it is always advised to be gentle when raising the...

Page 8: ...000 2003 Server Note3 If you have previously installed a wireless adapter card or adapter please uninstall the driver and utility Please follow the instructions below to install the WiFi Locator Professional Edition as a Wireless USBAdapter I Install the Configuration Utility A Insert the Installation CD to your CD ROM Drive Execute the Driver and Software Setup program from the Autoload CD Menu I...

Page 9: ...9 B If you want to install the software program in another location click Browse and select an alternative destination Then click Next ...

Page 10: ...10 C Click Continue Anyway to finish the installation d Click Finish to restart your computer after the installation ...

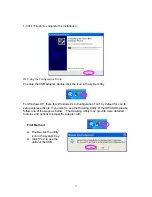
Page 11: ...o a hi speed USB 2 0 port on your computer If the device is plugged into a USB 1 1 port it will work at a lower speed B The Found New Hardware Wizard is displayed Some computers will have the option of asking Windows Update to search automatically for software If this happens on your computer select No not at this time C Select Install the software automatically Recommended and click Next ...

Page 12: ...12 D Click Continue Anyway and the system will start to install the USB adapter ...

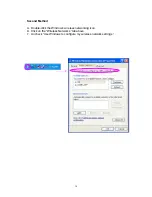
Page 13: ...s a Windows Zero Configuration Tool by default for you to setup wireless clients If you want to use the Hawking Utility of the HWU8DD please follow one of the ways as below The Hawking Utility may provide more detailed features and options to adjust the adapter with First Method A Double click the utility icon in the system tray B Click Yes to use the utility of the USB ...

Page 14: ...14 Second Method A Double click the Window s wireless networking icon B Click on the Wireless Networks tab above C Uncheck Use Windows to configure my wireless network settings ...

Page 15: ...o a PC or laptop with an available USB 2 0 interface This adapter is backwards compatible with USB 1 1 or USB 1 0 interfaces however due to the performance limitations of legacy interfaces the adapter cannot perform at its optimal level 2 Under Ad Hoc mode the adapter works in 802 11b mode only This is a rule defined by the WiFi Organization If you want to enable the data rate up to 54Mbps 11g ple...

Page 16: ...th information will be shown in the Available Networks field Double click the SSID site from the Available Networks field to connect directly to a specific SSID or wireless network The information of the SSID is shown on the Current Network Information Show the BSSID of the associatedAP is diaplayed in the Link Status field Signal Strength and Link Quality are shown below the BSSID and described w...

Page 17: ...ange and Apply is alternately shown over the same position Modify the SSID name from the SSID field When use the item the any will be unchecked previously Change the channel using the drop down menu Channel When using this feature Ad Hoc mode will automatically be set Select the transmission rate using the Tx Rate drop down menu Select the Ad_Hoc or Infrastructure Mode from the Network Type drop d...

Page 18: ... in the same position Select which key length 64 128 or 256 bit that you wish to use within your network If you do not know this information check with your network administrator Select which key set will be used by the field of Default Key ID Modify the 4 sets of keys depending on the selected key length in the field of Key Value The key value is used in hexadecimalformat Select which key format ...

Page 19: ...than standard WEP encryption and offers more robust security features Press the Change button to modify the contents of WPA setting when it is finished select Apply to save your changes The Change and Apply buttons are alternately shown in the same position Select WPA WPA PSK WPA2 or WPA2 PSK from the authentication Mode drop down menudepending on what security ...

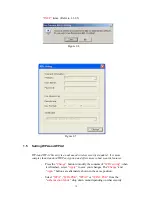
Page 20: ...elected the pre share key WPA PSK or WPA2 PSK protocol you can enter your password in the Passphrase field for access to the specific network If the ASCII format is checked the password length can be selected from 8 bytes to 63 bytes depending on the user and network settings If you check the Hexadecimal format 64 bit characters must be keyed in 1 6 Using Profiles Profiles can be used to save the ...

Page 21: ... off CAM Mode Maximum Power Saving mode or Fast Power Saving mode The default is CAM mode For the lowest power consumption setting select Maximum Power Saving mode throughput will be lower thanit would be in CAM and Fast Power Saving mode The throughput of Fast Power Saving mode is better than Maximum Power Saving mode but saves less power when compared to Maximum Power Saving mode The Country Roa...

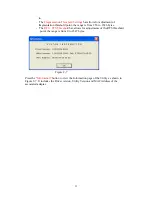
Page 22: ...56 to 2346 bytes The RTS CTS Threshold bar allows for adjustments of the RTS threshold point the range is from 0 to 2347 bytes Figure 2 7 Press the Information button to view the Information page of the Utility as shown in Figure 2 7 It includes the Driver version Utility Version and MAC Address of the associated adapter ...

Page 23: ...lable network adapters that can be chosen for use in AP Mode The clients that associate to the access points will have their MAC addresses shown in the field of the Station MAC Address The current status of the AP is shown in the current Network Setting field This field displays the Current Channel information as well as the Access Point s SSID The status of WEP encryption is displayed as disabled...

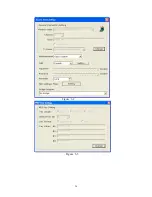
Page 24: ...24 Figure 3 2 Figure 3 3 ...

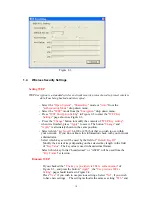
Page 25: ...nnel Modify the SSID name from the SSID field Checkthe Hide SSID box to hide the SSID from outside clients attempting to connect to your Soft AP When outside computers attempt to search for local networks your specific SSID will not be displayed There are 4 sets transmit power levelthat can be selected in the Tx power field Level 0 is the only available selection for this model 1 10 Setting Wirele...

Page 26: ...range is from 256 to 2346 Disable bytes Adjust the RTS CTS settings by sliding the bar left and right The threshold point range is from 0 to 2347 Disable bytes The advanced settings tab allows users to adjust their Preamble to long or short If you are an advanced user you may set the value here Otherwise it is recommended that you use the default setting 1 12 MAC Address Filtering in AP Mode MAC A...

Page 27: ...ckwise or counter clockwise in a 90 degree rotation 180 degree total from one extreme to the other Be very careful to NOT OVER EXTEND THE ROTATION LIMITS of the Dish 2 Finding the Best Signal Associate your Wireless G Dish Adapter to your local wireless network Position the Dish antenna towards the Access Point and rotate it slowly left and right in a 180 degree radius Signal Strength LED Readout ...

Page 28: ...ry new coding scheme for 6 12 and 24 Mbps mandatory speeds and 18 36 48 and 54 Mbps optional speeds The ERP includes the modulation schemes found in 802 11b including CCK for 11 and 5 5 Mbps and Barker code modulation for 2 and 1 Mbps B A protection mechanism called RTS CTS that governs how 802 11g devices and 802 11b devices interoperate 4 What is the IEEE 802 11b standard The IEEE 802 11b Wirele...

Page 29: ...ip based security has been developed to ensure the highest degree of security and authenticity for digital information wherever and however communicated or stored while making more efficient use of hardware and or software than previous encryption standards It is also included in IEEE 802 11i standard Compare with AES TKIP is a temporary protocol for replacing WEP security until manufacturers impl...

Page 30: ...r the original data without the need for retransmission To an unintended receiver DSSS appears as low power wideband noise and is rejected ignored by most narrowband receivers 15 What is Spread Spectrum Spread Spectrum technology is a wideband radio frequency technique developed by the military for use in reliable secure mission critical communication systems It is designed to trade off bandwidth ...

Reviews: