background image

16

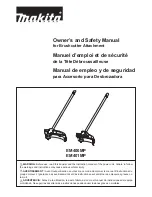
Assemble the safety guard

Remove the two screws from the top of the guard with the hex key.
Hold the Guard underneath the bracket, insert the two screws through the bracket in to the holes in 
the guard and re-tighten firmly. See picture below. 

  WARNING!  Use  only  original  manufacturer’s  replacement  parts,  accessories 

and  attachments. Failure to do so can cause poor performance, possible injury and may 
void your warranty. Never use the machine without the guard assembled!

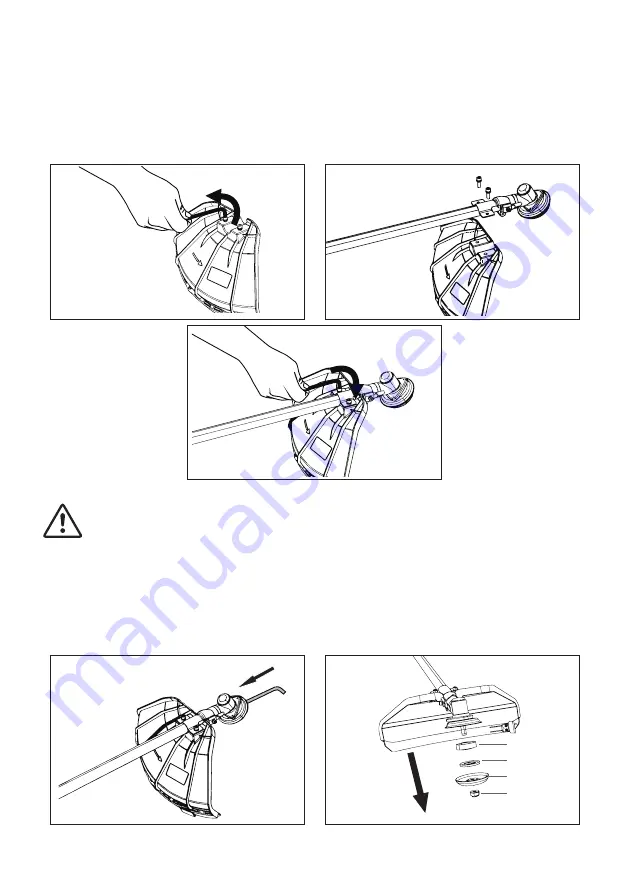
Assemble the line spool or cutting blade

Line up the two holes of the flange and shield(black one). Lock the spindle  by inserting the 5mm hex 
key through the holes as shown in the picture below. Turn the socket wrench clockwise until the 
nut is released. Take out inner flange(a), outer flange(b), protect cover plate(c), nut(d).

a
b
c
d

Summary of Contents for 66933

Page 1: ...SKU 66933 52cc Brush cutter Original User s Instructions READ BEFORE USE PLEASE KEEP THESE INSTRUCTIONS FOR FURTHER REFERENCE...

Page 2: ...TIONS AND WARNINGS 5 IMPORTANT SAFETY WARNINGS 7 PRODUCT DESCRIPTION AND IDENTIFICATIONS 13 ASSEMBLY AND OPERATING INSTRUCTIONS 14 CARE AND CLEANING 27 TROUBLE SHOOTING 34 DECLARATION OF CONFORMITY PE...

Page 3: ...ems please contact www coreservice co uk Hotline 44 01904 947568 Email support coreservice co uk Main unit Guard Shaft Spool Blade Double shoulder harness Fuel mixing bottle Hex key 5mm Socket wrench...

Page 4: ...nk capacity 1200ml Idle speed 3100 400min 1 Clutch engaged speed 4500min 1 Ignition C D I Cutting width grass trimmer 480mm Cutting width brush cutter 255mm Diameter of cutting line 2 4mm Net weight a...

Page 5: ...ar When working the distance between the machine and bystanders shall be at least 15m Max 6000 min 1 Maximum permitted rotational speed of the cutting tool Warning Hot surface Burns to fingers or hand...

Page 6: ...ing and Stopping Engine Section Choke Move choke lever to CHOKE position See Starting and Stopping Engine Section Beware of thrown objects Caution Risk of injury due to running blades Wear respiratory...

Page 7: ...h or damage to the machine Always take care when removing the packaging to prevent damage to you or to the machine IMPORTANT Before assembling the machine check all the parts indicated in the manual a...

Page 8: ...ine in an enclosed or poorly ventilated area breathing exhaust fumes can kill Clear the work area before each use Remove all objects such as rocks broken glass nails wire or other such debris which ca...

Page 9: ...gine starting It has been reported that vibrations from hand held tools may in certain individuals contribute to a condition called Raynaud s Syndrome Symptoms may include tingling numbness and blanch...

Page 10: ...vehicle allow the engine to cool empty the fuel tank and secure the cutter from moving Replace the string head if cracked chipped or damaged in any way Be sure the string head is properly installed an...

Page 11: ...distance from the cutting mechanism in particular after turning the engine on Never touch under the housing body when the engine is running Safety gloves must be used Never use the brush cutter witho...

Page 12: ...only original accessories and spare parts 2 Keep the cutter clean at all times in particular the air vents Never spray water on the cutter body Never clean the cutter and its components with solvents...

Page 13: ...6 Switch On Off 7 Throttle lock 8 Throttle lever 9 Fuel pump primer bulb Not all the accessories illustrated or described are included in standard delivery 10 Choke lever 11 Recoil starter handle 12 S...

Page 14: ...ng in accordance with local recycling schemes When assembling this machine please follow these instructions Assemble the bike handle on the machine 1 Assemble the bike handle Assemble the bike type ha...

Page 15: ...op on the depth limit step Insert the lower shaft into the clamp Pull the stop pin and slightly rotate it to be off the depth limit step Rotate the lower shaft until the stop pin clicks into the hole...

Page 16: ...parts accessories and attachments Failure to do so can cause poor performance possible injury and may void your warranty Never use the machine without the guard assembled Assemble the line spool or cu...

Page 17: ...two holes of the flange and shield black one Lock the spindle by inserting the 5mm hex key through the holes Mount the inner flange a blade outer flange b protect cover plate c nut d into the spindle...

Page 18: ...ver the shoulders and secure with the quick connect function of the harness The finished set up should resemble the picture below Note At the front of the harness there is an easily accessible quick r...

Page 19: ...he quick release mechanism The metal locking bar will be released automatically because of the weight of the machine and the machine will drop away from you NOTE Let the cutting attachment rest lightl...

Page 20: ...uctions relating to handling fuel Risk of damage The machine does not come supplied with 2 stroke engine oil 1a Fuel mixture 1 litre 1000ml petrol 25cc 25ml 2 stroke engine oil 40 1 ratio Using a funn...

Page 21: ...find any faults If a part has become defective be sure to replace it before you use the device again Check before use Check the safe condition of the machine Check the machine for leaks Check the mac...

Page 22: ...e lever 10 to the position do not press the primer bulb 5 Press and hold the machine then pull the recoil starter handle 5 6 times to start the engine 10 11 position 6 Once the engine is running smoot...

Page 23: ...lly and release WARNING If the brush cutter vibrates excessively STOP the engine immediately and investigate the cause 8 Adjusting line length while working This machine is fitted with a Bump to Feed...

Page 24: ...f the chord The recoil starter handle should be allowed to slowly return back to its starting position and never be allowed to snap back NOTE Do not start the motor in long grass ATTENTION When the en...

Page 25: ...for mowing down vegetation to prepare a garden for other applications ATTENTION Even if it is used carefully cutting around foundations stone or concrete walls will result in the line suffering more...

Page 26: ...ol at an angle of 30 to the right Place the handle in the required position Remember the increased risk of injury to the user bystanders and animals and the danger of damaging property due to objects...

Page 27: ...alent Reinstall the spark plug by hand then tighten it firmly with the spark plug wrench EVERY 24 HOURS OF USE Loosen and remove the air filter cover and filter element Inspect the element If the filt...

Page 28: ...he tool until it stops from lack of fuel LUBRICATION Remove the spark plug and then pour approximately a teaspoon of 2 stroke oil into the cylinder through the spark plug hole Before reinstalling the...

Page 29: ...he Assembly section Press the spool together and remove one half of the housing 2 Take the spool plate out of the line spool housing 3 Remove any remaining cutting line 4 Place the new cutting line in...

Page 30: ...together again 11 Cut the excess line to a length of around 13cm This will reduce the load on the engine when starting and warming up 12 Remount the line spool If you are replacing the complete line s...

Page 31: ...e the engine has cooled remove the spark plug using the socket spanner supplied 2 Clean the plug with a wire brush 3 Using a feeler gauge set the gap to 0 5 0 7mm 0 5 0 7mm 4 Install the spark plug ca...

Page 32: ...r Regular checks are therefore essential 1 Unclip the air filter cover and remove the sponge filter element 2 To avoid objects falling into the air tank remount the air filter cover 3 Wash the filter...

Page 33: ...e problems when starting up the machine and may require expensive repairs Slowly remove the fuel tank cap to release any pressure that may have in the tank Carefully empty the tank To remove the fuel...

Page 34: ...carburettor setting 4 Blunt cutting blade 1 Set the choke lever on the position 2 Clean the air filter 3 Contact an authorised customer service outlet 4 Have cutting blade re sharpened replaced The en...

Page 35: ...ation legislation Supply of Machinery Safety Regulations 2008 2006 42 EC Electromagnetic Compatibility Regulations 2016 2014 30 EU Noise Emission in the Environment by Equipment for use Outdoors Regul...

Page 36: ...there is one available Petrol oil used oil a mixture of oil and petrol and objects soiled with oil e g cleaning cloths do not belong in the household rubbish Dispose of oil contaminated items in acco...

Page 37: ...ate of delivery of the product if later The guarantee is subject to the following provisions The guarantee does not cover accidental damage misuse cabinet parts knobs or consumable items The product m...

Reviews: