background image

23

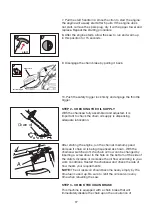
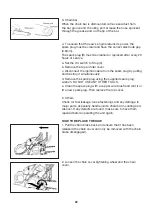
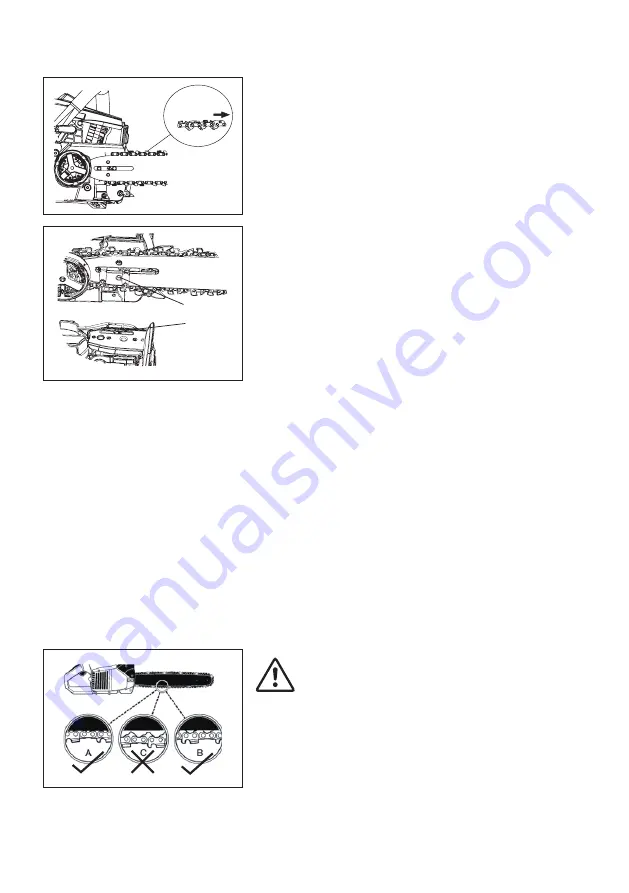
3. Fit the chain around the bar ensuring that the direction of 
the chain is as depicted in the picture on the bar. Fit the chain 
on the sprocket. Adjust the position of chain tensioner so the 
tensioner pin locates in the hole (A) on the bar.


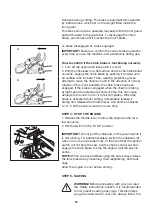
4. Adjust the tension to ensure that there is not too much 
slack in the chain. Make sure the tensioner pin (B) is located 
in the assembly hole (A) on the bar. Pay attention to the 
correct direction of the saw chain. Compare with the picture 
near the chain sprocket and the picture on the bar.


5. Fit the chain cover to the power unit and fasten the nuts to 
the chainsaw, ensure these are fastened as tight as possible 
using your fingers only.
6. While holding up the tip of the bar, adjust the chain tension 
by turning the adjustment wheel until the chain engagesin the 
bar channel. When tensioned correctly, it should be possible 
to pull one full chain link free of the bar channel with ease.
7. Tighten the wheel as secure as you can using your fingers.
 Then check the chain for smooth rotation and proper tension 
while moving it by hand. If necessary, loosen the chain cover.
8. Tighten the tensioner wheel.

NOTE: 

A new chain will expand its length during the first 

period of use. Check and re-adjust the tension frequently, as 
a loose chain can easily derail or cause rapid wear of itself 
and the chain bar.

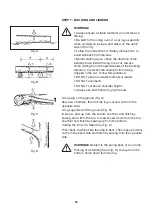
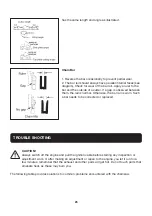
 CAUTION! 

If the saw chain is TOO LOOSE or TOO 

TIGHT the V-drive wheel, chain bar, chain and crank 
shaft bearing will suffer premature wear. Below Fig. 
shows the correct tension A (when cold) and tension 
B (when warm).


Fig. C shows a chain that is too loose.


Direction of chain

A

B

Summary of Contents for 75716

Page 1: ...rvice co uk Hotline 44 01904 947568 Email support coreservice co uk Chain saw x 1 Bar cover x 1 Fuel bottle x 1 Hex key x 1 Screw driver x 1 Socket wrench slotted screw drive x 1 Oregon chain x 1 Oreg...

Page 2: ...ax 6 5 m s2 K 1 5 m s2 Vibration ahv rear handle max 6 m s2 K 1 5 m s2 Spark plug L8RTF Guide bar Oregon 160SDEA041 Saw chain Oregon 91P057X The sound intensity level for the operator may exceed 80 dB...

Page 3: ...any use refer to the corresponding paragraph in the manual This symbol before a safety comment indicates a precaution a warning or a danger Ignoring this warning can lead to an accident for yourself...

Page 4: ...This will result in kickback of the chainsaw DO NOT hold the saw with one hand Hold the saw frmly with both hands Place your right hand on the rear handle and your left hand on the front handle DO NO...

Page 5: ...ating the chainsaw Perform assembly operations as described in this manual Failure to observe this warning may lead to serious injury death or damage to the chainsaw Always take care when removing the...

Page 6: ...devices PPE Use caution when handling fuel Move the chainsaw at least 10 feet 3m away from the fuelling point before starting the engine DO NOT allow other persons to be near when starting or cutting...

Page 7: ...user manual safety and maintenance instructions should be performed by competent chainsaw service personnel When transporting your chainsaw use the appropriate chain bar cover DO NOT operate your chai...

Page 8: ...bar tip contacts it may cause an extremely fast reverse reaction kicking the chain bar up and back towards the operator Pinching the saw chain along the top of the chain bar may push the chain bar ra...

Page 9: ...way from the operator PINCHING the saw chain along the TOP of the cutting chain bar may PUSH the chain bar rapidly back towards the operator Any of these reactions may cause you to lose control of the...

Page 10: ...ore storing in any enclosure To reduce the fire hazard keep the engine silencer and petrol storage area free of hedge trimmings leaves or excessive grease Replace worn or damaged parts for safety If t...

Page 11: ...hain and saw 2 Chain brake 3 Handle 4 Chock 5 Safety trigger lock 6 Switch 7 Petrol tank 8 Oil tank 9 Primer bulb 10 Air filter cover 11 Starter Not all the accessories illustrated or described are in...

Page 12: ...kback c STOP SWITCH immediately stops the engine when tripped The stop switch must be pushed to the START position to start or restart engine d SAFETY TRIGGER LOCK prevents accidental acceleration of...

Page 13: ...TEP 1 CHAIN BRAKE MECHANICAL TEST WARNING The purpose of the chain brake is to reduce the possibility of injury due to kickback however it cannot provide the intended measure of protection if the saw...

Page 14: ...N If the saw chain is TOO LOOSE or TOO TIGHT the V drive wheel chain bar chain and crank shaft bearing will suffer premature wear Below Fig shows the correct tension A when cold and tension B when war...

Page 15: ...Use special chainsaw oil to lubricate the saw chain WARNING Lack of chain oil will seriously damage the chain NOTE Most stores will sell acceptable oil under the name chainsaw chain oil IMPORTANT The...

Page 16: ...While holding the saw unit securely on the ground one foot holding down the rear handle left hand holding the front handle pull the start handle four times to warm the engine At this stage the engine...

Page 17: ...is dispensing adequate lubrication After starting the engine run the chain at medium speed and see if chain oil is being dispensed as shown With the chainsaw switched off the chain oil ow can be chan...

Page 18: ...ating at high speed for extended periods of time this can cause damage to the clutch or for it to fail completely When the brake is activated whilst cutting immediately release it having first release...

Page 19: ...uitable person before attempting to fell a tree When you fell a tree be sure to warn anyone in close proximity of the danger 1 When deciding the felling direction consider the wind lean of the tree lo...

Page 20: ...ble foothold or ladder DO NOT overreach DO NOT cut above shoulder height Always use both hands to grip the saw A log lying on the ground Fig A Saw down halfway then roll the log over and cut from the...

Page 21: ...sure that the engine has stopped and is cool Disconnect the spark plug to prevent accidental starting 1 Air filter Dust on the air filter surface can be removed by detaching the air filter cover A rem...

Page 22: ...ug by pulling and twisting it simultaneously d Remove the spark plug using the supplied spark plug wrench DO NOT USE ANY OTHER TOOLS e Clean the spark plug with a copper wire brush and refit it or fit...

Page 23: ...of the bar adjust the chain tension by turning the adjustment wheel until the chain engagesin the bar channel When tensioned correctly it should be possible to pull one full chain link free of the ba...

Page 24: ...HAIN AND CHAIN BAR The cutters need to be sharpened when 1 Sawdust becomes powder like 2 Cutting requires extra force 3 The chainsaw does not cut straight and clean 4 Vibration increases 5 Fuel consum...

Page 25: ...l is normal Otherwise the bar rail is worn Such a bar needs to be corrected or replaced TROUBLE SHOOTING CAUTION Always switch off the engine and pull the ignition cable before starting any inspection...

Page 26: ...es 1 Incorrect carburetor mixture adjustment setting 1 Have carburetor adjusted by an authorised service centre No power under load 1 Incorrectly gapped spark plug 1 Clean gap or replace plug Runs err...

Page 27: ...06 42 EC Electromagnetic Compatibility Regulations 2016 2014 30 EU The Restriction of the Use of Certain Hazardous Substances in Electrical and Electronic Equipment Regulations 2012 2011 65 EU EU 2015...

Page 28: ...ousehold waste Please recycle where facilities exist When you need to dispose of this product check with your retailer or local authority for suitable options Regulations encourage the recycling of Wa...

Page 29: ...ate of delivery of the product if later The guarantee is subject to the following provisions The guarantee does not cover accidental damage misuse cabinet parts knobs or consumable items The product m...

Reviews: