background image

9

•  Do not force the tool: It will do the job better and safer at the 

rate for which it was intended.

•  Arrange cord: Ensure the cord is arranged so that it cannot be 

tripped over, stopped on or have heavy weights rested on it and 
make sure that the cord will not be subjected to any damage.

•  Do not abuse the cable: Never carry the tool by the cord or pull 

it to disconnect it from the socket. Keep the cord away from 
heat, oil and sharp edges.

•  Do not over reach: Keep proper footing and balance at all times.
•  Maintaining your tool: Keep cutting blade sharp and clean for 

better performance. Follow instructions for lubrication and 
changing accessories. Inspect tool cable periodically and if 
damaged have it repaired by an authorized service facility. 
Inspect extension cable periodically and replace if damaged. 
Keep handles dry, clean and free from oil and grease.

•  Check damaged parts: Before further use of the tool, a guard 

or other part that is damaged should be carefully checked 
to determine that it would operate properly and perform its 
intended function. Check for alignment of moving parts, free 
running of moving parts, damage to parts, mounting and any 
other conditions that may affect its operation. A guard or other 
part that is damaged should be properly repaired or replaced 
by an authorized service center unless otherwise indicated in 
this instruction manual. Have defective switches replaced by an 
authorized service facility. Do not use the tool if the switch does 
not turn it on and off.

•  Disconnect tools: When not in use, before servicing and when 

changing accessories such as blades and cutters, always 
ensure the machine is disconnected from the mains supply.

•  Removing keys and wrenches: Form the habit of checking to 

see that keys and adjusting wrenches are removed from the 
tool before turning it on.

Summary of Contents for 90496

Page 1: ...SKU 90496 2500W Electric Cutting Shredder Original User s Instructions READ BEFORE USE PLEASE KEEP THESE INSTRUCTIONS FOR FURTHER REFERENCE...

Page 2: ...MBOLS CAUTIONS AND WARNINGS 5 IMPORTANT SAFETY WARNINGS 6 PRODUCT DESCRIPTION AND IDENTIFICATIONS 15 ASSEMBLY AND OPERATING INSTRUCTIONS 16 CARE AND CLEANING 23 TROUBLE SHOOTING 24 DECLARATION OF CONF...

Page 3: ...these items please contact www coreservice co uk Hotline 44 01904 947568 Email support coreservice co uk Shredder housing Stand Plunger Collection bag Wheels x 2 Wheel Caps x 2 Axle includes 4 x washe...

Page 4: ...ia mm 45 Measured sound pressure level dB A 97 9 K 3 Measured sound power level dB A 113 5 K 3 Cable PVC 2x1 0mm 2 meters BS plug IP rating IPX4 Net weight kg approx 8 9 Note The above specifications...

Page 5: ...tric shock Warning Switch off and remove the plug from mains before adjusting cleaning or if the cord is damaged Take care that no metal parts stones bottles cans or other debris are included when int...

Page 6: ...conformity for these Directives was done UK Conformity Assessed This marking indicates that this product should not be disposed with other household wastes To prevent possible harm to the environment...

Page 7: ...liance is not intended for use by persons including children with reduced physical sensory or mental capabilities or lack of experience and knowledge unless they have been given supervision or instruc...

Page 8: ...osion Guard against electric shock Avoid body contact with earthed or grounded surfaces e g pipes cables etc Keep children and pets away from the work area Do not let visitors touch the tool or extens...

Page 9: ...eep handles dry clean and free from oil and grease Check damaged parts Before further use of the tool a guard or other part that is damaged should be carefully checked to determine that it would opera...

Page 10: ...er supply cord of the tool should be replaced by an authorized service agent Additional safety advice The supply voltage must correspond to the voltage specified on the nameplate It is recommended tha...

Page 11: ...shredding means can cause damage to the cords and lead to contact with live parts Pull the plug from the socket Whenever the machine is left unattended Before cleaning a blockage Before checking clea...

Page 12: ...rom the feed intake opening Do not allow hands or any other part of the body or clothing inside the feeding chamber discharge chute or near any moving part Keep proper balance and footing at all times...

Page 13: ...ep all guards and deflectors in place and in good working condition Do not transport this machine while the power source is running Shut off the power source and disconnect from mains supply whenever...

Page 14: ...cooling vents clean of debris and other accumulations to prevent damage to the motor or possible fire If an extension cord is used it shall not be of lighter grade than the supply cord already fitted...

Page 15: ...ort handle 2 Hopper 3 Locking knob 4 On Off switch 5 Power cord 6 Debris bag hook 7 Motor housing Not all the accessories illustrated or described are included in standard delivery 8 Discharge chute 9...

Page 16: ...o switch the appliance on and wait until the motor has reached full speed 4 Insert the shredding material into the hooper 2 but do not overload the shredder 5 Make sure the shredded material can move...

Page 17: ...ains and make sure that all moving parts have come to a complete stop 1 Inspect the material to be shredded before starting Remove any objects or debris that could be thrown jammed or become entangled...

Page 18: ...o dry out 12 If during cutting the blade stalls stop the shredder immediately and disconnect it from the mains supply before investigating the cause 13 Remove any jammed debris from the blades and exa...

Page 19: ...ty c Where there is too much resistance against the cutting blade When the circuit breaker has been activated switch off the shredder and disconnect the power supply a Unscrew the locking knob at the...

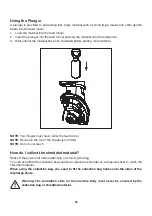
Page 20: ...ingers must never enter the feed funnel NOTE Never use the tool if the hopper is not fitted NOTE Do not over reach How do I collect the shredded material Shut off the power unit before attaching or re...

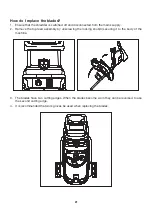
Page 21: ...ains supply 2 Remove the top feed assembly by unscrewing the locking knob 3 securing it to the body of the machine 3 The blades have two cutting edges When the blades become worn they can be reversed...

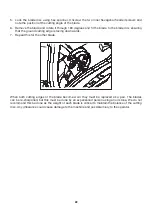
Page 22: ...ground cutting edge is facing downwards 7 Repeat this for the other blade When both cutting edges of the blade become worn they must be replaced as a pair The blades can be re sharpened but this must...

Page 23: ...ds are damaged 4 When servicing the cutting means be aware that even though the motor will not start due to the interlock feature of the hopper assembly the cutting means can still be moved if the mot...

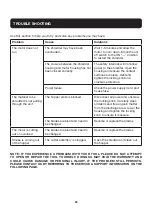
Page 24: ...is not pulling through the unit The hopper plate is blocked Disconnect all power and unscrew the locking knob Carefully clean all debris and free organic matter from the discharge area Lower the housi...

Page 25: ...the relevant Community harmonization legislation Supply of Machinery Safety Regulations 2008 2006 42 EC Electromagnetic Compatibility Regulations 2016 2014 30 EU The Restriction of the Use of Certain...

Page 26: ...esignated collection point for the recycling of waste electrical and electronic equipment The separate collection and recycling of your waste equipment at the time of disposal will help conserve natur...

Page 27: ...ate of delivery of the product if later The guarantee is subject to the following provisions The guarantee does not cover accidental damage misuse cabinet parts knobs or consumable items The product m...

Reviews: