27
GB
Translation
The lift does not move unless the seat is in the correct travel
position.
To put the lift into operation, proceed as follows:
- bring down the arms
W
and
U
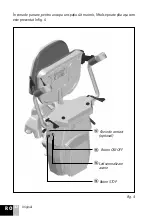
from the vertical position, as shown in fig . 4, to a
horizontal position, as shown in fig . 5 .
- the same applies to the seat
E
- by lifting the handle
Y
, you can also tilt the foot rest
T
from a folded position fig .
4 to a use position fig . 5; after that, you can get on the lift . Starting and moving the
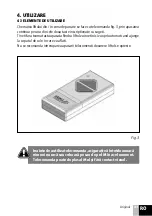
lift is made by moving the joystick
Q
fig . 5, as follows:
- to move to the right, move the joystick to the right and hold .
- to move to the left, move the joystick to the left and hold
- we do not recommend that you interrupt the command unless in case of obstacles
- to stop the lift at either end of the track, the control joystick must remain actuated
until the lift reaches the charging contacts and stops on its own, followed by the blue
LED
I
on the joystick arm lighting up, this indicating that the battery is charging
from the power supply
- if the lift is stopped on the track outside the charging elements, it will beep to warn
that the battery is not charging, and therefore that it must be moved so that the lift
may reach the charging contacts
- when the travel ends and the top of the track is reached, the seat
E
with backrest
and arms
W
and
U
fig . 5 are rotated to max . 90° to facilitate the user to get on and
off the seat . The standard elevator has a fixed seat . Optionally it can be equipped
with a manual rotation of the seat . Next are the steps for using this function:
- lift one of the handles
{
and slowly rotate the seat . After the seat starts to rotate
release the handle
{
and continue the rotation in the direction you have to get
of the lift . The rotation of the seat stops at 75º - fig no 5 .1 . if you want the seat to
rotate to 90º, lift the handle
{
again and turn more in the same direction until the
seat reaches 90º .
- to get back to the normal running position lift again the handle
{
and move in the
opposite direction as described above until the seat reaches the normal running
position .
Optionally, the stair lift can be equipped with electrical swivel seat function .
This movement is controlled by button
R
fig . 5, as follows:
- actuate the button in the right for right lifts or in the left for left lifts, and rotating
will occur as long as the button is pressed down, automatically stopping at a max .
angle of rotation of 90°
- to return the backrest and seat in normal travel position fig . 6, press the same button
on the reverse side .
Summary of Contents for HW 10
Page 4: ...4 D bersetzung Abb 1 Oberes Rohr Unteres Rohr Zahnstange St tze Fu st tze...
Page 5: ...5 D bersetzung Sitz Antrieb Zahnstange Schiene Ausgleich Abb 2...
Page 11: ...11 D bersetzung Abb 5 1 Drehsitzhebel...
Page 13: ...13 D bersetzung Abb 7...
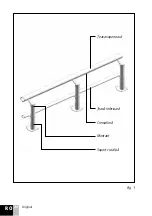
Page 21: ...21 GB Translation Fig 1 Upper tube Lower tube Rack Beam Sole support for pole...
Page 22: ...22 GB Translation Lift Rolling mechanism Drive pinion Rail Stabilization mechanism Fig 2...
Page 28: ...28 GB Translation Fig 5 1 Swivel seat handle...
Page 30: ...30 GB Translation Fig 7...
Page 38: ...38 RO Original Fig 1 eavasuperioar eav inferioar Cremalier Montant Suport cu talp...
Page 47: ...47 RO Original Fig 7...


