background image

9.

Pull the cable through the ceiling cap before connecting the cable to the driver.

Summary of Contents for PC LINEAR

Page 1: ... INSTRUCTION MANUAL DESIGN BY PIERRE CHARPIN PC LINEAR ...

Page 2: ......

Page 3: ...e product In some countries electrical installation must be carried out by authorised electricians contractors please check with your local authority for guidance The product must not be modified in any way HAY accepts no responsibility for any products that have been modified or tampered with The external flexible cable or cord of this luminaire cannot be replaced If the cord is damaged the lumin...

Page 4: ... PARTS Lamp with suspension wire cable Ceiling cap Mounting bracket LED driver Suspension mount ...

Page 5: ...1 Unpack all the parts and check that you have received all the parts listed Mark the position of the holes to be drilled 104 cm apart on the ceiling 104 cm ...

Page 6: ...2 Drill the holes using the correct type of drill for the ceiling you are drilling into 3 Insert the wall plugs Ensure you use the correct type of wall plugs for the type of ceiling ...

Page 7: ...4 Fix the suspension mount to the ceiling using the provided screws Disassemble the suspension mount as shown below and insert each screw into the suspension mount screwing them firmly into place ...

Page 8: ...disassembled suspension mount step 1 Guide the wire though the fixed suspension mount and through the exit hole on the side step 2 Screw the disassembled suspension mount together with the part that is fixed to the ceiling step 3 The suspension wire is now safely in place step 4 Repeat on the other side Step 1 Step 3 Step 2 Step 4 ...

Page 9: ...6 Level the lamp by adjusting the wire Pull the wire to shorten it or press the tab of the suspension mount to release it It is recommended that two persons perform this step ...

Page 10: ...7 Once the lamp is in place the excess wire trailing from the exit hole can be cut Note that once the wire has been cut the lamp can no longer be lowered ...

Page 11: ...8 Drill holes using the correct type of drill for the ceiling you are drilling into Fix the bracket with the attached driver to the ceiling using the provided screws ...

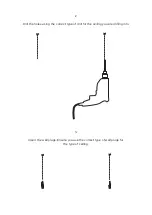
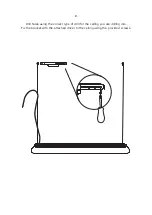
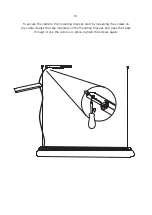
Page 12: ...9 Pull the cable through the ceiling cap before connecting the cable to the driver ...

Page 13: ...ecure the cable to the mounting bracket start by loosening the screws on the cable clamps that are mounted on the mounting bracket and pass the cable through Once the cable is in place tighten the screws again ...

Page 14: ... on the terminal block while pressing down on the small button next to them The live mains wire should be inserted into the slot marked L and the neutral mains wire into the slot marked N If you are unsure of the polarity of the wires then we recommend you contact a certified electrician L L N N LED LED L N ...

Page 15: ...the black cable into the slot on the black terminal block It is important that the wires are correctly connected HAY accepts no responsibility for any damage due to incorrect wiring of the lamp NOTICE Black cable in black terminal block Red cable in red terminal block L L N N LED LED LED ...

Page 16: ...13 Place the ceiling canopy over the LED driver and mounting bracket There are cable exit holes for the mains wires on either side of the ceiling cap ...

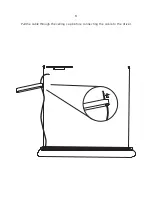
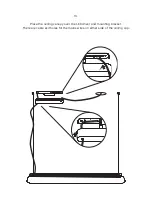
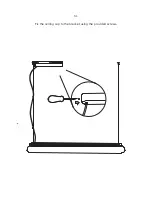
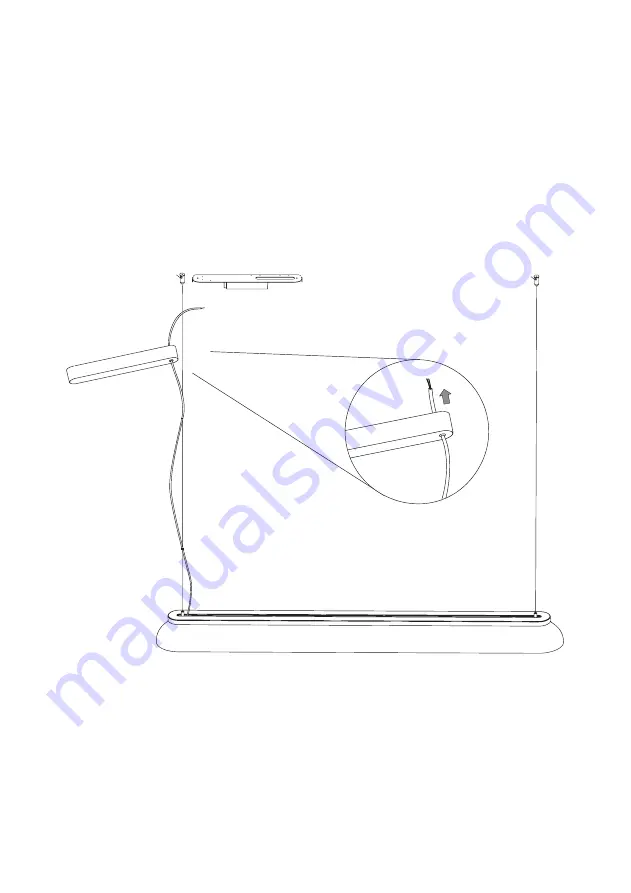
Page 17: ...14 Fix the ceiling cap to the bracket using the provided screws ...

Page 18: ...es advice and instructions on cleaning and caring for specific materials to prolong the life of your lighting Please find our Care Maintenance guide by scanning the QR code You can find more relevant information on PC Linear by scanning the QR code You can also find the same information here hay dk downloads ...

Page 19: ......

Page 20: ...04 01 2022 Havnen 1 8700 Horsens Denmark 45 4282 0282 hay hay com www hay com ...

Reviews: