background image

PRE-ASSEMBLY PREPARATION:

2/10

!

TH

I

S


PA

C

KAGE MAY CONTAIN SMALL ITEMS


WHICH SHOULD BE KEPT AWAY FROM CHILDREN

Please check that all parts and hardware are included before beginning assembly.

Save all packing materials until assembly is complete to avoid accidentally discarding smaller 
parts or hardware.

Read through the preparation and assembly instructions in full before beginning assembly

Please use CAUTION AND CARE WHEN LIFTING the product to avoid personal injury and 

(or) damage to the product.

     to reduce the risk of personal injury and damage to product or surroundings.  

Always install on level ground utilizing ground stakes. This garden 
permanently staked or attached to concrete floor or platform.

    house cannot be 

Keep all children and pets away from assembly area.

Begin assembly no less than 6 feet from any obstruction such as fence, garage, house, 

    overhanging branches, clothes line or electrical wires.

Some parts may contain sharp edges, wear protective gloves if necessary. At least two or 

    more people are recommended for safe assembly.

Please have a ladder and a rubber mallet ready before assembly. 

Note:

It is very important to read and follow these Safety Precautions before assembly and during the use of this 

product. 


Summary of Contents for PACA012-3

Page 1: ...nce with assembly please contact Customer Care Center 1 888 880 4884 ITEM NAME Belham Living Steel Outdoor Pergola Gazebo with Retractable Canopy Shades Green Canopy with Textured Brown Frame SKU PACA...

Page 2: ...risk of personal injury and damage to product or surroundings Always install on level ground utilizing ground stakes This garden permanently staked or attached to concrete floor or platform house cann...

Page 3: ...he flame resistance It is not fire proof The fabric will burn if left in continuous contact with any flame source The application of any foreign substance to the tent fabric may render the flame resis...

Page 4: ...Beam Long Side Beam Short Side Beam Short Side Beam Short Beam Guide Pole Guide Pole Post Base Canopy Stake Hex Wrench T Hex Wrench Bracket Bracket 1pc 1 10pcs 67pcs 2 M6x16 6pcs 3 M6x55 M6x65 4 16pcs...

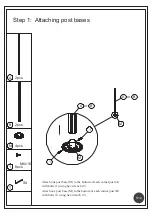
Page 5: ...2pcs 1 A B or M or A B Step 1 Attaching post bases Attach one post base M to the bottom of each corner post A with bolts 1 using hex wrench T Attach one post base M to the bottom of each corner post B...

Page 6: ...g the E F side beams Corner Post A with eight holes facing front Corner Post B with six holes facing front A B 2 1 2 2 2 3 2 1 Insert beam F into beam E secure the bracket O to beam E with bolts 1 2 2...

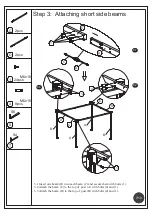
Page 7: ...C 1 C D Step 3 Attaching short side beams T 3 1 3 2 3 3 3 1 Insert one beam D into each beam C and secure them with bolts 1 3 2 Attach the beam C to the top of post A with bolts 4 and 1 3 3 Attach the...

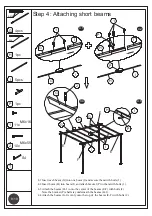
Page 8: ...ert each beam G into one beam I and secure them with bolts 1 4 2 4 3 Insert beam H into beam I and attach bracket P to them with bolts 1 Attach the beams H I onto the center of the beams E F with bolt...

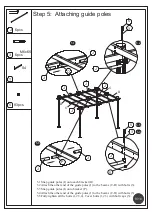
Page 9: ...nap guide poles J onto each bracket O 5 2 Attach the other end of the guide poles J to the beams C D with bolts 3 5 3 Snap guide poles J onto bracket P 5 4 Attach the other end of the guide poles J to...

Page 10: ...at each long side of the frame 6 1 6 2 6 3 6 2 Insert one guide pole K into both ends of one canopy Insert one guide pole L into both ends of the other canopy Snap each guide pole L into each guide po...

Reviews: