background image

1.19

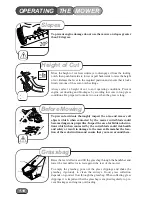
Remove the grassbag and operate the mower with the rear deflector in
the closed position.

Areas of heavy growth should be mown without collecting the clip-
pings.  If collection is required, first mow the area without the grass-
bag at the maximum height of cut setting.  Allow the grass clippings to
dry out and then mow the area at the maximum height of cut setting
with the grassbag fitted.  Reduce the height of cut and mow the area
again as necessary until the required finish is obtained.

To prevent  damage to your lawn do not remove more than one third
of grass height in one cut.

The cutterblade is driven by the engine via a friction disc to help pre-
vent damage occurring to the engine crankshaft and cutting mecha-
nism when a hidden obstruction or overload is encountered.  

Always stop the engine when a hidden obstruction or excessive vibra-
tion is encountered. Disconnect the spark plug lead and examine the
cutting mechanism.  ALWAYS replace a damaged cutterblade - refer to
“Maintenance”.

When moving the mower across non-grassed areas, stop the engine
and set the mower to the maximum height of cut to protect the cutting
mechanism.

Friction Disc

Non-Grassed Areas

STOP

CS146

MOWER

THE

OPERATING

CS222

Without Grass Collection

Heavy Growth

Summary of Contents for 396E

Page 1: ...Ranger 53 Pro CODE 396E OWNER S HANDBOOK English Version CODE SERIAL NO HANDBOOK 111 1071 Rev A 396E 270000001 Issue 12 12 06...

Page 2: ...ine Stop 14 Handlebar 15 Ground Drive Clutch Lever 16 Ground Drive Speed Control 17 Grassbag Assembly 18 Muffler Guard Briggs Stratton Intek Edge 60 121602 0315 E1 2900 rpm Unleaded petrol 1 5 litres...

Page 3: ...months Owner s Name Serial Number Date 2nd Year 24 months We certify that this service has been carried out by an Authorised Hayter Service Dealer Date Owner s Name Serial Number Date Note for dealer...

Page 4: ......

Page 5: ...Main Features Specifications 1 5 Contents 1 6 Introduction 1 7 Warranty 1 8 1 11 Safety Precautions 1 8 Safety Alert Symbol 1 8 Training 1 8 Preparation 1 9 Preparation 1 9 Operation 1 10 Operation 1...

Page 6: ...intended use This mower should be operated serviced and repaired only by persons who are familiar with its particular characteristics and who are acquainted with the relevant safety procedures The saf...

Page 7: ...C units and other such devices are not applicable Only machines fitted with a genuine Hayter friction disc or crankshaft support bearing which are used in accordance with the recommended operating an...

Page 8: ...mind that the user is responsible for accidents or hazards occurring to other people or their property While mowing always wear substantial footwear and long trousers Do not operate the equipment whe...

Page 9: ...d prevent hand or arm injury Mow only in daylight or good artificial light Avoid using the mower on wet grass where feasible Always be sure of your footing on slopes Walk never run Mow across the face...

Page 10: ...he mower Before refuelling Reduce throttle control setting during engine shutdown Keep all nuts bolts and screws tight to ensure that the equipment is in safe operating condition Frequently check fuel...

Page 11: ...removing and reassembling the cut terblade Always replace worn or faulty parts with genuine Hayter parts Maintenance Storage Safety Symbols Safety Alert Be aware to the possibility of injury Danger of...

Page 12: ...entan glement when using the machine CAUTION PREVENT DAMAGE When assembling the handlebar take care to ensure that the controls and cables do not become damaged Always replace damaged controls and cab...

Page 13: ...fix in position WARNING PREVENT ACCIDENTS Always ensure grassbag flap is securely fitted and in good condition Raise the rear deflector lower the grassbag through the handlebar and hook in position L...

Page 14: ...filler dipstick Wipe oil from it with a clean cloth Screw the oil filler dipstick back in place then unscrew and remove it to check the oil level The oil level is correct when it is at the full mark o...

Page 15: ...red to start a cold engine Operation of the primer bulb is usually unnecessary when starting a warm engine Stand behind the mower and hold the handlebar together with the engine stop lever with your l...

Page 16: ...confined areas Ground speed may be adjusted by operating the speed variator control Push forward to slow down and pull back to speed up IMPORTANT To avoid damage this control should only be opert ed w...

Page 17: ...ection To prevent accidents do not raise the front of the mower exces sively when making a turn Never raise the rear of the mower when the engine is running Reduce the throttle setting and then releas...

Page 18: ...ontacted by the mower cutterblade could become dangerous projectiles Inspect the area for hidden obstruc tions which when contacted by the cutterblade could risk health and safety or result in damage...

Page 19: ...n do not remove more than one third of grass height in one cut The cutterblade is driven by the engine via a friction disc to help pre vent damage occurring to the engine crankshaft and cutting mecha...

Page 20: ...bare patches Keep mowing increasing the frequency as required Treat with selec tive weed killers or combined weed feed preparations if you did not feed the lawn in April Summer mowing should now be un...

Page 21: ...the grass to thicken and protect the roots from the winter frost and snow Rake out the thatch from the turf and spike the lawn to assist in drainage Brush in peat and sharp sand Use a stiff broom to d...

Page 22: ...dry grass Check the oil level Remove grass debris from around the engine exhaust exhaust guard air ways in the top cowl and underside of the deck housing Remove grass debris from the grassbag and che...

Page 23: ...9 Cover Loosen casing clamp screw 1 and move the governor lever 2 in the direction of screw 1 as far as possible Move the throttle con trol to the choke position Tighten casing clamp screw Should onl...

Page 24: ...ir cleaner is kept uppermost to prevent engine damage 6 Remove the oil filler dipstick and drain the oil into a suitable container 7 Refill with new oil of the recommended SAE viscosity grade Refer to...

Page 25: ...use Never spray the engine with water during cleaning Water can contaminate the fuel Always clean with a brush or compressed air Grass and debris may clog the engine s air cooling system especially af...

Page 26: ...at all securing nuts and bolts are tight Replace missing or damaged items immediately Check the clutch cable operation every 25 operating hours and adjust if necessary Unscrew locknut 1 and screw adju...

Page 27: ...k plug lead has been removed The cutterblade has sharp edges ALWAYS wear strong gloves to protect your hands when working on the cutterblade DO NOT rotate tools towards the cut ting edges to avoid the...

Page 28: ...lade from the mower and clean using a brush and water Inspect the cutterblade for signs of damage Sharpen both cutting edges with a flat file to restore performance Ensure that the cutterblade is bala...

Page 29: ...ary Drain fuel from the engine by operating the engine until it stops Disconnect the spark plug lead Change the engine oil Remove the engine spark plug and pour 15ml of engine oil into the engine cyli...

Page 30: ...e height of cut Fuel starvation Fill fuel tank Engine cold Set throttle to choke position Incorrect contaminated fuel Drain fuel tank and fill with correct fuel Spark plug lead disconnected Connect sp...

Page 31: ...Cut height too low Increase cut height Grassbag full Empty grassbag Airflow through the Clean the grassbag grassbag is restricted Engine speed too slow Set throttle to fast position Mower is hard to...

Page 32: ...Electromagnetic Compatibility as amended and the regulations transposed into national law Also Directive 2000 14 EC Noise emission in the environment by equipment for use outdoors and the regulations...

Page 33: ...1 17 Spring Rear Deflector 1 see item 121 18 Bearing SA203560 10 19 Decal Height of Cut 320006 1 20 Gear Rear Wheel SA496770 2 21 Cover Wheel SA380570 2 22 Washer Plain SA150770 4 23 Deck SA380390 1 2...

Page 34: ...asher Plain SA181690 2 59 Bolt SA172960 1 60 Bolt SA184540 1 61 Cap Hub SA380740 4 62 Bolt Special SA3021890 2 63 Washer Fixing SA145900 4 64 Handlebar Lower L H SA380290 1 65 Support L H Handlebar SA...

Page 35: ...A380690 1 100 Cover SA480660 1 101 Cover SA480840 1 102 Screw Self Tapping SA185610 6 103 Screw Self Tapping SA185620 4 104 Cover SA480820 1 105 Wheel Front SA3012050 2 106 Spacer Ground Drive Cable S...

Page 36: ...8 Bumper Bar SA3016080 1 139 Ring Locating SA396620 2 140 Screw Self Tapping SA184950 28 141 Screw SA145700 2 142 Screw SA142450 2 143 Nut Full SA142000 1 144 Nut Dome SA106440 1 145 Rim Wheel SA38075...

Page 37: ...0 43 40 40 131 118 137 125 40 40 29 27 30 31 32 84 67 18 18 76 78 78 115 79 79 80 80 133 132 77 134 77 94 81 82 82 139 83 78 78 140 140 38 38 61 61 138 18 18 6 6 34 34 44 44 148 140 145 61 140 145 147...

Page 38: ...1 38 Notes NOTES...

Page 39: ...1 39 NOTES Notes...

Page 40: ...1 40 CUSTOMER INFORMATION Serial No Engine Type 121602 0315 E1 Engine Briggs Stratton Intek Edge 60 Date of Sale Your Local Dealer...

Reviews: