© 2002, Hayton Systems
Page 5
10. Pull down the drop menu by tapping on the
General
category in the top
right corner of the screen.
11. Tap on
Digitizer
and follow the on-screen instructions to align the touch
screen digitizer.
It is extremely important that this is done accurately
.
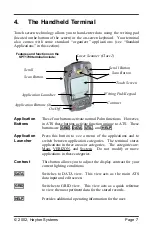
12. Tap the
Application Launcher
icon until the
All
category name
shows on the upper right corner of the screen.
13. Using the vertical scroll bar on the screen if necessary, find the
Restorer
icon . Tap the
Restorer
icon then tap
OK
.
14. Once Restorer has finished running, it will automatically launch
ATS
Register
. NOTE: If ATS Register has been run previously, it will not launch
automatically at this point. You may launch ATS Register at any time by
tapping on its icon from the Application Launcher.
15. Complete the information required in ATS Register. This should all be self
explanatory except for
Logon
and
Password
. Please contact your Verizon
liaison for guidance regarding this information.
16. Check (by tapping) the
ATS West
and/or
ATS East
boxes as desired. This
instructs the terminal to download one or both of the Verizon ATS versions.
17. Tap
Send
. A screen will appear affording you the opportunity to check
your connection settings or to
Update
. If you do not need to enter a pre-dialing
string (such as dialing 9 to get an outside line), proceed to step 20.
18. To set a pre-dialing string, tap
Connection Settings
. Restorer will have
ensured that all the settings on the Network screen are correct. Tap on the
“outlined” phone number. On the
Phone Setup
screen, tap the check box for
Dial Prefix
. That will ensure that a 9 (and subsequent pause) will be dialed
prior to dialing out.


