11
ENGLISH
1. Make sure the fuel valve (H) is in the ON position.
2. Move the choke lever (J) to the CHOKE position (only necessary when the
engine is cold).
3. Set the throttle (D) to position R.
4. Turn the engine switch (F) to the ON position. Slowly pull the starter rope (G)
until you feel resistance. Let the rope pull back a little, then pull the rope firmly
several times to start the engine.
5. Once the engine is running properly, move the choke lever (if used for cold
engine) slowly back to the RUN position.
6. If the machine has been started with a cold engine, let the engine run at half
throttle for 3 to 4 minutes, then move the throttle (1) to the R position.
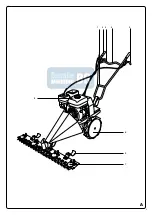
DRIVING FORWARD (FIG. A)
1. Grasp both handles (2).
2. Depress the clutch lever for forward travel (3).
DRIVING BACKWARDS (FIG. A)
1. Grasp both handles (2).
2. Press the lever for reverse (5).
3. Adjust the speed with the throttle.
Never press both clutch levers at the same time.
ADJUSTING THE SPEED (FIG. A)
1. Adjust the speed for driving and mowing with the throttle (1).
Guide the machine, but let the machine do the work.
SWITCH OFF CUTTER BAR
1. Release the clutch lever.
SWITCH OFF THE ENGINE (FIG. A + B)
There are two switches to turn the machine off: the throttle on the handle and the
engine switch on the engine.
• Set the throttle (1) to L.
• Set the engine switch (F) on the engine to OFF.
DRIVING WITH THE ENGINE SWITCHED OFF
1. Pull the locking pin out of the wheel axle.
2. Push the wheel further onto the axle.
3. Insert a locking pin through a wheel axle.
4. Press the lock onto the locking pin.
ADJUST CLUTCH CABLE
If the drive belt slips while the machine is moving forward or in reverse, the
adjusting nut on the cable
turn upwards.
If the mower cannot stop after that, release the clutch lever and turn the adjusting
nut downwards
CLEAN CUTTER BAR
The cutter bar should be cleaned after use.
1. Dismount the blade by loosening all bolts.
2. Lubricate all moving parts with a biodegradable lubricant.
3. Install the blade in reverse order.
Wear protective gloves when removing and replacing the blade.
TRANSPORT AND STORAGE
Shut off the engine and close the fuel tap before moving the machine.
If the machine is taken out of use for a longer period of ti
me, you must empty the fuel tank and change the oil. This prevents problems with
the restart.
• Empty the fuel tank.
• Change the oil.
• Cover the machine and place it in a clean and dry environment.
CLEANING AND MAINTENANCE
Regular cleaning and maintenance are essential for the machine to function
properly and for a long service life.
Do not perform any cleaning or maintenance work while the engine is
running.
Do not smoke during the following activities. Do not perform work in the
vicinity of sparks, flames or open flames.
Never clean the machine with water or a high-pressure cleaner. Water in
the machine can cause a short circuit or corrosion.
• Make sure that all nuts, bolts and screws are tightened. Nuts and bolts that are
worn or badly tightened can damage the motor or frame.
• Never store the machine with gasoline in the tank in a building where fumes
can reach an open flame or spark. Allow the engine to cool before moving the
machine.
• Keep the machine free from grass, dirt and excessive grease to reduce the risk
of fire.
• Replace worn or damaged parts for safety.
• If the fuel tank has to be drained, this should be done outdoors.
• Check the machine and make sure that all dirt deposits have been removed.
• Lubricate the wheel axle and bearings regularly.
CHECK THE OIL LEVEL
You must always check the oil level before starting.
• Remove the dipstick from the filling point.
• Clean the dipstick.
• Insert the dipstick into the filling hole for a few seconds before pulling it out
again.
• Check the oil level. The oil level must be at a value between high and low.
• If the level is below the level, top up the oil. Use a funnel to prevent spillage.
• Mount the dipstick.
CHANGE OIL
You must change the oil after the first 20 operating hours, and then after every 100
hours or 6 months.
• Place a container under the drain point.
• Remove the dipstick from the filling point.
• Remove the drain plug.
• Drain the oil into the drain pan.
• Replace the drain plug and tighten securely.
When you drain the oil, the fuel tank must be empty. Run the engine until
it stops due to lack of fuel.
CLEANING THE AIR FILTER
You must clean the air filter every 50 operating hours.
• Remove the air filter cover (A).
• Remove the air filter from the filter holder.
• Clean the filter with warm water and a mild detergent. Allow the filter to dry
• Place the filter in the filter holder and replace the cover.
CHECK THE SPARK PLUG
• Remove the spark plug cable from the spark plug (C).
• Remove the spark plug using the spark plug wrench.
• Clean the electrode with a wire brush.
• Check the contact distance (correct value 0.6 - 0.8 mm) and adjust if necessary.
• Refit the spark plug.
Summary of Contents for 57091HBM
Page 2: ...2 5 ENGLISH 9 FRAN AIS 13 DEUTSCH 17 ESPA OL 21 ITALIANO 25 31...
Page 3: ...3 A 2 3 4 5 6 9 7 1 8...
Page 4: ...4 B A D K L M N B E G H F C J...
Page 5: ...5 NEDERLANDS a 5 5...
Page 29: ...29 ITALIANO 30 10 15 1 2 3 4 4 1 4 2 4 3 4 4 4 5 4 6 5 5 1 5 2 5 3 5 4 5 5 6...
Page 30: ...30...
Page 32: ...HBM Machines B V Grote Esch 1010 2841 MJ Moordrecht The Netherlands www hbm machines com...


