


17
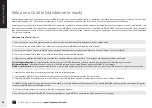
Power up
1
Ensure that all devices are turned off.
2
Connect the audio outputs from the Master system to the inputs on the Slave
device(s).
3
Refer to the user manual for the video enabled MHUB and follow the setup
guidelines listed in there - do not proceed to uControl setup, instead, return to
the instructions listed here.
4
Connect MHUB AUDIO outputs or sub/slave ports to speakers or amplifiers.
5
Connect an Ethernet cable between your router and the IP control port on
your MHUB AUDIO.
6
Connect the power cable to MHUB AUDIO - the MHUB will turn on.
7
MHUB AUDIO will begin to boot up, this can take 60 seconds. uControl will
not find MHUB AUDIO until this period has passed.
8
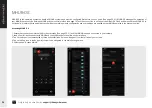
Load uControl
9
Complete setup on uControl (see “Setup on uControl”).
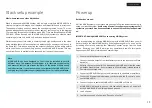
Both devices are new
If all the MHUB systems in your stack are new then follow the instructions below to
setup your stacked system.
Avoid using uControl to configure your system until all
systems in your stack have been connected to one another and they’re all powered
on.
IMPORTANT: Adding MHUB AUDIO to an existing MHUB system
If you are upgrading an existing MHUB system with MHUB AUDIO then you will
have to restore the older MHUB back to its default settings first. You can do this
by loading uControl and selecting the “Manually Connect” option from the home
screen. Restoring your MHUB will wipe any operational data, uControl packs,
Sequences, HDA Cloud information and user settings.
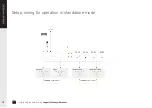
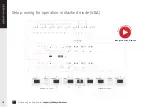
Stack setup example
Whole-home audio and video distribution
Stack a video enabled MHUB system with a single or multiple MHUB AUDIO’s to
create pixel-perfect 4K images on all displays and impactful sound in every room.
The speakers in each zone can access the sound being routed to your TV or can
be used independently to play any music or audio of your choosing. In the diagram
(“Setup: wiring for operation in stacked mode (V&A)”) we are illustrating how MHUB
PRO (4x4) 40 can be used with x2 MHUB AUDIO (6x4) systems to create a stack
comprising of video only, audio only and video and audio zones.
Whilst the purpose of this setup is primarily to add high-quality sound to the video
being watched there is also the option to distribute the Sonos player to all zones in
the home (#1). This is done by routing the output of the Sonos in to an audio splitter
which then feeds in to the auxillary ports on each MHUB AUDIO device. This way
sound from Sonos is available to be accessed in all zones of the property.
Note:
MHUB AUDIO has been designed so that it can be installed in several
different ways. The purpose of the diagram is to illustrate a typical setup
and assumes that you are already familiar with the basics of audio wiring
and infrastructure. If you are unsure how you might install MHUB AUDIO in to
your property then contact support@hdanywhere.com for further assistance.
Summary of Contents for MHUB
Page 1: ...Revision 1 10 07 19 MHUB AUDIO 6x4 Product Guide CODE MHUBAUDIO64 ...
Page 2: ...2 Box Fe ...
Page 3: ...eatures Specs 1 ...
Page 6: ...6 Interface Con ...
Page 7: ...ntrol Stacking 2 ...
Page 12: ...12 Wiring Power ...
Page 13: ...Up First Boot 3 ...
Page 18: ...18 Setup w ...
Page 19: ...with uControl 4 ...
Page 22: ...22 ...
Page 23: ...MHUB OS 6 ...
Page 26: ...26 T ...
Page 27: ...The Legal Bit 7 ...