MHUB 4K (8x8) Manual
4
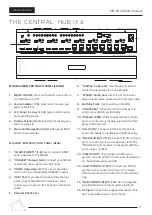
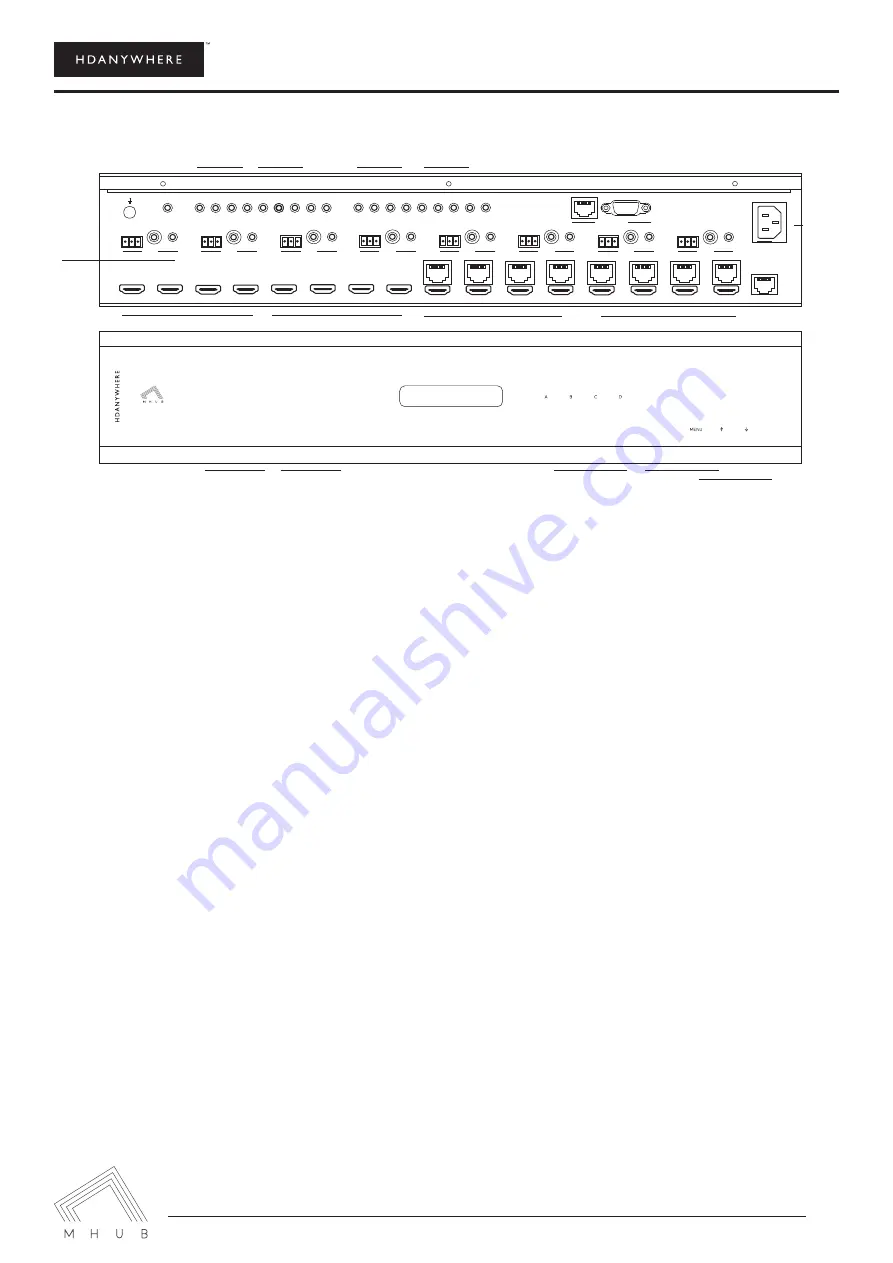
THE CENTRAL HUB (X1)
MHUB 4K (8X8) PRO CHASSIS (REAR)
1
3
4
14
15
16
13
8
5 6 7
11
12
9
10
2
MHUB 4K (8X8) PRO TOUCH PANEL (FRONT)
1
2
3
4
5
6
1
2
3
4
5
6
7
8
7
8
A
A
B
C
d
E
F
G
H
Display IR (IN)
HUB IR (IN)
source ir (OUT)
AMP ir (OUT)
HUB CONTROL
RS232
IP
100-240V AC 50/60HZ
SOURCE INPUT
RS232
DigitaL
Stereo
B
RS232
DigitaL
Stereo
C
RS232
DigitaL
Stereo
D
RS232
DigitaL
Stereo
E
RS232
DigitaL
Stereo
F
RS232
DigitaL
Stereo
G
RS232
DigitaL
Stereo
H
RS232
DigitaL
Stereo
LAN
ALL ir (IN)
A
B
C
D
E
F
G
H
4
5
1
2 / 3
OK
E
1
2
3
4
5
6
7
8
F
G
H
MHUB 4K (8X8) PRO TOUCH PANEL (FRONT)
1. MHUB ON/OFF:
Press and hold for 2 seconds to
turn MHUB on or off
2. Source Selector (1-8):
Select which source you
want to switch to
3. LCD Panel
: Displays MHUB system information
and switching status
4. Display Selector (A-H)
: Select which display you
want to ouput to
5. Menu and Navigation Control
: Brings up EDID
and IP menu settings
MHUB 4K (8X8) PRO TOUCH PANEL (REAR)
1. “SOURCE INPUTS” [1-8]:
Use to connect HDMI
source devices to the MHUB
2. “HDBASET” Outputs [A-H]:
Connect your MHUB
receivers to these ports via a CAT cable
3. “HDMI” Outputs [A-H]
: These ports provide a
mirror of the corresponding HDBASET output
4. “LAN” Port:
If you wish to enable the ethernet
ports on your MHUB 4K Pro receivers, then
connect your router to this port via an ethernet
cable
5. Receiver RS232 port
6. “DIGITAL” audio port:
Use this port to extract
multi-channel audio via a coaxial cable
7. “STEREO” audio port:
Use this port to extract
down-mixed stereo audio via a 3.5mm jack cable
8. Earthing Point:
Use to earth your MHUB
9. “HUB IR (IN)”
: Connect an IR RX to this port to
control your MHUB via IR locally
10. “DISPLAY IR (IN)” [1-8]:
Connect IR RXs to these
ports to control your displays via IR with a third
party control system
11. “ALL IR (IN)”:
Connect an IR RX to this port to
send commands to all displays simultaneously
12. “SOURCE IR (OUT)” [1-8]:
Connect IR TXs to these
ports to control your source devices via IR. The
“SOURCE IR” port number corresponds with the
source input number
13. “AMP IR (OUT)”:
If you have an AVR in your
system, connect an IR TX to this port and place it
on the IR window of your AVR
14. “HUB CONTROL IP” Port:
Connect the MHUB
system to your router via this port to enable
DASH features and IP control from the uControl
App
15. “HUB CONTROL RS232” Port:
Use to integrate
your MHUB with a control system via RS232
16. DC input:
Connect the supplied IEC lead to this
port to provide power to your matrix


