- 3 –
6.
Setup (menu)
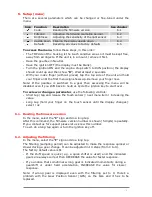
There are several parameters which can be changed or fine-tuned under the
menu.
Sign Function
Description
See chapter
Code
Reading the firmware version
6.1
Filtering
Adjusting the filtering (sampling period)
6.2
Brightness
Adjusting the sensitivity of the light sensor
6.3
Upside down Flipping the display upside down
6.4
Defaults
Resetting all values to factory defaults
6.5
To access the menu
, follow these steps, in this order:
-
The TOP side of the housing is the touch sensitive area so it must be kept free,
away from all objects. If the unit is in a mount, remove it first.
-
Have the gearbox in Neutral.
-
Have the ignition OFF (the display must be blank).
-
Turn the ignition ON and the engine stop switch to RUN position (the display
should count up and then show “
0
”). Wait at least 2 seconds.
-
With your index finger (without gloves) tap the top side of the unit and hold
your finger until the first menu sign shows up. Remove your finger now.
Note:
If the gearbox is switched to a gear then accessing the menu will be
disabled even if you shift back to neutral. Cycle the ignition key to start over.
To review or change a parameter
, use the following controls:
-
Short tap
(tap and release the touch sensor): next menu item / increasing the
value
-
Long tap
(hold your finger on the touch sensor until the display changes):
select / ok
6.1.
Reading the firmware version
In the menu, select the “
C
” sign and do a
long tap
.
After this command, the firmware version number is shown (5 digits) repeatedly.
If you contact us for support please let us know this number.
To exit, do a
long tap
again or turn the ignition key off.
6.2.
Adjusting the filtering
In the menu, select the “
F
” sign and do a
long tap
.
The filtering (sampling period) can be adjusted to make the response quicker or
slower during a gear change. It can be adjusted in 10 steps (from 0 to 9).
The factory default value is
3
.
-
If the shift speed is quick (e.g. a quick shifter is used) and the indicated
gears are always correct then DECREASE the value for faster response.
-
If you notice that sometimes wrong gear is indicated momentarily during a
gearshift or under hard acceleration, INCREASE the value for slower
response.
Note:
if wrong gear is displayed even with the filtering set to 9, there’s a
problem with the Gear Position Sensor (GPS) on the bike and it has to be
replaced.


