background image

1

2

3

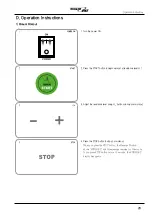
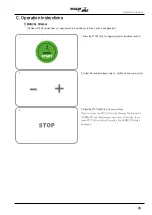
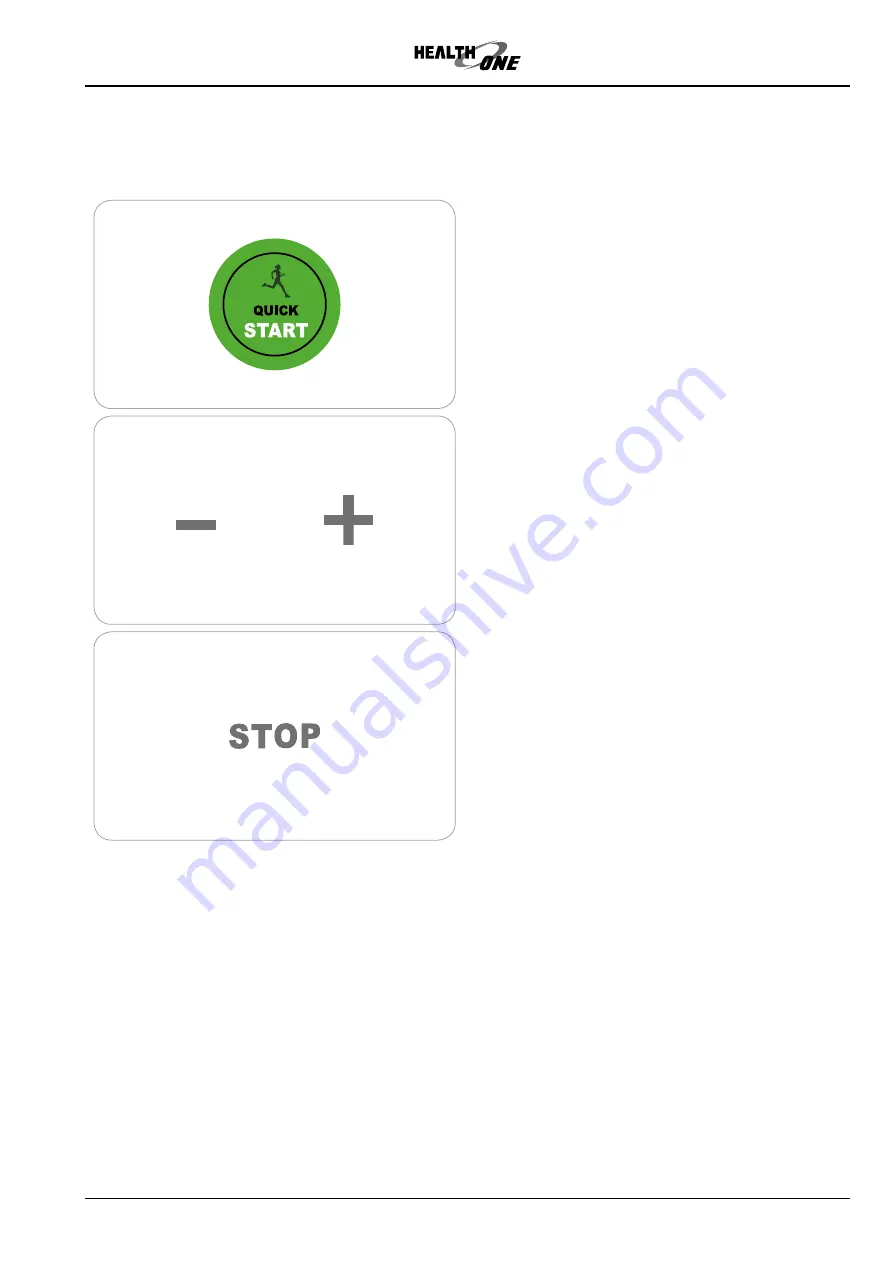
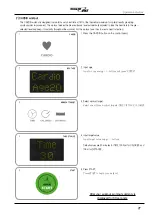
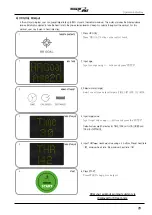
1.  Press the START button to begin workout at resistance level of 1.

2.   Adjust the resistance level using +/_ buttons during your workout.

3.Press the STOP button to stop your workout. 

When you press the STOP button, the Message Window shows 
“SUMMARY” and this message remains for 30 seconds. If you 
press STOP button before 30 seconds, the SUMMARY display 
disappears.

26

C. Operation Instructions

1)  MANUAL Workout  

The bike with FND display does not need power from outside since it has a built-in self-generator.

Operation Instructions

Summary of Contents for HRB-700S

Page 1: ...o ehealth one com www ehealth one com Before using this equipment please read all Safety Instruction carefully to ensure safe and correct operation FOR BETTER LIFE User s Manual Upright Bike HUB 700T...

Page 2: ...front shroud B how to assemble the display console 12 Display Console for bike with built in TV monitor A Features and Functions 15 B Control Board 16 C TV channel setting 17 D Operation Instructions...

Page 3: ...get programs POLAR contact type Option Telemetry Bluetooth Wireless Headphone Smart Link 72 9kg HUB 700S FND Self Generator Specifications Model Display Power Dimension Weight Max Load Resistance Leve...

Page 4: ...immediately Do not leave the power cord near the fire or excessive heat for bike with TV monitor Do not attempt to repair or modify the bike unless a qualified engineer Do not use a multi socket simul...

Page 5: ...LEVEL Do not abruptly change the resistance level Especially abrupt start may cause some damage to user body or product Be careful not to pinch your foot or cloth between moving parts such as pedal s...

Page 6: ...plug and socket and make sure the electrical outlet is grounded only for bike with TV monitor When moving please do it by two persons to avoid any waist injury Injected plastic parts or pedal parts co...

Page 7: ...HUB 700T 700S Display Console Assembly Main Body Assembly Front Shroud 7 6 Components of Upright Bike...

Page 8: ...F Mobile Phone Rack G Console Post H Water Bottle Holder I Front Shroud J Rear Shroud K Crank L Pedal M Saddle Seat N Seat Adjusting Lever O Front Foot P Rear Foot Q Leveling Adjuster R Foot Wheel S...

Page 9: ...monitor Please install the bike on even floor and avoid any uneven surface When installing the bike with TV monitor should be plugged into electrical socket which is grounded Please remove dust or for...

Page 10: ...onto the body tube 3 Fix the front shrouds using 5 pcs of Pan Head Screw 4 Slide the water bottle onto the fix bracket located on the console post Required tools A Phillips Screwdriver B Phillips Scr...

Page 11: ...HRB 700T 700S Display Console Assembly Post Shroud Main Body Assembly Seat Assembly 9 Components of Recumbent Bike 11...

Page 12: ...t Rate Grip F Mobile Phone Rack G Console Post H Water Bottle Holder I Front Shroud J Rear Shroud K Crank L Pedal M Back Seat N Saddle Seat O Side Handgrip P Seat Position Adjusting Lever Q Front Foot...

Page 13: ...iver B 6 pcs of M5 x 10 Pan Head Screw Required tools B 6 pcs of M5 x 10 Pan Head Screw A Phillips Screwdriver After unpacking all of the components assemble and install the bike as per the following...

Page 14: ...underneath then join console post and body post 2 Fix the post and the tube using hex socket flat head cap bolts securely 2 1 C B B A B D C Carefully pull the following cables out of body post A Comm...

Page 15: ...ools A Phillips Screwdriver B how to assemble the display console Required tools A Phillips Screwdriver B 6 pcs of M5 x 10 Pan Head Screw Caution When assembling the front shrouds be careful not to da...

Page 16: ...t seat assembly from the back of aluminum slide Connect cable of heart rate sensor to connector from body Assemble rear shroud and seat stopper in reverse order Required tools 1 Required tools 2 B M5...

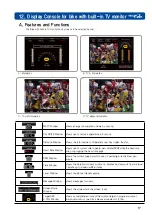
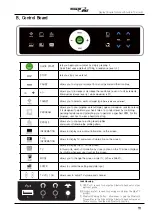
Page 17: ...the heart rate strap or grapping the heart rate grips RPM RPM Window shows the current speed at which user is pedaling in revolutions per minute min TIME Time Window shows the duration of user s worko...

Page 18: ...of 6 preset profiles and workout following the profile pattern Information allows to display only workout information on the screen TV Information allows to display TV and workout information on the...

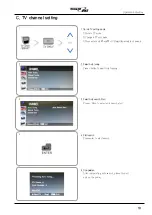
Page 19: ...for 4 second 3 Select Auto search Start Press btton to select auto search start 4 Start search Press enter to start search 5 Compeletion After compeleting auto search please turn off and on the power...

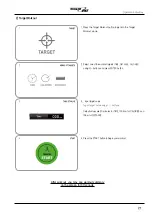
Page 20: ...and this message remains for 30 seconds If you press STOP button before 30 seconds the SUMMARY display disappears 2 Press the START button to begin workout at resistance level of 1 3 Adjust the resis...

Page 21: ...ENTER button After workout you may see workout summary on the screen for 30 sconds 3 Input target value Input target value using buttons Default values are 30 minutes for TIME 100Kcal for CALORIES and...

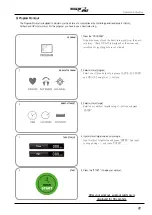
Page 22: ...workout targets using buttons and press ENTER workout target 3 4 Input workout target value and your age Input workout target value and press ENTER And input your age using and press ENTER target valu...

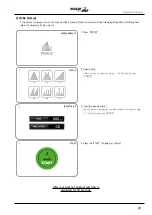
Page 23: ...ect profile you desire using buttons and press ENTER PROFILE WORKOUT PROFILE TARGET VALUE START 23 1 2 3 4 4 Profile Workout Operation Instructions In this workout program user can choose one of the 6...
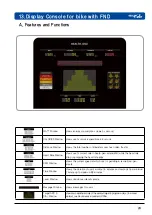
Page 24: ...rate grips RPM Window shows the current speed at which user is pedaling in revolutions per minute Time Window shows the duration of user s workout in minutes and seconds from minimum 1 minute up to m...

Page 25: ...ardiovascular function FAT BURN is one of three workout programs CARDIO FAT BURN and HR GOAL to maximize the aerobic benefits of your workout by using the body s fat stores for fuel HR GOAL is one of...

Page 26: ...o stop your workout When you press the STOP button the Message Window shows SUMMARY and this message remains for 30 seconds If you press STOP button before 30 seconds the SUMMARY display disappears 26...

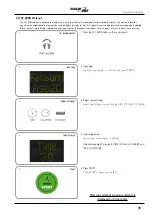
Page 27: ...ttons and press ENTER 5 Press START Press START to begin your workout 27 1 2 3 4 5 Operation Instructions 2 CARDIO workout The CARDIO workout is designed to maintain user s heart rate at 75 of the the...
Page 28: ...4 workout target 3 Input age 2 FAT BURN Workout 1 Operation Instructions 3 FAT BURN Workout The FAT BURN workout is designed to maintain user s heart rate at 65 of the theoretical maximum for optimal...
Page 29: ...ER 1 Press HR GOAL Press HR GOAL button on the control board 6 Press START Press START to begin your workout 29 TARGET HEART RATE 1 Input age 2 Workout Target 3 Target Value 4 Target Value 5 START 6 O...

Page 30: ...you desire using buttons and press ENTER 1 Press PROFILE 6 Press the START Press the START to begin your workout 30 PROFILE Workout 1 PROFILE 2 Target Value Target Value 3 START 5 Operation Instructi...

Page 31: ...lue Input target value using buttons Default values are 30 minutes for TIME 100Kcal for CALORIES and 10Km for DISTANCE 3 Press the START button to begin your workout TARGET Workout TARGET Value START...

Page 32: ...breakage caused by putting or dropping heavy object onto the product 3 Damage or distortion of exterior by organic solvent such as thinner and benzene 4 Malfunction caused by using other parts not su...

Page 33: ...DMC Hi Tech Industry Center 330 Seongamro Mapogu Seoul Republic of Korea 121 912 Tel 02 6203 8777 Fax 02 6203 8778 www ehealth one com E mail ceo ehealth one com 2013 HEALTH ONE CO LTD www ehealth one...

Reviews: