5
12
ASSEMBLY
Place all parts of the HEALTH CYCLE by HealthRider
¨
in a cleared area and remove the packing materials.
Do
not dispose of the packing materials until assembly is completed.
Assembly requires the included tools and your own adjustable spanner .
36
36
1
2
1
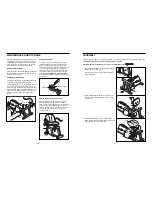
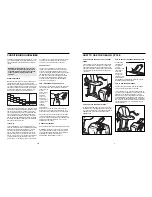
1. Refer to the inset drawing. Loosen the Lock Knob (36)
on the right side of the Frame (1).
Slide the Seat Frame (2) out until it stops. Retighten
the Lock Knob (36).
2. Attach the Seat Bracket (58) to the Seat Frame (2)
with the two Seat Bracket Bolts (59) and 3/8Ó Nylon
Locknuts (37).
3. Set the two Seat Spacers (46) on the Seat Frame (2).
Attach the Seat (53) and the Seat Spacers to the Seat
Frame with the four Seat Screws (55).
2
58
2
59
37
3
53
46
Inspect and tighten all parts of the HEALTH CYCLE
by HealthRider
¨
regularly. The HEALTH CYCLE can
be cleaned with a soft, damp cloth. To prevent dam-
age to the console, keep liquids away from the con-
sole and keep the console out of direct sunlight.
BATTERY REPLACEMENT
If the console does not function properly, the batteries
should be replaced. To replace the batteries, refer to
assembly step 6 on page 6.
HANDLEBAR LUBRICATION
If a squeak is heard when the handlebars are moved,
a small amount of grease should be applied.
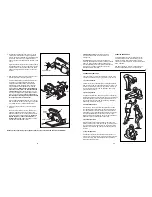
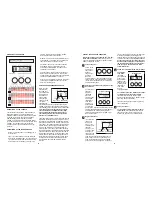
Turn the Resistance Knob (7) counterclockwise until
you can remove it. Remove the Star Washer (11).
Using pliers, grip the head of the Long Carriage Bolt
(13) and remove it. Apply a thin film of grease to both
sides of the Handlebar Housings (10). Reattach all
parts, making sure that they are in the positions
shown.
CRANK ADJUSTMENT
If the arms of the Crank (14) become loose, they
should be tightened in order to prevent excessive
wear. Loosen the crank nut on the left arm of the
Crank. Place the end of a standard screwdriver in one
of the slots in the slotted crank nut. Lightly tap the
screwdriver with a hammer to turn the slotted crank
nut counterclockwise until the arms are no longer
loose.
Do not overtighten the slotted crank nut.
When the slotted crank nut is properly tightened, tight-
en the crank nut.
HOW TO STORE THE HEALTH CYCLE
When the HEALTH CYCLE is not in use, it can be
folded for compact storage. Refer to the drawing
below. Loosen the Lock Knob (36) on the right side of
the frame. Slide the Handlebar Frame (2) into the
Frame (1) as far as it will go. Tighten the Lock Knob.
Store the HEALTH CYCLE indoors, away from
moisture and dust.
MAINTENANCE AND STORAGE
36
2
1
13
7
11
Crank Nut
Slotted Crank Nut
14
Lubricate
Lubricate
10
10
2
55


