background image

18

HOW TO USE A HEART RATE PROGRAM

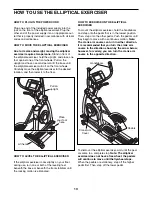
1. Begin pedaling or press any button on the con-

sole to turn on the console.

A moment after you turn on the console, the
screen will light.

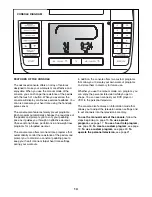
2. Select a heart rate program.

To select one of the two heart rate programs,
press the Heart Rate Control button once or twice
until the desired program appears on the screen.

If you select the first heart rate program,

a

track and the target heart rate setting (bpm) for the
program will appear on the screen.

If you select the second heart rate program, 

the

maximum target heart rate setting (bpm) and a
diagram of the target heart rate settings for the
program will appear on the screen. The arrow
below the diagram will indicate your progress.

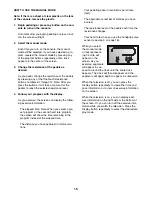
3. Enter a target heart rate setting.

If you select the first heart rate program,

the

target heart rate setting (bpm) for the program will
appear on the screen. Press the increase and
decrease buttons above the Heart Rate Control
button to change the target heart rate setting, if
desired. Note: The same target heart rate setting
will be programmed for the entire program. 

See

EXERCISE INTENSITY on page 23 for heart rate
guidelines.

If you select the second heart rate program, 

the

maximum target heart rate setting of the program
will appear on the screen. Press the increase and
decrease buttons above the Heart Rate Control
button to change the maximum target heart rate

setting, if desired. Note: If you change the maxi-
mum target heart rate setting, the intensity level of
the entire program will change. 

See EXERCISE

INTENSITY on page 23 for heart rate guide-
lines.

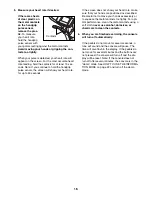
4. Hold the handgrip pulse sensor.

It is not necessary to hold the handgrip pulse sen-
sor continuously during a heart rate program; how-
ever, you should hold the handgrip pulse sensor
frequently for the program to operate properly.

Each time you hold the handgrip pulse sensor,
keep your hands on the metal contacts for at
least 30 seconds. 

5. Press the Start button or begin pedaling to

start the program.

First heart rate control program

—The same tar-

get heart rate setting is programmed for all seg-
ments of this program. 

Second heart rate program

—This program is

divided into 30 one-minute segments. One target
heart rate setting is programmed for each seg-
ment. Note: The same target heart rate setting
may be programmed for consecutive segments. 

The target heart rate setting for the first segment
will be indicated by the height of the program dia-
gram. When the first segment ends, the arrow
below the diagram will move one position to the
right. 

The program will continue in this way until the
arrow reaches the right end of the program dia-
gram. To stop the program at any time, stop pedal-
ing. A tone will sound and the time will flash in the
display to indicate that the program is paused. To
restart the program, simply resume pedaling. 

Summary of Contents for 8.5 Ex Crosstrainer El Elliptical

Page 1: ...plete customer satisfaction If you have questions or if parts are damaged or missing PLEASE DO NOT CONTACT THE STORE please contact Customer Care IMPORTANT You must note the product model number and serial number see the drawing above before contacting us CALL TOLL FREE 1 888 922 4222 Mon Fri 6 a m 6 p m MST Sat 8 a m 4 p m MST ON THE WEB www healthriderservice com CAUTION Read all precautions and...

Page 2: ...RDERING REPLACEMENT PARTS Back Cover LIMITED WARRANTY Back Cover 2 HEALTHRIDER is a registered trademark of ICON IP Inc WARNING DECAL PLACEMENT The warning decal shown here has been applied in the location shown If the decal is missing or illegible call the telephone number on the front cover of this manual and request a free replacement decal Apply the decal in the location shown Note The decal m...

Page 3: ...ncluding the user s move ment may affect the accuracy of heart rate readings The pulse sensor is intended only as an exercise aid in determining heart rate trends in general 12 When you stop exercising allow the pedals to slowly come to a stop 13 If you feel pain or dizziness while exercising stop immediately and cool down 14 Use your elliptical exerciser only as described in this manual 15 To red...

Page 4: ...o help us assist you note the product model number and serial number before con tacting us The model number is HREL8806 1 The serial number can be found on a decal attached to the elliptical exerciser see the front cover of this manual for the location of the decal To avoid a registration fee for any service needed under warranty you must register the exerciser at www healthriderservice com regist...

Page 5: ...number of the part from the PART LIST near the end of this manual The number following the parentheses is the quantity needed for assembly Note Some small parts may have been preassembled If a part is not in the hardware kit check to see if it has been preassembled M4 x 16mm Self tapping Screw 79 16 M8 x 42mm Bolt 71 4 M10 x 20mm x 1mm Washer 81 2 M4 x 16mm Screw 86 8 M6 x 35mm Phillips Screw 87 8...

Page 6: ... two M10 x 78mm Patch Screws 90 97 26 26 1 2 89 89 25 25 90 35 35 2 3 Position the Base 1 near the Frame 2 as shown See the inset drawing Attach two Leveling Feet 26 to the underside of the Base Have a second person tip the Frame 2 for ward Insert the Base 1 into the Frame Attach the Base with four M8 x 75mm Patch Screws 107 four M8 Split Washers 72 and four M8 x 15mm x 4 5mm Washers 99 2 1 3 1 99...

Page 7: ... band to hold the wires in place until step 13 Insert the Upright 6 into the Frame 2 Attach the Upright with three M8 x 16mm Patch Screws 95 and three Star Washers 100 Avoid pinching the Wires 48 110 and the Coaxial Cable 109 between the Upright and the Frame 4 Hook the front ends of the Frame Covers 105 106 together Attach each Frame Cover to the Frame 2 with three M4 x 16mm Self tapping Screws 7...

Page 8: ... same way Hexagonal Holes 6 Orient the Left Roller Leg 12 which is marked with a Left sticker near the left Crank Arm 36 as shown Apply a small amount of the included grease to both sides of a Wave Washer 98 Slide the Wave Washer onto the end of the left Crank Arm 36 Next slide the Left Roller Leg 12 onto the Crank Arm and set the Roller 22 on the Base 1 Attach the Left Roller Leg with an M10 x 20...

Page 9: ...ease to the Pivot Axle 65 and insert the Pivot Axle into the Frame 2 Attach each Frame Cover 17 to the Frame 2 with two M4 x 16mm Screws 86 9 Grease 65 17 86 10 Apply a small amount of grease to both sides of a Wave Washer 98 Slide the Wave Washer onto the left end of the Pivot Axle 65 Next slide the Left Handlebar 8 onto the Pivot Axle as shown Attach the Left Handlebar with an M10 x 23mm Shoulde...

Page 10: ...Pedal Leg Axle into the Left Roller Leg 12 Apply a small amount of grease to both sides of two Wave Washers 98 Slide a Wave Washer onto each Pedal Leg Axle 32 13 Orient the Left Pedal Leg 14 as shown and slide it onto the Pedal Leg Axles 32 Attach the Left Pedal Leg to the Left Handlebar Leg 11 with two M10 x 20mm Patch Screws 91 two Axle Caps 31 and two M10 x 25mm Washers 94 Attach the Left Pedal...

Page 11: ... left over after assembly is completed To protect the floor or carpet from damage place a mat under the elliptical exerciser Plug the power cord into the power socket at the rear of the elliptical exerciser see HOW TO PLUG IN THE POWER CORD on page 13 IMPORTANT If the elliptical exerciser has been exposed to cold tempera tures allow it to warm to room temperature before plugging in the power cord ...

Page 12: ...terminal on the elliptical exerciser frame HOW TO CONNECT A DVD PLAYER OR VCR USING THE AUDIO VIDEO INPUT JACK Plug one end of an RCA component video cable into your DVD player or VCR and plug the other end into the audio video input jack on the back of the console 75 Ohm Terminal 75 Ohm CATV Cable Before operating the television you must connect a 75 ohm CATV cable to the 75 ohm terminal on the e...

Page 13: ... rocks slightly on your floor during use turn one or both of the leveling feet beneath the base or beneath the front stabilizer until the rocking motion is eliminated HOW TO EXERCISE ON THE ELLIPTICAL EXERCISER To mount the elliptical exerciser hold the handlebars and step onto the pedal that is in the lowest position Then step onto the other pedal Push the pedals until they begin to move with a c...

Page 14: ...atically control the resistance of the pedals and prompt you to maintain a constant pedaling pace to keep your heart rate near target heart rate settings during your workouts In addition the console offers two custom programs that allow you to create your own workout programs and store them in memory for future use Whether you use the manual mode or a program you can enjoy the personal television ...

Page 15: ... you select a pre set program or the second heart rate program the screen will show the time remaining in the program instead of the elapsed time The distance you have pedaled in total revolu tions Your pedaling pace in revolutions per minute rpm The approximate number of calories you have burned The resistance level of the pedals each time the resistance changes Your heart rate when you use the h...

Page 16: ...ow your heart rate make sure that your hands are positioned as described Be careful not to move your hands excessively or to squeeze the metal contacts too tightly For opti mal performance clean the metal contacts using a soft cloth never use alcohol abrasives or chemicals to clean the contacts 6 When you are finished exercising the console will turn off automatically If the pedals do not move for...

Page 17: ...the screen to alert you When the first segment ends the arrow below the dia gram will move one position to the right The pedals will then automatically adjust to the resistance level for the second segment As you exercise you will be prompted to keep your pedaling pace near the target pace setting for the current segment When the color of the RPM display on the screen is white or blue increase you...

Page 18: ... above the Heart Rate Control button to change the maximum target heart rate setting if desired Note If you change the maxi mum target heart rate setting the intensity level of the entire program will change See EXERCISE INTENSITY on page 23 for heart rate guide lines 4 Hold the handgrip pulse sensor It is not necessary to hold the handgrip pulse sen sor continuously during a heart rate program ho...

Page 19: ...step 6 on page 16 HOW TO CREATE A CUSTOM PROGRAM 1 Begin pedaling or press any button on the con sole to turn on the console A moment after you turn on the console the screen will light 2 Select a custom program To select a custom program press the Create Your Own button once or twice until the desired custom program appears on the screen 3 Press the Start button or begin pedaling to start the pro...

Page 20: ...or of the RPM display on the screen is white or blue increase your pace When the RPM display is yellow or pink decrease your pace When the RPM display is green maintain your current pace To stop the program at any time stop pedaling A tone will sound to indicate that the program is paused To restart the program simply resume pedaling 4 Change the program if desired If desired you can change the pr...

Page 21: ... Press the Volume buttons to adjust the vol ume When you press either Volume button the volume level indicator will appear on the screen for a few seconds To use earphones or headphones not included plug them into the headphone jack on the console 5 When you are finished using the television press the TV button To turn off the television press the TV button repeatedly until the word CONSOLE appear...

Page 22: ...appears on the screen Then press the Volume increase button to add the channel or the Volume decrease button to delete the channel Continue this process until you have added all desired chan nels and deleted all unwanted channels 3 Press the TV button again and select a cable connection After you press the TV button press the Volume increase button to select the Standard Cable set ting the Channel...

Page 23: ...on your floor during use see HOW TO LEVEL THE ELLIPTICAL EXERCISER on page 13 HOW TO ADJUST THE DRIVE BELT If the pedals slip while you are pedaling even while the resistance is adjusted to the highest setting the drive belt may need to be adjusted To adjust the drive belt first remove the screws from the left and right side shields not shown Note There are two different sizes of screws in the sid...

Page 24: ...aused by the local company signal reception Contact the local cable company PROBLEM No display appears in the CONSOLE mode and no picture appears in the TV mode SOLUTION a Make sure that the power cord is plugged into a properly grounded outlet Also make sure that the power cord is securely connected to the jack on the front of the elliptical exerciser PROBLEM The display appears in the CONSOLE mo...

Page 25: ...our goal is to strengthen your cardiovascular system you must perform aerobic exercise which is activity that requires large amounts of oxygen for prolonged periods of time For aerobic exercise adjust the intensity of your exercise until your heart rate is near the highest number in your training zone WORKOUT GUIDELINES Warming up Start with 5 to 10 minutes of stretching and light exercise A warm ...

Page 26: ...illes Stretch With one leg in front of the other reach forward and place your hands against a wall Keep your back leg straight and your back foot flat on the floor Bend your front leg lean forward and move your hips toward the wall Hold for 15 counts then relax Repeat 3 times for each leg To cause further stretching of the achilles tendons bend your back leg as well Stretches Calves achilles tendo...

Page 27: ...27 NOTES ...

Page 28: ...1 1 Belt 52 1 Flywheel 53 1 C Magnet 54 2 Outer Bearing Set 55 1 Magnet 56 1 Spring 57 1 Idler 58 1 Flywheel Pulley 59 1 Clamp 60 2 Inner Bearing Set 61 1 Motor 62 1 Resistance Cable Pulley 63 1 Resistance Cable Set 64 1 Right Upright Cover 65 1 Pivot Axle 66 2 Hub Cover 67 1 Stop Screw 68 1 Idler Screw 69 1 M8 Flange Screw 70 4 M8 x 35mm Screw 71 4 M8 x 42mm Bolt 72 4 M8 Split Washer 73 4 M4 x 12...

Page 29: ...er 107 4 M8 x 75mm Patch Screw 108 1 M4 x 12mm Bright Screw 109 1 Coaxial Cable 110 1 Pulse Wire Hex Key Grease User s Manual Key No Qty Description Key No Qty Description Note Specifications are subject to change without notice See the back cover of this manual for information about ordering replacement parts These parts are not illustrated ...

Page 30: ... 11 18 19 33 33 41 41 79 79 81 80 71 96 93 98 9 53 79 59 67 20 62 96 58 20 69 47 56 63 48 51 5 26 26 49 49 6 2 8 11 18 19 33 33 41 79 79 80 81 71 96 93 98 41 47 50 61 73 73 17 77 77 95 100 100 95 95 86 98 79 17 86 86 65 86 76 76 86 86 10 64 79 102 79 79 79 79 79 79 79 79 79 79 72 72 107 107 103 1 104 106 44 103 105 108 99 99 99 40 78 101 101 78 109 110 98 79 92 82 82 82 82 ...

Page 31: ...41 41 16 33 31 91 94 31 32 91 94 37 29 86 86 79 79 79 24 83 95 85 22 27 27 34 34 95 83 7 32 41 41 94 91 98 30 54 60 12 91 94 98 46 46 88 88 87 87 42 88 46 88 87 41 41 94 91 13 31 31 32 33 33 91 91 94 94 14 91 94 42 28 21 41 32 41 22 85 85 79 79 EXPLODED DRAWING B Model No HREL8806 1 R1207A ...

Page 32: ...ponsible or liable for indirect special or consequential damages arising out of or in con nection with the use or performance of the product or damages with respect to any economic loss loss of property loss of revenues or profits loss of enjoyment or use costs of removal or installation or other consequential damages of whatsoever nature Some states do not allow the exclusion or limitation of inc...

Reviews: