background image

6

7.

Make sure that all parts of the elliptical crosstrainer are properly tightened. Note: There may be some
hardware left over after assembly is completed. 

To protect the floor or carpet from damage, place a mat

under the elliptical crosstrainer.

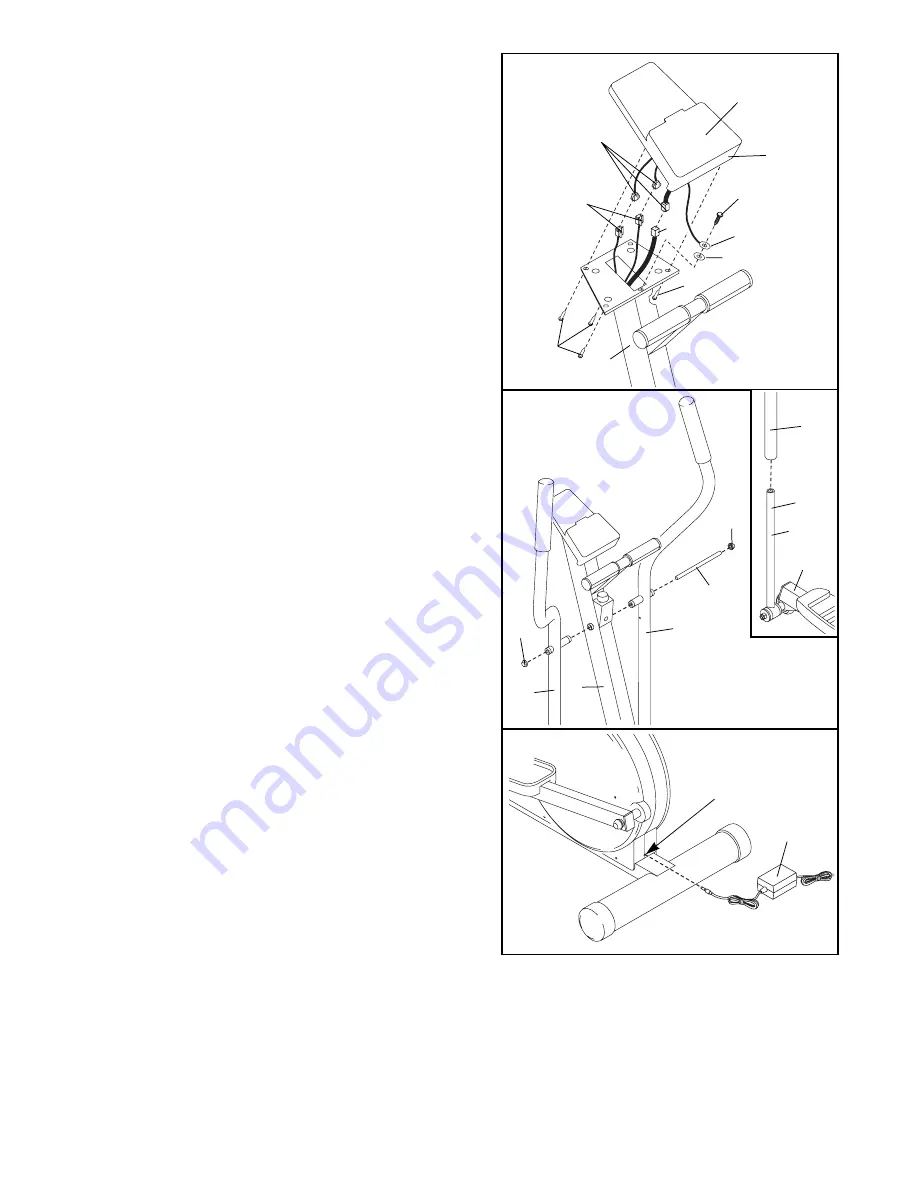
5. Refer to the inset drawing. Apply a small amount of the

included lubricant to a paper towel; rub a thin film of
lubricant onto the Chrome Extension Tube (21) on the
Right Pedal Arm (4). Slide the Chrome Extension Tube
into one of the Upper Body Arms (7).

Slide the other Chrome Extension Tube (21) into the
other Upper Body Arm (7) in the same way.

Tap a 5/8Ó Axle Cap (85) onto one end of the Axle (19).
Insert the Axle through one of the Upper Body Arms
(7) and then through the Upright (2). It may be helpful
to tap the Axle with a rubber mallet. Slide the other
Upper Body Arm (7) onto the Axle. 

Make sure that the

Upper Body Arms are turned as shown.

Tap another

5/8Ó Axle Cap (85) onto the Axle.

4. Connect the Extension Wire (51) to the corresponding

wire on the Console (87). 

Next, connect the two Pulse Wires (86) to the two
remaining wires on the Console (87). Note: Either
Pulse Wire can be attached to either wire on the
Console.

Next, connect the ground wire to the indicated hole in
the Upright (2) with a Zinc #8 x 1/2Ó Screw (35) and
the #8 Star Washer (53). 

Carefully feed the wires down into the Upright (2).
Attach the Console Base (49) to the Upright with four
Zinc #8 x 1/2Ó Screws (35). 

Be careful to avoid

pinching the wires.

86

87

49

35

35

2

57

Console

Wires

35

53

Ground Wire

4

5

19

2

85

7

7

85

21

Lube

4

7

6. Plug the Power Supply (96) into the jack at the rear of

the elliptical crosstrainer. 

Note: Your Power Supply

may look different from the one pictured.

6

Jack

96

Summary of Contents for E 530

Page 1: ...If you have questions or if there are missing or damaged parts we will guarantee complete satisfac tion through direct assistance from our factory TO AVOID UNNECESSARY DELAYS PLEASE CALL DIRECT TO OUR...

Page 2: ...3 BEFORE YOU BEGIN 4 ASSEMBLY 5 HOW TO USE THE ELLIPTICAL CROSSTRAINER 7 MAINTENANCE AND TROUBLESHOOTING 11 CONDITIONING GUIDELINES 12 PART LIST 14 EXPLODED DRAWING 15 HOW TO ORDER REPLACEMENT PARTS...

Page 3: ...ulse sensor is not a medical device Various factors including the user s move ment may affect the accuracy of heart rate readings The pulse sensor is intended only as an exercise aid in determining he...

Page 4: ...lthRider E530 If you have addition al questions please call our Customer Service Department toll free at 1 800 999 3756 Monday through Friday 6 a m until 6 p m Mountain Time excluding holidays To help...

Page 5: ...nt of the Upright 2 with the two welded bolts on the front of the Frame 1 Carefully push the Wire Harness not shown into the Upright until there is no slack Next pivot the Upright 2 about halfway to t...

Page 6: ...o tap the Axle with a rubber mallet Slide the other Upper Body Arm 7 onto the Axle Make sure that the Upper Body Arms are turned as shown Tap another 5 8 Axle Cap 85 onto the Axle 4 Connect the Extens...

Page 7: ...does not have a freewheel the pedals will continue to move until the flywheel stops When the pedals are stationary step off the highest pedal first Then step off the lowest pedal USING THE UPPER BODY...

Page 8: ...s display shows the elapsed time or the remain ing time in a resistance program total distance the resistance level and the number of 1 4 mile laps you have completed The display will change modes eve...

Page 9: ...rix to show which mea surement is selected To change the measure ment simultaneously press the PROGRAM SELECT button and the START PAUSE button until the console sounds a tone and the new measurement...

Page 10: ...n the CURRENT SEGMENT column and the TIME dis play counts down to zero The console will then sound a tone and the two displays will pause The console will remain in this state until the START PAUSE bu...

Page 11: ...f the elliptical crosstrainer does not sit flat on the floor one or both of the leveling pads should be adjusted First loosen the jam nut on each leveling pad Next turn the leveling pads as needed unt...

Page 12: ...les and on the lungs to oxygenate the blood For aerobic exercise adjust the intensity of your exercise until your heart rate is near the middle of your training zone WORKOUT GUIDELINES Each workout sh...

Page 13: ...straight and your back foot flat on the floor Bend your front leg lean for ward and move your hips toward the wall Hold for 15 counts then relax Repeat 3 times for each leg To cause further stretching...

Page 14: ...44 6 10 Washer 45 2 Wheel 46 2 3 8 x 1 3 4 Button Head Screw 47 1 Left Side Shield 48 1 Right Side Shield 49 1 Console Base 50 1 Reed Switch Wire 51 1 Extension Wire 52 1 Reed Switch Bracket 53 1 8 St...

Page 15: ...65 49 35 31 66 16 67 13 12 17 14 15 28 63 4 42 44 43 43 81 81 78 78 76 61 63 76 30 9 9 6 74 83 40 73 73 67 67 17 17 38 68 70 69 34 36 80 38 39 37 48 71 73 73 72 72 77 84 84 35 56 72 47 2 7 7 18 17 19...

Page 16: ...es not extend to any product or damage to a product caused by or attributable to freight damage abuse misuse improper or abnormal usage or repairs not provided by an ICON authorized service center pro...

Reviews: