background image

8

12. Make sure that all parts of the elliptical crosstrainer are properly tightened. Note: There may be

some hardware left over after assembly is completed. To protect the floor or carpet from damage, place
a mat under the elliptical crosstrainer.

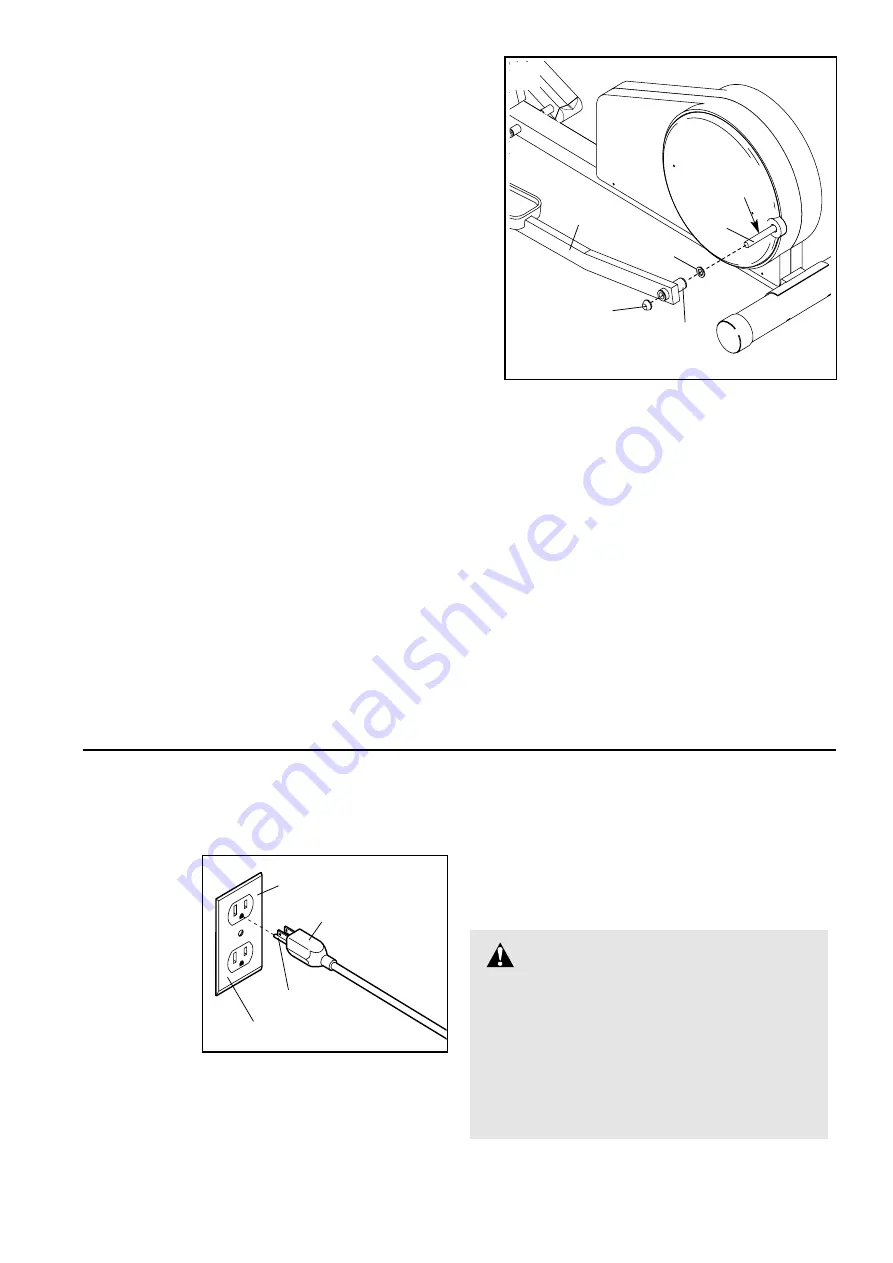
11. Apply a small amount of grease to the axle on the left

Crank Arm (8). 

Side a Nylon Washer (78) and the Left Pedal Leg (5)
onto the axle on the left Crank Arm (8). Note: It may
be helpful to use a rubber mallet to tap these parts on.
Be careful not to confuse the Left Pedal Leg with
the Right Pedal Leg (not shown); look at the posi-
tion of the round tube to correctly identify the Left
Pedal Leg. 
Next, tap a 3/4” Axle Cap (40) onto the
axle. 

Attach the Right Pedal Arm (not shown) in the same
way.

8

Grease

78

40

5

Round

Tube

11

HOW TO PLUG IN THE POWER CORD 

This product
must be
grounded.
If it should
malfunction
or break
down,
grounding
provides a
path of least
resistance for
electric
current to reduce the risk of electric shock. This prod-
uct is equipped with a cord having an equipment-
grounding conductor and a grounding plug. Plug the
power cord into an appropriate outlet that is prop-

erly installed and grounded in accordance with all
local codes and ordinances. This product is for
use on a nominal 120-volt circuit. Important: The
elliptical crosstrainer is not compatible with GFCI-
equipped outlets.

DANGER:

Improper connection

of the equipment-grounding conductor can
result in an increased risk of electric shock.
Check with a qualified electrician or service-
man if you are in doubt as to whether the
product is properly grounded. Do not modify
the plug provided with the product—if it will
not fit the outlet, have a proper outlet 
installed by a qualified electrician.

Grounded Outlet Box

Grounding Plug

Grounded Outlet

Grounding Pin

HOW TO USE THE ELLIPTICAL CROSSTRAINER

All manuals and user guides at all-guides.com

Summary of Contents for Health Rider E730

Page 1: ...erial Number Decal QUESTIONS As a manufacturer we are com mitted to providing complete customer satisfaction If you have questions or if there are missing parts please call 1 888 936 4266 Mon Fri 8h00...

Page 2: ...ld not be used by persons weighing more than 115 kg 250 lbs 8 Wear appropriate exercise clothing when using the elliptical crosstrainer Always wear athletic shoes for foot protection 9 Always hold the...

Page 3: ...e product model number and serial number when calling The model number is HRCCEL11900 The serial number is print ed on a decal attached to the elliptical crosstrainer see the front cover of this manua...

Page 4: ...ed in assembly The number in parenthesis below each drawing refers to the key number of the part from the PART LIST on page 18 The second number refers to the quantity used in assembly Note Some small...

Page 5: ...ear Stabi liser is turned so the square holes are facing away from the Frame Attach the Rear Stabilizer with two Carriage Bolts 2 and two M10 Nylon Locknuts 55 2 4 55 55 1 2 7 V shaped Groove 15 Greas...

Page 6: ...t 3 with four Console Plate Screws 39 and four M10 Split Washers 73 Make sure that the Long Extension Wire is not pinched between the Upright and the Console Plate 7 87 101 7 Carefully feed all wires...

Page 7: ...Pedal 23 which has the letter R molded onto the bottom Slide the Right Pedal onto the Right Pedal Leg 6 as shown Make sure that the plastic posts are completely inserted into the holes in the Right P...

Page 8: ...d malfunction or break down grounding provides a path of least resistance for electric current to reduce the risk of electric shock This prod uct is equipped with a cord having an equipment grounding...

Page 9: ...ainer does not have a free wheel the pedals will continue to move until the flywheel stops When the pedals are stationary step off the highest pedal first Then step off the lowest pedal FEATURES OF TH...

Page 10: ...aining time in a personal trainer program total distance the incline level and the total number of quarter mile laps completed The display will change modes every seven seconds Note The letter L will...

Page 11: ...RESISTANCE button at the same time to select the user mode The left dis play will show the total distance accumulated on the elliptical crosstrainer The right display will show the total number of ho...

Page 12: ...T PROGRAM SEGMENT column and the elliptical crosstrainer will adjust to the second resistance and incline settings If the resistance or incline setting for the current segment is too high or too low t...

Page 13: ...of the Y adapter HOW TO CONNECT YOUR PORTABLE STEREO Note If your stereo has an RCA type AUDIO OUT jack see instruction A below If your stereo has a 1 8 LINE OUT jack see instruction B If your stereo...

Page 14: ...on your stereo HOW TO CONNECT YOUR COMPUTER Note If your computer has a 1 8 LINE OUT jack see instruction A If your computer has only a PHONES jack see instruction B A Plug one end of a 1 8 to 1 8 st...

Page 15: ...iner s instructions During the CD program the resistance and incline of the elliptical crosstrainer will automati cally change according to the settings of the pro gram An electronic chirping sound wi...

Page 16: ...calibrate itself It will not need to be calibrated again To activate the incline calibration process press the INCLINE button Wait for the incline motor to stop Next press the INCLINE button While the...

Page 17: ...Each workout should include three parts 1 a warm up 2 training zone exercise and 3 a cool down Warm up Warming up prepares the body for exer cise by increasing circulation delivering more oxygen to t...

Page 18: ...Nylon Locknut 56 1 M6 Eyebolt 57 1 M6 Nylon Locknut 58 1 Adjustment Bracket 59 4 Wheel Spacer 60 13 M4 x 16mm Screw 61 4 M5 x 25mm Screw 62 1 5 16 Shoulder Bolt 63 2 Flywheel Bearing 64 2 Frame Bearin...

Page 19: ...84 19 61 60 83 65 71 27 72 71 71 60 60 24 68 81 93 96 60 101 100 100 103 71 102 98 105 33 66 85 85 76 89 85 85 89 37 82 55 94 63 56 58 57 62 17 80 47 10 99 55 63 18 60 26 12 50 72 72 31 51 52 55 53 1...

Page 20: ...to any product or damage to a product caused by or attributable to freight damage abuse mis use improper or abnormal usage or repairs not provided by an ICON authorized service center to products use...

Reviews: