background image

10

HOW TO USE THE MANUAL MODE

Make sure that the power cord is plugged into a 
120-volt outlet. Follow the steps below to use the
manual mode of the console.

Turn on the power.

If you just plugged in the power cord or moved
the pedals, the power will already be on. The
power can also be turned on by pressing any 
button on the console.

Select the manual mode.

When the power
is first turned on,
the manual mode
will automatically
be selected and
the manual mode
indicator will light.
If a different mode is selected, press the MODE
button repeatedly to select the manual mode.

Begin striding and adjust the resistance.

When the MANU-
AL mode is select-
ed, the resistance
of the pedals will
be at the minimum
setting. As you
exercise, adjust
the resistance as desired by pressing the RESIS.
button. Pressing the upper arrow on the button
will increase the resistance; pressing the lower
arrow will decrease the resistance.

If you stop exercising for twenty seconds or
longer, or if you press the START/PAUSE button,
a tone will sound, the console will pause, and the
TIME display will begin to flash. In addition, the
resistance of the pedals will return to the mini-
mum setting. To restart the console, press the
START/PAUSE button or simply begin striding.

Follow your progress with the four displays.

As you exercise, the four displays will provide
continuous feedback (see paragraphs 3, 4, 5, and
6 on page 9).   

Turn off the power.

If the pedals are not moved and the console but-
tons are not pressed for ten minutes, 

the power

will turn off automatically.

HOW TO USE THE WORKOUT PROGRAMS

Turn on the power.

See step 1 at the left.

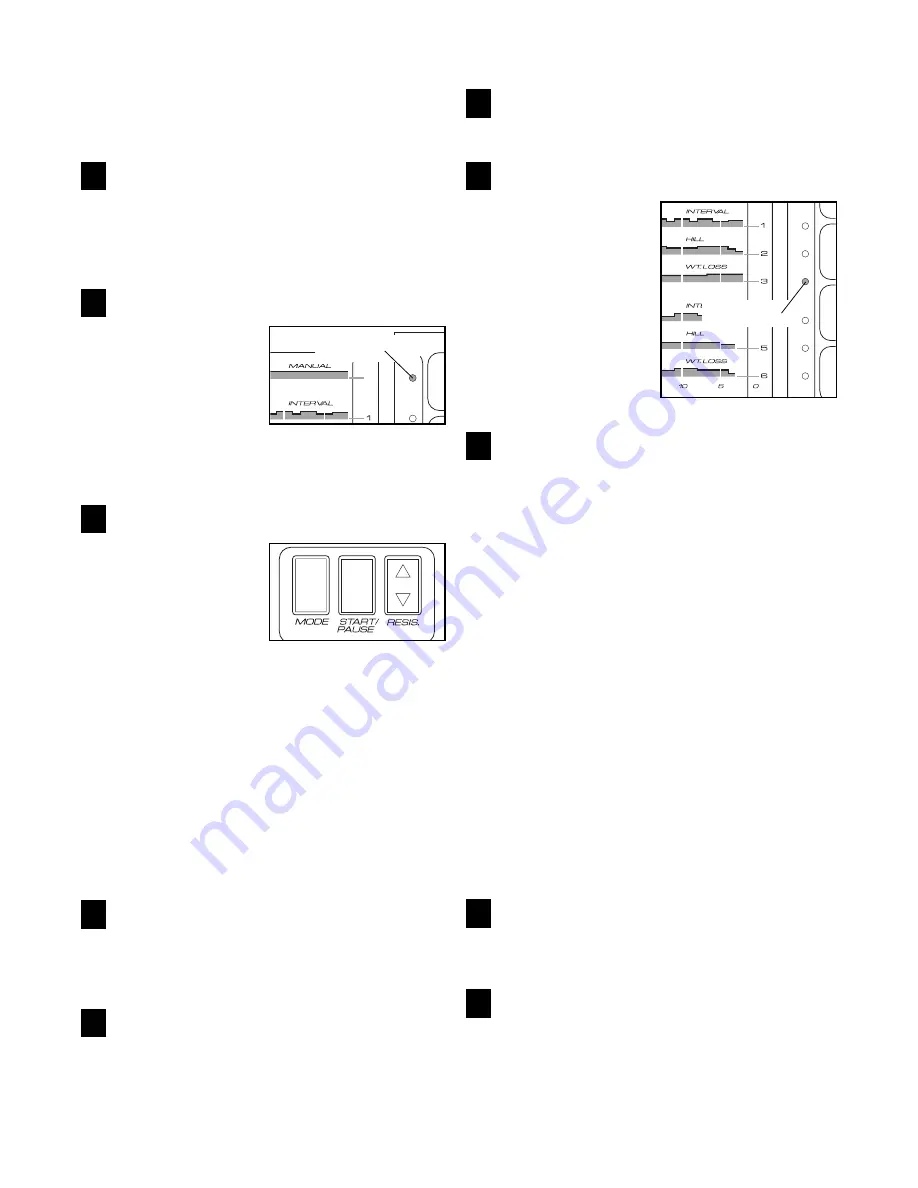
Select one of the six workout programs.

Press the MODE
button repeatedly to
select the desired
program. An indica-
tor will light to show
which program you
have selected.
Programs 1, 2, and
3 are twenty-minute
programs; programs
4, 5, and 6 are thirty-
minute programs.

Start the program.

Press the START/PAUSE button and begin strid-
ing. As you exercise, the resistance of the pedals
will periodically change as shown by the profiles
on the left side of the console. (Note: If the resis-
tance is too high or too low, it can be adjusted
with the RESIS. button. Pressing the upper arrow
on the button will increase all resistance settings
of the program; pressing the lower arrow will
decrease all resistance settings.) The program
will continue until no time remains in the TIME
display.  

To pause the program before the program is com-
pleted, press the START/PAUSE button. A tone
will sound, the console will pause, and the TIME
display will begin to flash. In addition, the resis-
tance of the pedals will return to the minimum
setting. (Note: The program will also automatically
pause if the pedals are not moved for twenty sec-
onds.) To restart the program, press the START/
PAUSE button or simply begin striding. After a
moment, the resistance of the pedals will return
to the current program setting. 

Follow your progress with the four displays.

During the program, the four displays will provide
continuous feedback.  

Turn off the power.

If the pedals are not moved and the console but-
tons are not pressed for ten minutes, 

the power

will turn off automatically.

1

1

2

2

3

4

5

3

4

5

Indicator

Indicator

Summary of Contents for HREL89070

Page 1: ...l No HREL89070 Serial No Serial Number Decal QUESTIONS If you have questions or if there are missing or damaged parts please call direct to our toll free Customer Hot Line The trained technicians on o...

Page 2: ...when mounting or dis mounting the elliptical crosstrainer Always hold the handlebar or the upper body arms when using the elliptical crosstrainer 9 When you stop exercising allow the pedals to slowly...

Page 3: ...the Elliptical Crosstrainer If you have additional questions please call our Customer Service Department toll free at 1 800 999 3756 Monday through Friday 6 a m until 6 p m Mountain Time excluding ho...

Page 4: ...materials Do not dispose of the packing materials until assembly is completed The following tools are required for assembly a phillips screwdriver two adjustable wrenches and a rubber mallet PART CHA...

Page 5: ...e inset drawing Feed the console wire har ness into the Upright 3 until the end of the console wire harness extends from the bottom of the Upright While another person holds the Upright 3 connect the...

Page 6: ...the indicated holes in the Incline Frame 2 with the tube on the Base 1 Insert the Incline Axle 75 through the left side of the Incline Frame through a Plastic Spacer 56 through the tube on the Base th...

Page 7: ...wing Apply some of the included clear lubricant to a paper towel rub a thin film of lubri cant onto the Chrome Extension Tube 63 on the right Pedal Arm 12 Slide the Chrome Extension Tube into the Righ...

Page 8: ...a complete stop CAUTION The elliptical crosstrainer does not have a freewheel the pedals will continue to move until the flywheel stops When the pedals are stationary step off the highest pedal first...

Page 9: ...program 4 DISTANCE display This display shows the total distance you have completed in miles 5 SPEED display This display shows the number of strides you are taking per minute as well as your cur rent...

Page 10: ...utes the power will turn off automatically HOW TO USE THE WORKOUT PROGRAMS Turn on the power See step 1 at the left Select one of the six workout programs Press the MODE button repeatedly to select th...

Page 11: ...e frame where the wheels move along it Other parts of the elliptical crosstrainer can also be cleaned in this manner Never use abrasives or sol vents to clean the elliptical crosstrainer LUBRICATING T...

Page 12: ...the demand on the heart to pump blood to the muscles and on the lungs to oxygenate the blood For aerobic exercise adjust the intensity of your exercise until your heart rate is near the middle of your...

Page 13: ...stretching of the achilles tendons bend your back leg as well Stretches Calves achilles tendons and ankles 4 Quadriceps Stretch With one hand against a wall for balance reach back and grasp one foot...

Page 14: ...ire Harness 40 2 L Bracket 41 2 Pedal Arm Spacer 42 4 Pedal Arm Bushing 43 2 3 4 Axle Cap 44 10 8 x 3 4 Black Screw 45 2 5 16 x 4 Shoulder Bolt 46 4 5 16 Wheel Washer 47 4 Wheel Bearing Key No Qty Des...

Page 15: ...42 43 41 42 43 42 44 48 47 45 49 44 48 46 47 64 49 29 29 82 53 54 55 56 52 58 59 52 58 59 55 60 60 38 78 71 44 39 67 75 82 52 52 62 62 79 79 13 40 31 31 74 46 46 46 38 38 65 40 24 72 26 57 84 69 68 66...

Page 16: ...does not extend to any product or damage to a product caused by or attributable to freight damage abuse misuse improper or abnormal usage or repairs not provided by an ICON authorized service center p...

Reviews: