background image


5


ASSEMBLY INSTRUCTION 


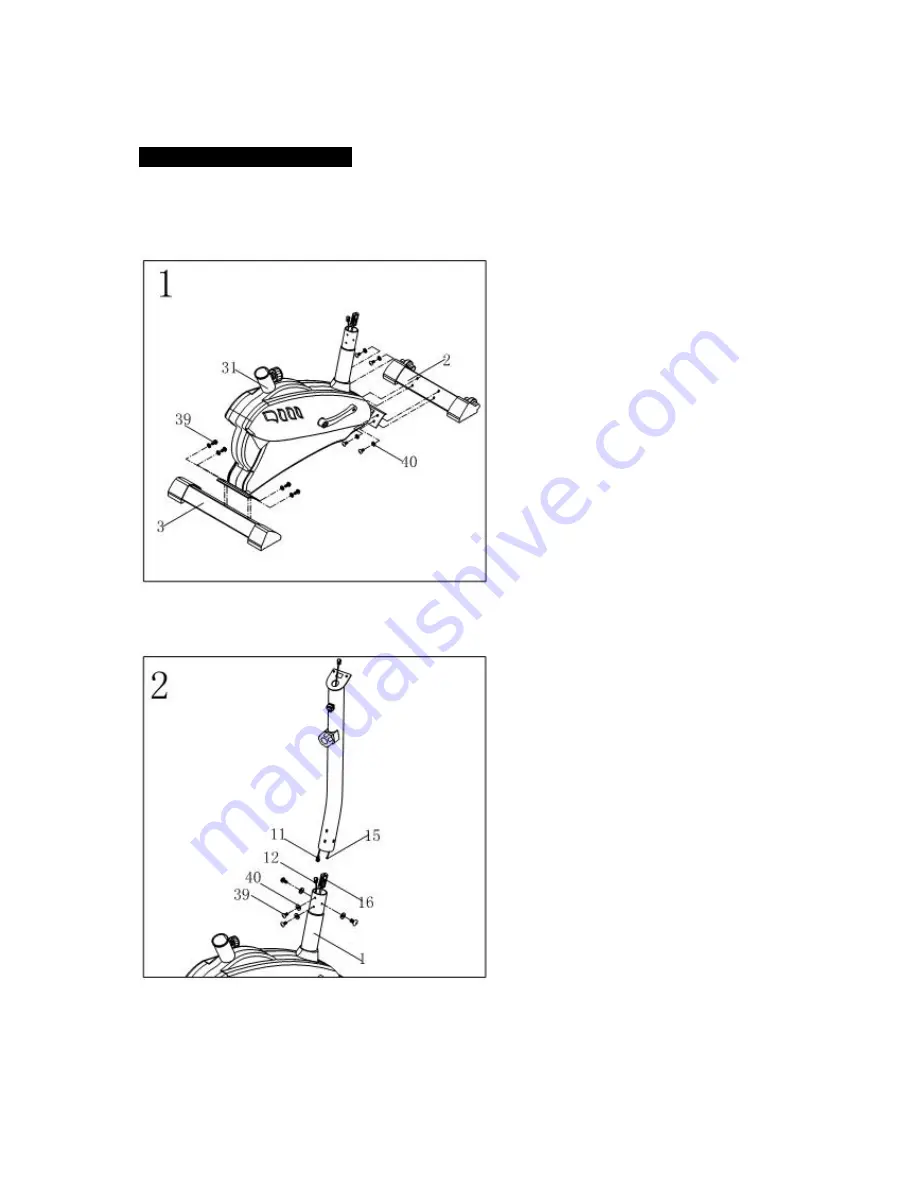
STEP 1 

Attach the two stabilizers (2) & 
(3) to the main frame (1) using 
four sets of domed nuts (39), 
washers (40) and M10 x 55 key 
head bolts (20).


STEP 2


Take the front post and join the 
upper computer wire (11) with 
lower computer wire (12). Then 
connect the bottom of the 
Upper Tension Cable (15) to 
the lower Tension Hook (16)   
Slide the handle support (4) 
into the front post housing, and 
then fix with four sets of M8 x 
15mm bolts (39) and curved 
washers (40). Making sure you 
do no trap any of the wires.


Summary of Contents for CHEETAH / 402BK

Page 1: ...MODEL CHEETAH 402BK MAGNETIC EXERCISE BIKE...

Page 2: ...m 4 Keep children and pets away from the equipment The equipment is designed for adult use only 5 Use the equipment on a solid flat level surface with a protective cover for your floor or carpet For s...

Page 3: ...2...

Page 4: ...1 PC 14 HANDLE PULSE 1 SET 15 THE UPPER TENSION CABLE 1 PC 16 THE LOWER TENSION HOOK 1 PC 17 SEAT POST 1 PC 18 MAGNETIC WHEEL 1 PC 19 BELT PULLEY 1 PC 20 HEAD BOLT 1 PC 21 WASHER 1 SET 22 PEDAL 1 SET...

Page 5: ...PCS 48 17 22 3t WASHER 2 PCS 49 BUCKLE 1 PC 50 5 12mml CROSS SCREW 1 PC 51 10 20 1 5t WASHER 1 PC 52 5 15mml SCREW 8 PCS 53 4 20mml SELF TAPPING SCREW 2 PCS 54 5 50mml CROSS SCREW 1 PC 55 5 20 1 5t A...

Page 6: ...ts 20 STEP 2 Take the front post and join the upper computer wire 11 with lower computer wire 12 Then connect the bottom of the Upper Tension Cable 15 to the lower Tension Hook 16 Slide the handle sup...

Page 7: ...uter 10 And fix the computer 10 into the computer support STEP 4 Keep hand pulse cable outside Then put the handle bar 8 on the handle Support 4 and secure it with the knob 30 plastic tube 28 and plat...

Page 8: ...at 17 into the seat support 6 Put the seat post 5 into the plastic cover 1 Fasten the seat support 6 with the knob 32 Attach the pedal 22 to the crank STEP 6 Now all the steps are finished your machin...

Page 9: ...s advisable to do a few stretching exercises as shown below Each stretch should be held for approximately 30 seconds do not force or jerk your muscles into a stretch if it hurts STOP 2 The Exercise Ph...

Page 10: ...sure all connections are correct MUSCLE TONING To tone muscle while on your EXERCISE CYCLE you will need to have the resistance set quite high This will put more strain on your leg muscles and may mea...

Page 11: ...on of functions SET The key allows you to choose a target value for TIME DISTANCE CALORIES PULSE RESET Reset the value to zero by pressing the key OPERATION PROCEDURES 1 AUTO ON OFF The system turns o...

Page 12: ...for the most accurate reading CALORIES The calories burned will be displayed by pressing mode key until brand cal appears SCAN Automatic display of the following functions in the order shown TIME SPE...

Page 13: ...s carried out Cycles Recumbent cycles Checking pedal and cranks are tight and pedal straps are adjusted before starting exercise and undone when completing exercise lightly oiling pedals and cranks on...

Page 14: ...f required refer to owners manual Check tension of drive belt Regular preventative maintenance will go a long way in ensuring a trouble free workout If at any time you do need assistance please call o...

Reviews: