15
2010/2/26 Ver1.0+V1.0
IV.
Mode Instructions
1.
For the treadmill is dynamo type, it need 25PRM above or 15VDC/2000ma transformer to
start the computer continuously.
2.
When the treadmill not plug to the transformer, the computer will be totally powered by
dynamo. While the rotate speed is lower than 40RPM, the computer will be powered by
batteries. If not operated for 1 minute and a half, it will enter into electric save mode (the
screen will shut down).
3.
Step on the pedals (40RPM
↑
), then the electric power will be stored automatically.
4.
While the rotate speed is lower than 40RPM, it will display ”
RPM
↑
”icon.
When ”
RPM
↑
”display for 15 seconds, it will enter into PAUSE mode and back to
start/ready menu after 45 seconds.
5.
Under electric save mode or PAUSE mode, when the rotate speed is higher than 60RPM, it
will resume to start/ready menu.
6.
Under Start/Ready mode or program control mode, if press
key, it will enter into
start-up of Manual run directly.(Parameters adopt the default value)
7.
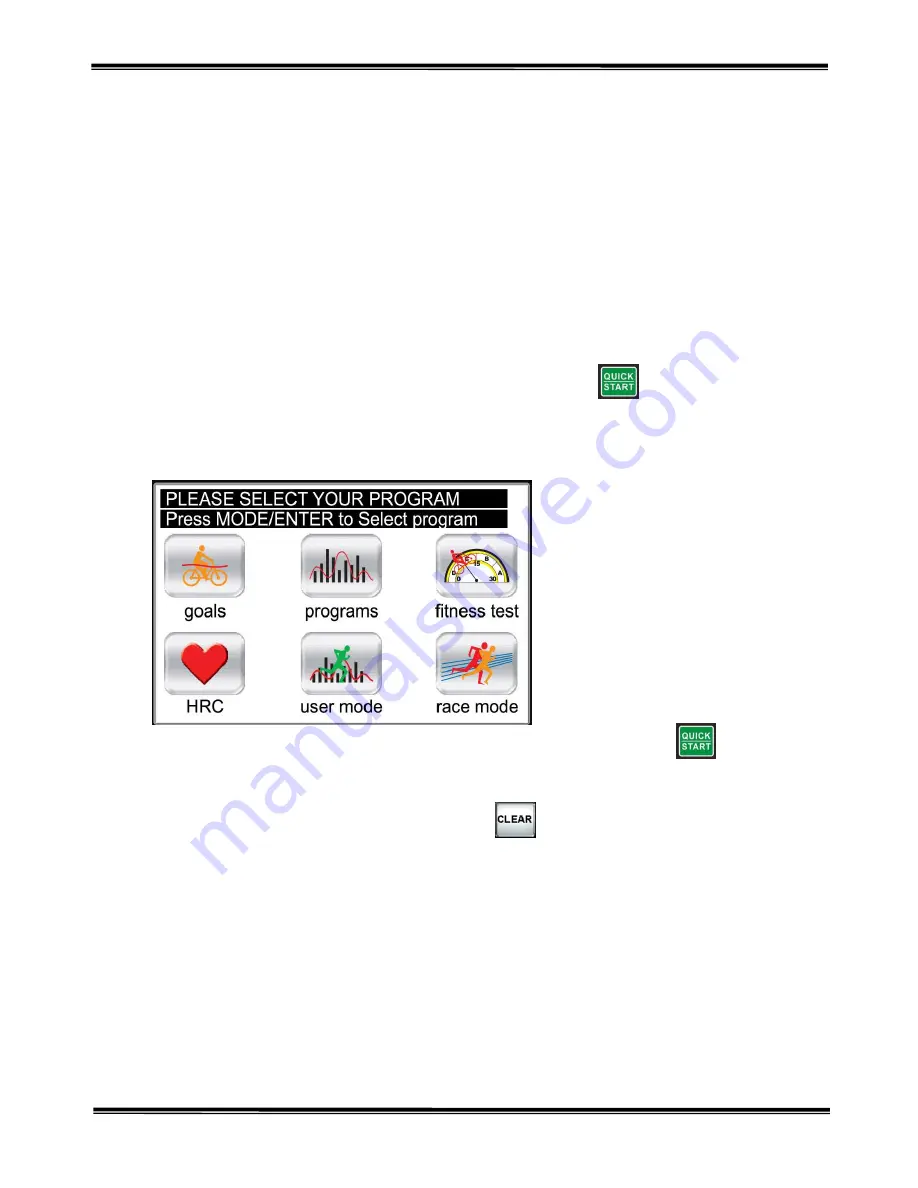
In standby mode, it can choose Goal Mode, Programs Mode, Fitness Test Mode, HRC
Mode, User Mode, Race Mode in middle window; blue frame will show on mode which
use chooses.
8.
Programs mode
:
After choosing PROGRAM, adjust parameter, or press
directly to
start (It will be start by default if there is no parameter need to be adjust).
9.
Workout has 32 levels in all. The setting time will be executed averagely by 32 levels.
10.
During setting any parameter, you can press
to cancel the setting and back to the
first parameter or program control menu. All the parameters will get back to the default
value.
11.
There are character strings to instruct the user how to operate under mode edit menu or
parameter setting menu.
12.
The runner goes counter-clockwise on racetrack. On the bottom left corner will display the
number of circles (LAPS). Every circle is 0.4KM (0.25MIL).You can switch it to project
mode by touching the small picture key on the bottom right corner.
Summary of Contents for HC10TVUB
Page 5: ...4 2010 2 26 Ver1 0 V1 0 Assembly Parts...
Page 24: ...23 2010 2 26 Ver1 0 V1 0 Program Control Project Figure level review...
Page 25: ...24 2010 2 26 Ver1 0 V1 0...
Page 26: ...25 2010 2 26 Ver1 0 V1 0...
Page 27: ...26 2010 2 26 Ver1 0 V1 0...
Page 28: ...27 2010 2 26 Ver1 0 V1 0...
Page 29: ...28 2010 2 26 Ver1 0 V1 0...
Page 30: ...29 2010 2 26 Ver1 0 V1 0...
Page 31: ...30 2010 2 26 Ver1 0 V1 0...
Page 32: ...31 2010 2 26 Ver1 0 V1 0...
Page 33: ...32 2010 2 26 Ver1 0 V1 0...
Page 34: ...33 2010 2 26 Ver1 0 V1 0...
Page 35: ...34 2010 2 26 Ver1 0 V1 0...


