background image

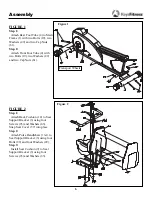
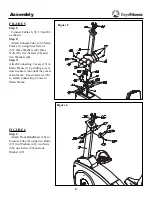
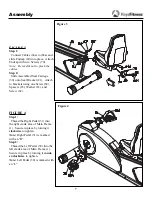
FIGURE 1

Step 1:  

Attach Rear Foot Tube (4) to Main

Frame (1) with two Bolts (19), two
Washers (49) and two Cap Nuts
(61).

Step 2:

Attach Front Foot Tube (4) with

two Bolts (19), two Washers (49)
and two Cap Nuts (61).

FIGURE 2

Step 1:

Attach Back Cushion (14) to Seat

Support Bracket (3) using four
Screws (93) and Washers (63).
Snap Seat Cover (57) into place.

Step 2:

Attach Pulse Handlebars (13A).to

Seat Support Bracket (3) using four
Bolts (89) and four Washers (49).

Step 3:

Install Seat Cushion (9) to Seat

Support Bracket (3) using four
Screws (93) and Washers (63).

Assembly

6

Figure 2

Figure 1

jTransport Wheels

Summary of Contents for HT840R

Page 1: ...Fitness 4009 Distribution Drive Suite 250 Garland TX 75041 www keysfitness com 315 00052 08 05 Rev A HT840R Owner s Manual HT840R RECUMBENT Model Name HT840R 1 Serial Number Write down for future ref...

Page 2: ...ents 2 Important Safety Information 3 Before You Start 4 Assembly 5 9 Console Overview 10 12 Monitoring Your Heart Rate 13 14 Moving Instructions 15 Warm Up Exercises 16 Exploded View 17 Parts List 18...

Page 3: ...d while you are wet Ironman Fitness recom mends a mat be placed under the unit to protect floor or carpet and for easier cleaning 4 Wear comfortable good quality walking or running shoes and appropria...

Page 4: ...ill affect your exercise heart rate If you have heart problems you are not active and or are over the age of 35 years do not use the pre set pro grams or start an exercise program without first contac...

Page 5: ...ENCH Main Components 1 OWNER S MANUAL 2 REAR FOOT TUBE 3 FRONT FOOT TUBE 4 MAIN FRAME 5 LEFT AND RIGHT PEDALS 6 PULSE HANDLES 7 CONSOLE 8 AC ADAPTER Hardware 1 M8X85MM CARRIAGE BOLT 19 Qty 4 2 M8 X19M...

Page 6: ...Cap Nuts 61 FIGURE 2 Step 1 Attach Back Cushion 14 to Seat Support Bracket 3 using four Screws 93 and Washers 63 Snap Seat Cover 57 into place Step 2 Attach Pulse Handlebars 13A to Seat Support Bracke...

Page 7: ...brackets using one Screw 84 Spacers 83 Washer 63 and Screw 62 FIGURE 4 Step 1 Thread the Right Pedal 31 into the right crank area of Main Frame 1 Secure in place by turning it clockwise to tighten No...

Page 8: ...two Screws 90 and two Washers 49 Step 3 Attach Connecting Covers 16 to Main Frame 1 by sliding covers down console tube until they meet main frame Use six Screws 70 to attach Connecting Covers to Mai...

Page 9: ...ole Tube 2 using four Screws 39 Note The four Screws 39 will already be installed into the back of Console 15 when you remove it from the box Step 2 Attach Water Bottle Holder 2A using two Screws 81 A...

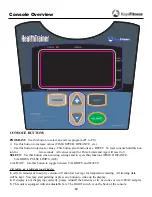
Page 10: ...n when entering settings and to cycle thru funcions TIME DISTANCE CALORIES PULSE LIMITS AGE CAL WATT Use this button to toggle between CALORIES and WATTS GENERAL INFORMATION 1 After 4 minutes of inact...

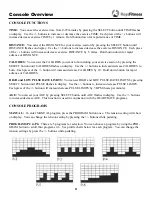
Page 11: ...ress of the button will increase decrease CALORIES by 10 Hold down button for rapid advance of CALORIES HIGH and LOW PULSE RATE LIMITS You can set HIGH and LOW PULSE RATE LIMITS by pressing SELECT but...

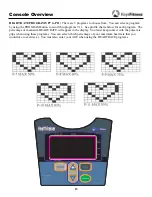
Page 12: ...rofile charts below for each program The percentage of maximum HEART RATE will appear in the display You must keep contact with the pulse rate grips when using these programs You can select which perc...

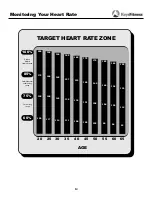
Page 13: ...nths of exercising the AHA recommends aiming for the lower part of the target heart rate zone 60 then gradually progressing up to 75 According to the AHA exercising above 75 of your maximum heart rate...

Page 14: ...ange Cardiovascular conditioning range Fat burning range 20 25 30 35 40 45 50 55 60 65 AGE 200 195 190 185 180 175 170 165 160 155 170 166 162 157 153 149 145 140 136 132 150 146 143 139 135 131 128 1...

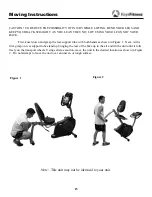
Page 15: ...t tube with both hands as shown in Figure 1 Next with a firm grasp on rear support tube stand up bringing the rear of the bike up in the air and tilt the unit until it rolls freely on the transport wh...

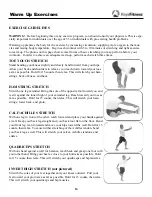
Page 16: ...ne leg extended Bring the sole of the opposite foot toward you and rest it against the inner thigh of your extended leg Reach toward your toes as far as possible Hold for 15 counts then relax This wil...

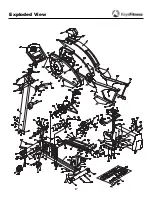
Page 17: ...Exploded View 17...
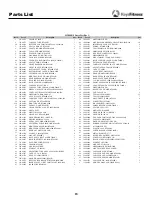
Page 18: ...X50MM SCREW 7 21 323 00003 CARRIAGE TUBE CM835 850 HT840 ALL900 920 1 72 302 01211 M8 LOCKNUT THIN HT640U 9 22 330 00015 LEFT CRANK HT840R 420R 1 73 302 01235 SCREW TPM5X10MM 2 22A 330 00016 RIGHT CRA...

Page 19: ...o obtain warranty service You must prepay any shipping charges export taxes custom duties and taxes or any other charges associated with transportation of the parts or Product In addition you are resp...

Page 20: ...Customer Service 1 888 340 0482 Keys Fitness 4009 Distribution Drive Suite 250 Garland TX 75041 www keysfitness com...

Reviews: