background image

11

• Outdoor Lifestyles by Hearth & Home technologies Burner/Hearth Kits •  4004-316 Rev  I • 01/2022

Operating Instructions 

Hearth & Home Technologies • Grand Oak Match Light Gas Log Sets • 4004-300 Rev B • 12/05

14

P.  Lighting Instructions- Match Light

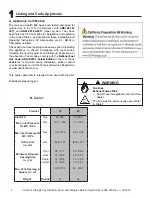
Asphyxiation Risk

Gas-burning appliances produce smoke and 

carbon monoxide gas during operation.

•  The damper 

must

 be open

•  The chimney must draw properly
These fumes can be harmful if not vented 

properly.

WARNING

1.  STOP!

 Read the safety information previously listed above.

2.  Turn gas control manual valve to the full “OFF” position.

3.  Wait 5 minutes to clear out any gas. Then smell for gas, including near the floor. If you smell gas, STOP! Follow “B” 

in the safety information above on this label. If you don’t smell gas, go to the next step.

4.  Place a lit match on the surface of the burning embers. Do not hold match in hand.

5.  Turn gas control manual valve to the full “ON” position.

6.  If appliance will not operate, follow the instructions “TO TURN OFF GAS TO APPLIANCE” and call your service 

technician or gas supplier.

TO TURN OFF GAS TO APPLIANCE

LIGHTING INSTRUCTIONS

A.

  This appliance has a manually lighted burner and must be lit by hand. When lighting the burner, follow these 

instructions exactly.

B.  BEFORE LIGHTING 

smell all around the appliance area for gas. Be sure to smell next to the floor because some 

gas is heavier than air and will settle on the floor.


WHAT TO DO IF YOU SMELL GAS


•  Do not try to light any appliance.


•  Do not touch any electrical switch; do not use any phone in your building.


•  Immediately call your gas supplier from a neighbor’s phone. Follow the gas supplier’s instructions.


•  If you cannot reach your gas supplier, call the fire department.

C.

  Do not use this appliance if any part has been under water. Immediately call a qualified service technician to inspect 

the appliance and to replace any part of the control system and any gas control that has been under water.

D.  Use only your hand to push in or turn the gas control handle. Never use tools. If the handle will not push in or turn 

by hand, do not try to repair it. Call a qualified service technician. Force or attempted repair may result in fire or 

explosion.

Turn manual  gas control handle to “OFF” position. Do not force.

FOR YOUR SAFETY READ BEFORE LIGHTING

FOR YOUR SAFETY READ BEFORE LIGHTING

WARNING! 

IF THESE INSTRUCTIONS ARE NOT FOLLOWED EXACTLY, A FIRE OR EXPLOSION MAY RESULT 

CAUSING PROPERTY DAMAGE, PERSONAL INJURY OR LOSS OF LIFE.

(Place lit match in ember bed before turning on valve)

(Located in wall or floor 

near fireplace)

Valve Key

Valve

Summary of Contents for outdoor lifestyles OD-18NG

Page 1: ...ther appliance What to do if you smell gas Do not try to light any appliance Do not touch any electrical switch Do not use any phone in your building Immediately call your gas supplier from a neighbor...

Page 2: ...ention to all cautions and warnings This owner s manual should be retained for future reference We suggest you keep it with your other important documents and product manuals The information contained...

Page 3: ...as Piping 7 C Gas Pressure 8 4 Installation Instructions A Install the Damper Stop 9 B Install the Burner Pan Assembly 9 C Install the Grate 9 D Place Lava Rock 9 E Install the Logs 10 F Adjust the Bu...

Page 4: ...ections In the absence of local codes comply with the National Fuel Gas Code ANSI Z223 1 Latest Edition in the U S If any assistance is required during installation please contact your local dealer or...

Page 5: ...ation consult a qualified installer service agency or the gas supplier WARNING Sharp Edges Wear protective gloves and safety glasses during installation CAUTION C Inspect the Appliance and Components...

Page 6: ...been under water Immediately call a qualified service technician to inspect the appliance and to replace any part of the control system and any gas control which has been under water WARNING Inspect a...

Page 7: ...ote Have the gas supply line installed in accordance with local building codes if any If not follow ANSI 223 1 Installation should be done by a qualified installer approved and or licensed as required...

Page 8: ...are tight Turn on the gas and coat each joint with a non corrosive gas leak check solution Air bubbles will form indicating any leaks DO NOT USE A FLAME OR ANY TYPE OF IGNITION SOURCE TO CHECK FOR LEA...

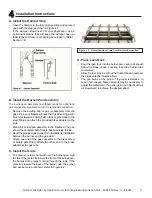
Page 9: ...r pan assembly in the fireplace The pan should be centered both front to back and side to side Bend the provided gas connector to facilitate its installation between the burner and the gas stub Attach...

Page 10: ...rate this appliance Cleaning Periodic examination and cleaning of the venting system of the fireplace should be done before initial use and at least annually by a qualified agency Fire Risk Explosion...

Page 11: ...ighting the burner follow these instructions exactly B BEFORE LIGHTING smell all around the appliance area for gas Be sure to smell next to the floor because some gas is heavier than air and will sett...

Page 12: ...ilation air is not obstructed front grilles and vent caps Before installing into a solid fuel burning fireplace the chimney and firebox should be inspected and cleaned to remove soot creosote ashes pa...

Page 13: ...ied technician recommended Check Condition of doors surrounds and fronts Obstructions of combustion and ventilation air Condition of logs Condition of firebox Gas connections and fittings Obstructions...

Page 14: ...earth Kits 4004 316 Rev I 01 2022 14 7 7 Reference Materials Service Parts Stainless Hearth Kit Assembly Stainless Grate Assembly 1 2 Outdoor lifestyles by hearth home technologies hearth kits Beginni...

Page 15: ...ch FT 18 1 FT 18 1 1 4 End Cap 4066 157 4066 157 1 5 Brass Elbow 1 2 x 3 8 Flare not shown 10 1037 10 1037 1 7 Orifice BPO 2 26 BPO 2 26 1 8 Damper Stop Assy SRV500 SC SRV500 SC 1 9 Brass Elbow 3 8 x...

Page 16: ...rth Kits 4004 316 Rev I 01 2022 16 B Optional Components Matchlight Burner Hearth Kits FSP 10 SS Conversion kit Matchlight to Safety Pilot LP Specify Size Available for All Models GLHE PACKAGE Gas Log...

Page 17: ...t from HHT regardless of the installation or occupancy date The term Lifetime in the table below is defined as 20 years from the beginning date of warranty coverage for gas appliances 10 years from th...

Page 18: ...ndling devices such as exhaust fans or forced air furnaces or other such causes 6 use of fuels other than those specified in the operation instructions 7 installation or use of components not supplied...

Page 19: ...follow these instructions for safe installation and operation D O N O T D I S C A R D This product may be covered by one or more of the following patents United States 4593510 4686807 4766876 4793322...

Reviews: