11
04/21
7058-805F
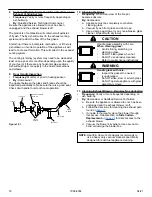
G. Hopper Lid Latch and Hopper Switch
1.
Lift up the hopper lid and lock into open position. Now
you can fill the hopper with fuel.
2.
The hopper switch is designed to shut down the feed
motor when the hopper lid is open. Leaving the lid open
too long can cause the fire to go out
(Figure 11.1)
.
3. To close the hopper lid, while holding lid open with one
hand, push the bottom of the latch inwards to release
from locked position and then slowly close the hopper
lid
(Figure 11.2)
.
Figure 11.1
Figure 11.2
1.
A thermostat is required for proper operation of this
appliance. If you have to adjust the feed rate after
you have started the fire, most of the pellets in the
hopper will need to be removed so start out with filling
the hopper approximately 1/4 full at this time. Set the
thermostat to its lowest setting and plug the power cord
into nearby outlet.
2.
The exhaust blower will stay on for approximately 18
minutes even though the thermostat is not calling for
heat. This is normal.
3. Locate the heat output control switch mounted on
the back of the appliance in the upper left corner
(Figure 10.1 on
.
4.
Turn it to the “high” setting by pushing the top of the
control switch in and then adjust the thermostat to its
highest setting.
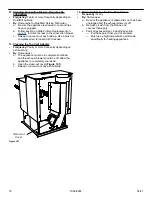
5. Look through the hole in the left lower side panel and
you will see the red call light on the control box will
be on
(Figure 11.3)
. This indicates the thermostat is
calling for heat. On the
6.
The fuel feed system and the igniter should now be on.
7.
For your first fire it will be necessary to press the reset
button once approximately 2 minutes after start up
and again in 5 minutes. Reset as needed or every 60
seconds until pellets begin to drop into firepot. This will
fill the feed system and allow the appliance to begin
dropping pellets. Or you can put a handful of pellets
in the firepot to speed up the process. The appliance
will continue to run as long as the thermostat is calling
for heat.
8.
Once the appliance has ignited, let it burn for
approximately 15 minutes, then set the thermostat to
the desired room temperature. Adjust the heat output
control switch to the desired setting.
Figure 11.3
Control Box
Junction Box
Red Call Light
Fuse
Convection
Blower
LOCATED BEHIND LEFT SIDE PANELS
Odors and vapors released during initial operation.
•
Curing of high temperature paint.
•
Open windows for air circulation.
Odors may be irritating to sensitive individuals.
CAUTION
Hopper Lid Latch
Hopper Switch
Push Bottom of Latch
Inward to Release
H. Starting Your First Fire


