background image

23 

Summary of Contents for F-031XX1 series

Page 1: ...tomer is able to fully operate the appliance and is aware of any cleaning or maintenance requirements CAVELLO GAS FIRE CAVELLO XE GAS FIRE Model numbers F 031XX1 MANUAL for use on Natural Gas G20 at a...

Page 2: ...2...

Page 3: ...nce 8 Connec ng the Appliance to the Gas Supply 9 Checking Opera on of Appliance 9 Comple ng the Installa on 10 Appliance Technical Informa on 11 Cleaning Instruc ons 11 Service Instruc ons 12 User In...

Page 4: ...1858 Chimneys Components Concrete Flue Blocks IS813 1996 Domes c Gas Installa on Republic of Ireland Prior to installa on ensure that the gas supply is compa ble with the appliance this appliance mus...

Page 5: ...unning If the appliance spills with the restrictor ed then the restrictor should be removed and the spillage test repeated If the spillage test con nues to fail expert advise should be sought and addi...

Page 6: ...replace opening It is important to note that should a spacer of any kind be used to bring the appliance out of the replace then the 300mm dimension must be taken from the most forward surface of this...

Page 7: ...this advice not be followed the customer should be advised to give due to considera on to the safety of the occupants in the room where the appliance is to be installed 3 The user must be made aware...

Page 8: ...being installed with a spacer kit this should be a ached to the appliance using the screws included and the foam seal which is supplied with the appliance should be a xed to the rear face of the space...

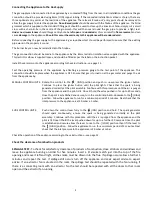
Page 9: ...IGN posi on and push in now press the igniter bu on Con nue to press the igniter bu on un l the pilot lights Check that the spark is being generated correctly at the pilot assembly Con nue with this...

Page 10: ...stomer aware of the health and safety warning detailed later in these instruc ons Explain to the customer that the ceramics are fragile and must be treated with great care explain that the ceramics ar...

Page 11: ...with the greatest of care Cleaning of these components should only be undertaken once the appliance is switched o and has been allowed to cool for a minimum period of one hour The components should b...

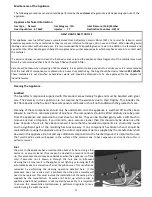
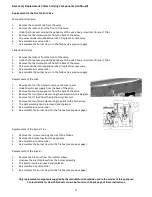
Page 12: ...gas carrying components will require the removal of the burner tray The following informa on details the removal of this tray Once removed refer to the relevant sec on that follows detailing the remov...

Page 13: ...the cover panel 2 Undo the pilot gas supply from the base of the pilot 3 Remove the thermocouple nut from the back of the valve 4 Remove the two 2 screws securing the microswitch see diagram 5 Remove...

Page 14: ...hould the spark generator fail to provide a spark at the electrode it may be that a small amount of soot has fallen from the fuel bed onto the pilot assembly causing a short circuit If this is the cas...

Page 15: ...orce any component into posi on if it does not t easily then you are not ng the part correctly These instruc ons can also be followed to remove or reinstall the fuel bed a er cleaning This is a proced...

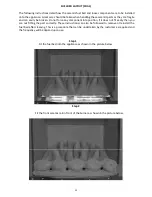
Page 16: ...e two side cheeks into posi on as shown in the picture below These are marked L and R for le hand and right hand Step 4 Carefully place four coals between the front rail and the fuel bed as shown in t...

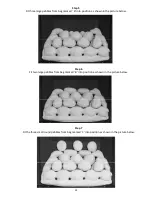
Page 17: ...7 Step 5 Fit three coals into posi on as shown in the picture below Step 6 Fit two coals into posi on as shown in the picture below Step 7 Fit the three coals into posi on as shown in the picture belo...

Page 18: ...force any component into posi on if it does not t easily then you are not ng the part correctly These instruc ons can also be followed to remove or reinstall the fuel bed a er cleaning This is a proce...

Page 19: ...ide cheeks into posi on as shown in the picture below These are marked L and R for le hand and right hand Step 4 Carefully place medium pebbles from bag A between the front rail and the fuel bed as sh...

Page 20: ...marked B into posi on as shown in the picture below Step 6 Fit two large pebbles from bag marked B into posi on as shown in the picture below Step 7 Fit the three small round pebbles from bag marked C...

Page 21: ...in this manual Hearth Products Ltd Unit 14 Tollgate Industrial Estate Sta ord ST16 3SU Product Fiche Manufacturer Hearth Products Ltd Model No F 031XX1 F 031XX2 Energy E ciency Class F F Direct Heat...

Page 22: ...e P XX1133 Ceramic Sidecheek LH Pebble P XX1134 Ceramic Sidecheek RH Pebble P XX1135 Ceramic Loose Fuel Pack Pebble To order spare parts for your appliance visit www hearthproducts co uk sparesshop or...

Page 23: ...23...

Page 24: ...r if there is any concern or ma er of understanding that you feel needs to be clari ed please contact us directly Our contact details are shown below Hearth Products Ltd Unit 14 Tollgate Industrial Es...

Reviews: