Hearthstone Quality Home Heating Products, Inc.
Bristol DX Model 8763
40
As Needed:
Glass and Gasket Replacement
In the event that you need to repair or replace a
cracked or broken glass, order kit 97-58621
(complete side glass assembly with frame) or 97-
58620 (complete side glass assembly with frame) and
use the following
instructions to replace the
components. Your Bristol uses a folded flat fiberglas s
gasket to make a tight seal between the glass frame
and the firebox. In time, the gasket can become brittle
and compressed and should be replaced using the
following instructions. New gasket material is also
available from your Authorized Hearthstone Dealer.
Protect your hands with work gloves, and wash up
later.
If Replacing Glass
1. Allow the Bristol to cool completely. If the glass
is severely broken, first pull the broken
fragments of glass away from the firebox using
heavy-duty gloves.
2. Dismount the top casting, front cast panel and
side cast panels.
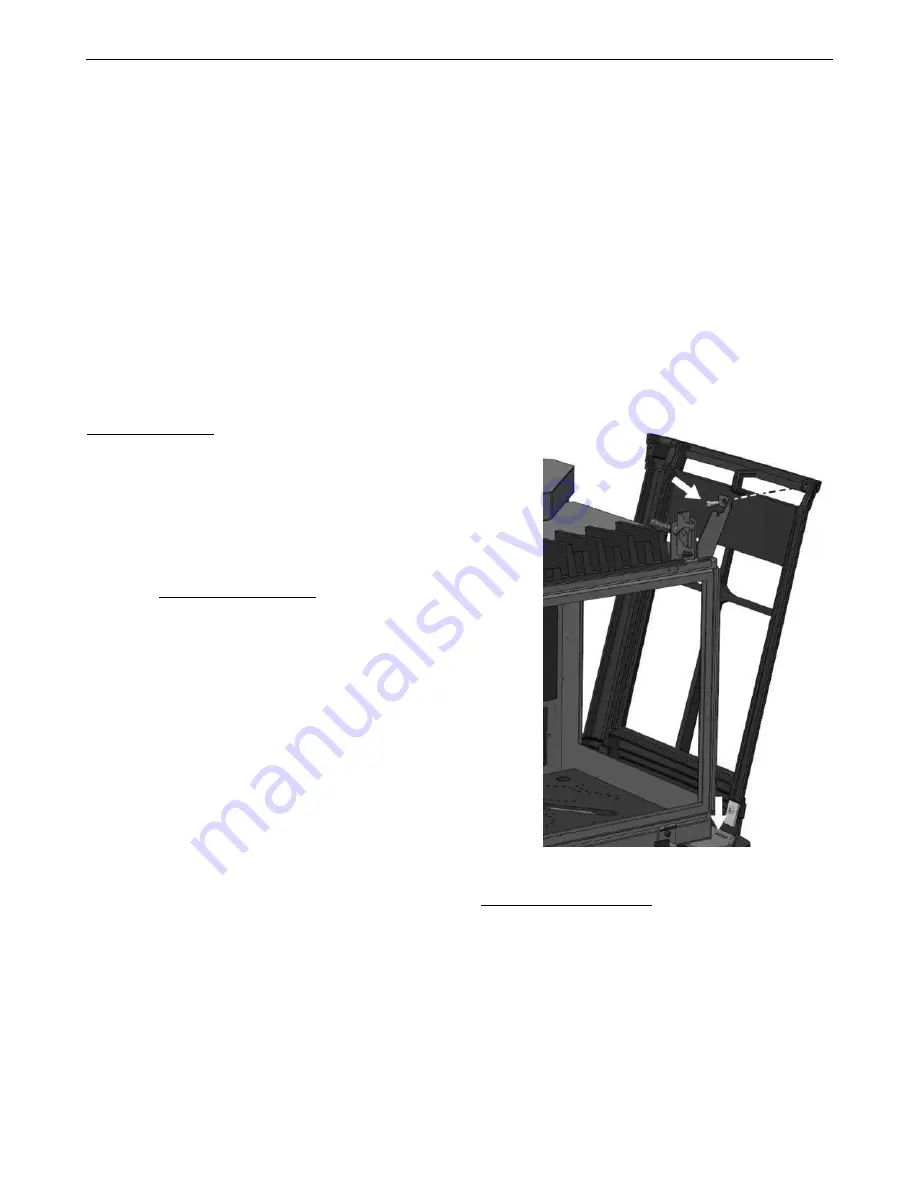
3. To dismount the side panels, first remove the top
and front façade. Remove the top front machine
screw while holding the panel, and then lift the
side panel off the stove (
See Figure 44
).
4. Dismount the front glass assembly by releasing
the upper spring clips
– then lift the frame up and
out of the lower mounting points.
5. Dismount the side glass assemblies by removing
the six screws (retain for reassembly) securing
the frame to the firebox. Ensure the glass doesn’t
fall out of the frame during removal.
6. Remove the glass from the front glass frame by
drilling out the four 1/8” rivets on the upper glass
clips. Push the top of the glass slightly away from
the frame and lift it up above the lower clips, and
then out of the frame, set it aside.
7. Remove the glass from the side frames by lifting
the frame off the glass. You may have to hold the
glass down while pulling up on the frame. Do this
as evenly as possible to avoid bending the frame,
or breaking the glass.
8. Remove the existing gasket from each piece of
glass by grasping one end and pulling firmly.
Clean off as much of the hanging
fiber “hairs” as
possible
9.
Locate the three pieces of 1” x1/8” flat tape
gasket. Use the two shorter pieces for the side
glass. Peel the adhesive protecting paper away
from one end. Starting at the middle of the bottom
edge of the glass apply the gasket centered on
the edge of the glass. Continue to wrap the
gasket loosely around the edge until you meet at
the starting point. Adjust the gasket so the ends
do not overlap. If the gasket length is too long,
trim the excess. Do not leave ends with ragged
edges.
10. Firmly and evenly, fold the gasket around the
edges of the glass so it lies flat on the surface.
There should be no folds at the corners.
11. Place each gasketed glass back in its frame. With
four new 1/8” rivets reinstall the 2 glass clips on
the front glass frame. The glass assemblies are
now ready to remount on the unit.
Figure 44
– Side Panel Mounting Detail
If replacing gasket only:
1. Follow Steps 1
– 8 above (as needed depending
on glass panel being replaced).
2. Remove the existing gasket from the glass by
grasping one end and pulling firmly. Clean off as
much of the hanging fiber “hairs” as possible
3.
Locate the three pieces of 1” x1/8” flat tape
gasket. Use the two shorter pieces for the side


