Hearthstone Quality Home Heating Products, Inc
CHAMPLAIN DV Model 8301
L
IGHTING THE
U
NIT THE
F
IRST
T
IME
S
MOKE AND
F
UMES
W
ARNING
When lit for the first time, the Champlain will emit
some smoke and odors. This is normal “off-gassing”
of the paints and oils used in the manufacturing, and
assembly of the unit. Open windows to vent the
room if necessary. The off gassing and fumes will
subside after the first 10 to 20 minutes of operation.
Once the Champlain in place and connected as
described previously, the unit is ready to be lit for the
first time. Hearthstone tests each Champlain before
shipment, so ignition should take place without
failure.
P
ILOT
L
IGHT
The Champlain has a piezoelectric spark igniter (the
red or black push button located next to the gas
control valve behind the valve access door), which
ignites the pilot light by means of a spark at the pilot
light assembly. Do not attempt to light the unit with a
match or by any means other than the piezoelectric
spark.
P
ILOT
A
DJUSTMENT
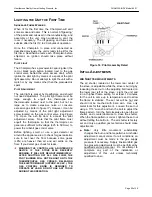
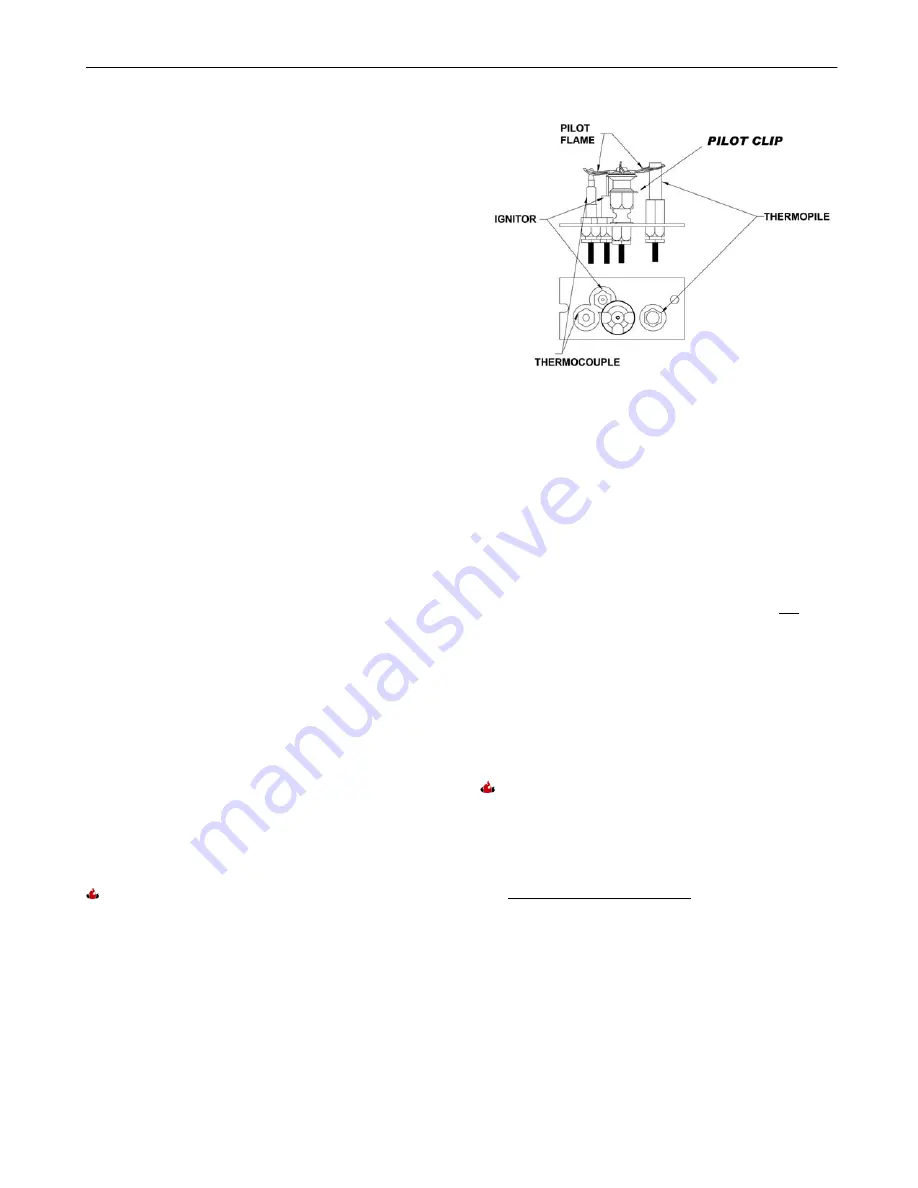
The pilot light is preset by Hearthstone and should
not need adjustment. The pilot light flame must be
large enough to engulf the thermopile and
thermocouple located next to the pilot, but not so
large as to create excessive noise or consume
excessive gas
(refer to figure 17).
However, it can be
adjusted by means of the pilot light adjustment
screw located on the gas control valve (
see Figure
15
). Open the ash lip door to access the pilot
adjustment screw. Note that the pilot flame must
engulf the thermopile so that the thermopile can
generate sufficient milli-voltage (325 to 500-mv) to
power the millivolt gas control valve
Before lighting, smell, or use a gas detector all
around the appliance area to check for gas leaks. Be
sure to test near the floor because some gases
(LPG) are heavier than air and will settle on the
floor. If you detect gas, check for leaks.
WARNING!
THE CONTROL HAS AN INTERLOCK
DEVICE. IF THE STOVE WAS RECENTLY
BURNING, IT WILL NOT RELIGHT IMMEDIATELY.
AFTER SHUTTING OFF ALL GAS FLOW, THE
PILOT BURNER WILL NOT RELIGHT UNTIL THE
THERMOCOUPLE HAS COOLED, RELEASING
THE ELECTROMAGNET (APPROX. 60 SEC.). THE
GAS CONTROL KNOB IS DESIGNED TO
OPERATE BY HAND. DO NOT USE ANY TOOLS
DURING THIS OPERATION.
Figure 16: Pilot Assembly Detail
I
NITIAL
A
DJUSTMENTS
A
IR
S
HUTTER
A
DJUSTMENTS
The air shutter, located at the lower rear center of
the stove, is adjustable while the stove is burning by
loosening the set nut on the adjusting bolt located on
the lower rear left of the stove. Light the unit and
run at highest flame setting for at least 10 minutes
for the unit to come up to temperature and to allow
the flame to stabilize. The set nut will be hot and
should not be touched with bare skin. Use only
metal tools for this adjustment. Loosen the set nut
using a 7/16” wrench and turn the bolt to adjust the
flame pattern. Turn the bolt clockwise to open the air
shutter, and counterclockwise to close the shutter.
When the flame pattern is correct, tighten the set nut
without letting the bolt turn. The air shutter is factory
set and only a qualified gas technician should make
adjustments.
Note:
Very little movement substantially
changes the burn and flame patterns. Air shutter
adjustment cannot correct for all conditions; an
adjustment
must be made to the gas supply
pressure if necessary. Supply line/manifold gas
line pressure adjustments must be performed by
qualified service personnel. Do not attempt to
complete any part of the installation or
adjustment of this unit unless technically
qualified to do so.
Page 20 of 30

