Hearthstone Quality Home Heating Products, Inc
®
Craftsbury (Model 8392)
15
Secure all joints, including attaching the stovepipe to
the stove's flue collar, with three sheet metal screws.
Install #10 x 1/2" (3 mm x 13 mm) sheet metal screws
into the holes pre-drilled in the flue collar.
Disregarding the screws can cause joints to separate
from the vibrations that result from a creosote
chimney fire.
You can simplify connecting stovepipe by using
additional accessories such as telescoping pipes,
slip-connectors or clean-out tees. These accessories
ease the periodic inspection of your chimney, as well
as allow you to dismantle the stovepipe easily
(without moving the stove).
Install the stove as close as practical to the chimney,
while maintaining all proper clearances. Install
stovepipe that is as short and as straight as possible.
Horizontal runs of stovepipe must always rise away
from the stove at a minimum of 1/4" per foot
(21mm/m).
We do not recommend long runs of stovepipe to
increase heat dispersal
. Longer lengths of stovepipe,
or more connecting elbows, than necessary increase
the chances of draft resistance and the accumulation
of creosote buildup.
In general, you do not need to install a stovepipe
damper with the Craftsbury. Some installations,
however, could benefit from a stovepipe damper,
such as a tall chimney which can create a higher than
normal draft. In such cases, a damper can help
regulate the draft. The Craftsbury requires a draft
between -0.06" and -0.1" WC. For drafts above -0.1"
WC, install a stovepipe damper. To vent the
Craftsbury directly out the back flue exit, a minimum
draft of -
0.08” WC is required. Check the draft at stove
installation time.
Remember, the NFPA recommends minimum
clearances for chimney connectors to combustibles
such as walls and ceilings. Once the stove is installed
at safe distances from these combustible surfaces, it
is also important to maintain these connector
clearances for the remainder of the installation.
R
EAR
E
XIT
I
NSTALLATION
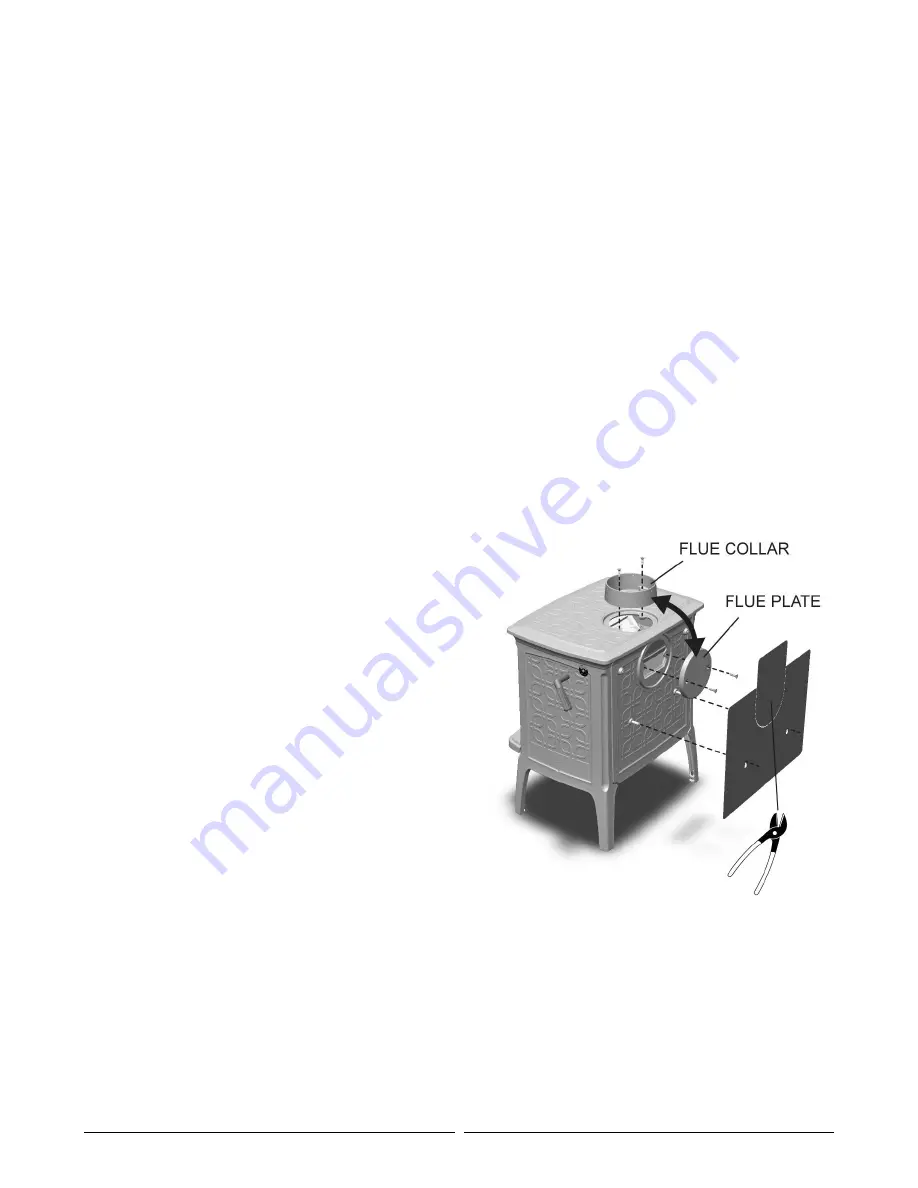
The Craftsbury may be installed with a direct rear flue.
In the rear exit configuration, a draft of -
0.08” WC or
more is necessary to ensure the proper function of
stove. Do not install the stove in the rear exit
configuration if you do not have sufficient draft. The
mi
nimum chimney height is 15’ for rear exit
configurations.
The Craftsbury is shipped in the vertical flue
configuration. To install the stove in the rear flue
configuration, switch the positions of the flue collar
and the flue plate following these steps:
1.
Using a 5/32” hex key, remove the flue collar from
the top of the stove by removing the two screws
visible within the flue collar.
2. Remove the rear heat shield. Loosen the two
screws and lift the heat shield to remove it.
3.
Using a 5/32” hex key, remove the flue plate from
the back of the stove by removing the two visible
screws.
4. Install the flue collar on the back of the stove and
the flue plate on the top of the stove using 2
screws each. Be sure to keep the ¼” gasket in the
channel on both the flue collar and the flue plate
to ensure a sealed firebox.
5. Using metal snips, remove the section of the rear
heat shield to allow the pipe to pass through it.
6. Re-install the rear heat shield. The two screws
should fit in the keyhole features of the shield. Be
sure the standoffs are correctly positioned behind
the heat shield and tighten it in place.
Figure 8
– Rear Exit


