background image

Hearthstone Quality Home Heating Products, Inc.                                   

                                BARI Model #8180                                      

O

PERATION


L

IGHTING THE 

U

NIT FOR THE 

F

IRST 

T

IME


WARNING: IF YOU DO NOT FOLLOW THESE 
INSTRUCTIONS EXACTLY, A FIRE OR 
EXPLOSION MAY RESULT CAUSING PROPERTY 
DAMAGE, PERSONAL INJURY OR LOSS OF LIFE. 


CAUTION: LIGHTING THE BARI FOR THE FIRST 
TIME AND ADJUSTMENTS TO THE UNIT SHOULD 
BE PERFORMED BY QUALIFIED SERVICE 
PERSONNEL. 

This appliance is designed only for use with the 
type(s) of fuel gas indicated on the rating plate. This 
appliance is not convertible for use with other gases, 
unless a certified kit is used. 

Cet appareil doit être atilisé uniquement avec les 
types de gas indiqués sur la plaque signalétique. Ne 
pas l’utiliser avec d’autres gas sauf si un kited 
conversion certifié est installé. ) 

S

MOKE AND 

F

UMES 

W

ARNING


When lit for the first time, the Bari will emit some 
smoke and fumes.  This is normal “off-gassing” of 
the paints and oils used in the manufacturing and 
assembly of the unit.  Open windows to vent the 
room if necessary. The off-gassing and fumes will 
subside after the first 10 to 20 minutes of operation. 

O

DORS AND 

I

MPURITIES


A heater of this type may produce other odors during 
heater operation due to impurities that may exist in 
the immediate area. Sources of impurities can be 
cleaning solvents, paint solvents, cigarettes, 
candles, smoke, pet hair, dust, adhesives, new 
carpet, and/or textiles. Such odors usually dissipate. 
However, opening a window or otherwise providing 
additional ventilation to the area can alleviate the 
condition quickly. If any odor persists, remove 
potential sources, or contact your dealer or an 
authorized service technician. 

P

ILOT 

L

IGHT


The Bari has a piezoelectric spark igniter (the black 
push button located next to the gas control valve 
behind the valve access door), which ignites the pilot 
light by means of a spark at the pilot light assembly.  


CAUTION:


DO


NOT


LIGHT


PILOT


OR


BURNER


BY


HAND! 

Never attempt to light the pilot or main burner by 
hand with a match or lighter. If, after repeated 
attempts, the pilot light fails to light using the 

piezoelectric ignitor, discontinue operation; turn off 
the gas to the gas control valve, and immediately 
contact qualified service personnel for assistance. 

P

REPARE 

F

OR 

L

IGHTING


Prepare for the lighting procedure by adjusting the 
thermostat (if equipped) to its lowest setting or OFF 
position. If the gas control knob is not in the OFF 
position, turn the knob fully clockwise to OFF. Locate 
the variable output control knob and turn it fully 
clockwise to the highest setting. 

Prior to lighting the unit for the first time, wait 5 
minutes to allow any residual gas within the unit to 
dissipate. Smell all around the appliance area for 
gas. Be sure to smell next to the floor because some 
gases (LP) are heavier than air and will settle on the 
floor. If you do not smell gas after this five-minute 
period, proceed with the lighting procedure. If you do 
smell gas, DO NOT proceed with the lighting 
procedure. Instead, 

immediately refer to the What 

to Do If You Smell Gas Warning, on the cover of 
this manual. 


NOTE:

 The valve control has an interlock 

device. After shutting off all gas flow, the pilot 
burner cannot be relit until the thermocouple has 
cooled, releasing the electromagnet (approx. 60 
seconds). The gas control knob is designed to 
operate by hand. Do not use any tools during 
this operation. Damaged knobs may result in 
serious injury. 

I

NITIAL 

A

DJUSTMENTS


Once the Bari is assembled, in place, and connected  
as described in the “Clearances To Combustibles”, 
“Venting Components & Configurations,” “Electrical 
Connections”, and “Gas Supply and Connections” 
sections of this manual, the unit is almost ready to 
light for the first time. Hearthstone tests each unit 
prior to shipment, so ignition should take place 
without failure. However, a number of small 
adjustments may be necessary to compensate for 
variations in gas pressure, altitude, and other factors 
particular to each installation. 

V

ARIABLE 

O

UTPUT 

C

ONTROL


The gas control valve is equipped with a variable 
output control. This control varies the rate of heat 
produced by the unit by varying the gas pressure to 
the TEK Burner. A combination of heat output and 
the thermostat setting affect the length of the burn 


20

Summary of Contents for hase-Bari 8180

Page 1: ...staller service agency or gas supplier must perform installation and service of this appliance In the Commonwealth of Massachusetts all installation of gas lines and gas fittings must be performed by...

Page 2: ...Hearthstone Quality Home Heating Products Inc Bari Model 8180 Intentionally Blank 2...

Page 3: ...eep your original receipt in a safe place as proof of purchase Serial Number Fuel type Natural Gas Liquid Propane Sold by Date of Purchase Address Phone E mail Website Installed by Date of Installatio...

Page 4: ...ION 12 VENT CONNECTION 12 RESTRICTOR PLATE 12 VENTING COMPONENTS CONFIGURATION 14 ELECTRICAL CONNECTIONS 16 GAS SUPPLY CONNECTIONS 17 FIRE LOG PLACEMENT 18 OPERATION 20 LIGHTING THE UNIT FOR THE FIRST...

Page 5: ...STRIKING OR SLAMMING SHUT REPLACEMENT OF THE GLASS PANEL SHOULD BE DONE BY A LICENSED OR QUALIFIED SERVICE PERSON NEVER BURN PAPER WOOD OR OTHER MATERIALS This gas heater is designed to burn natural g...

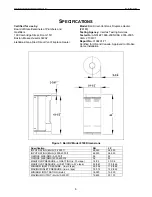
Page 6: ...No 3109401 T1 Certified for US and Canada Approved for Mobile Home Installation Figure 1 Bari DV Model 8180 Dimensions Specification NG LP INPUT RATING Btu hr 0 2000 ft 26 500 26 500 INPUT RATING Btu...

Page 7: ...he unit or venting system chimney immediately discontinue operation of the unit and contact qualified service personnel Clean the area around under and behind the unit on a regular basis to prevent th...

Page 8: ...D VENTING MANUFACTURERS The heater is approved for installation only with the venting components provided by manufactures listed on this page Simpson Dura Vent Inc P O Box 1510 Vacaville CA 95696 1510...

Page 9: ...EPENDENT LABORATORY TO ANSI AND CSA STANDARDS WILL PREVENT FIRE OR SPONTANEOUS COMBUSTION WE DO NOT CONTROL THE COMBUSTIBLE MATERIALS EXPOSED TO HEAT BY THIS PRODUCT THEREFORE AN ASSESSMENT MUST BE MA...

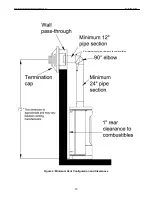
Page 10: ...Hearthstone Quality Home Heating Products Inc Bari Model 8180 2 minimum vent pipe clearance to combustibles Figure 4 Minimum Vent Configuration and Clearances 10...

Page 11: ...y recommend 12 inches particularly where strong winds prevail H Not to be installed within 15 feet 4 5m above a meter regulator assembly within 3 feet 91cm horizontally from the center line of the reg...

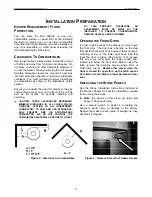
Page 12: ...ent configurations Controlling the draft also changes the aesthetics of the flame The restrictor plate consists of a rotating shutter in the flue connector This shutter is attached to a rod that protr...

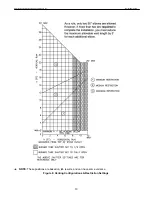
Page 13: ...Hearthstone Quality Home Heating Products Inc Bari Model 8180 NOTE These positions are based on lab results and can have some variance Figure 8 Venting Configurations Restriction Settings 13...

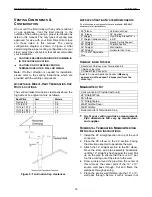
Page 14: ...tallations 90 0 Elbow Vertical Vent Cap 45 0 Elbow 36 Snorkel 6 Straight 9 Straight Simpson only Vinyl Siding Standoff 4 x 6 5 8 12 Straight Round Ceiling Support 24 Straight Thimble Covers 36 Straigh...

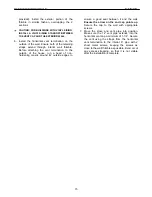
Page 15: ...ent termination to the outside of the house run a bead of non hardening mastic around its outside edges to ensure a good seal between it and the wall Ensure the arrow on the end cap points up Secure t...

Page 16: ...living space as the unit Since the transmitter is the device measuring the temperature you will want to keep it off the floor and away from any influences that may cause the temperature in the vicini...

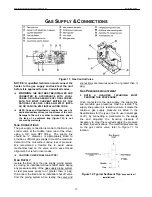
Page 17: ...of pressure We recommend a flexible line to avoid undue mechanical load on the valve and to ease thread alignment but refer to local codes CAUTION CHECK FUEL GAS TYPE GAS SUPPLY Isolate the Bari from...

Page 18: ...if subjected to rough or improper handling Exact positioning of the log set is required in order to obtain a pleasing flame pattern and efficient combustion Incorrect log placement may cause carbon bu...

Page 19: ...the seam 7 Sprinkle the charcoal embers over the burner ports only Ensure that you leave the ports open over the pilot and where the main burner ignites WARNING DO NOT PLACE ANY CHARCOAL EMBERS OR RO...

Page 20: ...mpts the pilot light fails to light using the piezoelectric ignitor discontinue operation turn off the gas to the gas control valve and immediately contact qualified service personnel for assistance P...

Page 21: ...he remote to ON Then set the desired temperature 9 Shut the gas control valve access door 10 If Remote was selected set remote to ON and set desired temperature setting Normally if Remote position was...

Page 22: ...the locking nut without turning the screw The air shutter is factory set and only a qualified gas technician should make adjustments Note Very little movement is needed to substantially change the bu...

Page 23: ...o reach temperature and for the flame pattern to stabilize The flame pattern should be similar to the one shown in Figure 14 There are several guidelines to aid in determining if the flame pattern is...

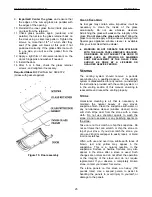
Page 24: ...e large enough to engulf the thermopile and thermocouple as shown in Figure 13 NOTE Do not operate the unit for more than 1 2 minutes without the log set in place Turn the unit off by setting the ther...

Page 25: ...BUSE SUCH AS STRIKING OR SLAMMING SHUT REPLACEMENT OF THE GLASS PANEL SHOULD BE DONE BY A LICENSED OR QUALIFIED SERVICE PERSON VENTING The venting system should receive a periodic examination by a qua...

Page 26: ...e screws not provided screw the steel plate to the framing in the wall Once the screws are in place and the stove is in its proper location tighten the two screws that hold the two plates together HIG...

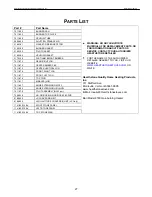
Page 27: ...404 KNOB EXTENSION HIGH LOW 7211 370 PILOT ASSEMBLY NG 3 port 7200 338 NG ORIFICE MAIN ORIFICE 38 SPUD 91 56800 LP CONVERSION KIT 91 56803 HIGH ALTITUDE CONVERSION KIT LP Only 1141 820 149 V RIGHT ST...

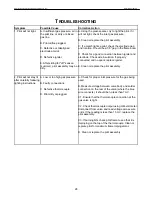
Page 28: ...on If properly connected and no spark replace igniter E Clean or replace the pilot assembly 2 Pilot will not stay lit after carefully following lighting instructions A Low or too high gas pressure B F...

Page 29: ...replace Note do not use any metal cleaning device as this may damage the orifice 4 Pilot and burner come on but go out after some warm up A Inconsistent or insufficient flame on thermopile B Insuffic...

Page 30: ...ns B3 Clear obstructions C If gas pressures are correct and the flames stay the same adjust the air shutter for a proper burn 9 Burner flashback Air gas mixture ignites inside the burner near the orif...

Page 31: ...sed If the vent air int ake system is disasse mbled for any r easo n reinstal l per theinstructions prov ided with the in itial instructions This ven ted gasfireplace he ater is not for use wi th air...

Page 32: ...Hearthstone Quality Home Heating Products Inc BARI Model 8180 32 NOTES...

Reviews: