Hearthstone Quality Home Heating Products, Inc.
BARI Model #8180
R
OUTINE
M
AINTENANCE AND
C
ARE
The Bari requires minimal routine maintenance and
care. Ensure the Bari is cool and off when cleaning,
or servicing. Clean the unit once a year. Have a
qualified service person inspect the venting system
to ensure that it is clean, free of obstruction, safe,
and in good working order. If service or maintenance
is required, qualified service personnel should
perform it.
WARNING: DO NOT SUBSTITUTE MATERIALS.
FOR REPLACEMENT PARTS, OR FOR
INFORMATION ABOUT PARTS OR SERVICE,
CONTACT YOUR LOCAL HEARTHSTONE
DEALER.
C
LEANING
WARNING: DO NOT CLEAN THE UNIT WHEN HOT
The unit should receive regular cleaning on, under,
and around the stove to prevent the buildup of dust
and lint. Clean the exterior surfaces of the unit using
soap, water, and a soft cloth.
Do not
use abrasive or
chemical cleaners and take care not to scratch the
glass or finish when cleaning the unit. The use of
chemical wax based cleaners or polishes are not
recommended due to the potential for discoloration
of the stones, castings or finish when the residues of
the cleaners or polishes are exposed to heat.
Excessive buildup of dust, spider webs, or room air
contamination may cause odors when the stove is
hot.
F
IREBOX
,
P
ILOT
,
&
B
URNER
A
SSEMBLY
The firebox requires periodic cleaning to prevent the
accumulation of dust, lint, and other debris. To clean
the firebox, set the ON/OFF/REMOTE switch to the
“OFF” position, and turn off the gas to the gas
control valve. When the unit is cool, open the front
door. Carefully remove the decorative log set,
taking care not to damage the logs or the stove’s
finish. Clean the firebox and burner, and carefully
vacuum the entire surface of the log set. Thoroughly
vacuum the ports (holes) along the top of the burner,
and the pilot assembly.
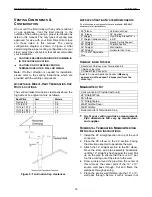
With the decorative logs out of the firebox. Briefly
light the unit. Check to ensure a proper flame is
burning from each burner port. The pilot flame must
be large enough to engulf the thermopile and
thermocouple as shown in
Figure 13.
NOTE: Do not operate the unit for more than
1-2 minutes without the log set in place. Turn
the unit off by setting the thermostat to
“OFF”, and turning the gas control valve off.
Allow the unit to cool.
Check and clean any burner ports that are not
burning, or not burning properly. Clean burner ports
using a soft brush or vacuum cleaner. If the pilot
flame height needs adjustment, it should be adjusted
by qualified service personnel as described on
page
22
.
Complete the cleaning procedure by carefully
placing the log set back within the firebox (
see page
18
). Re-install the glass assembly and front cast.
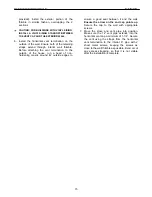
Turn on the gas, light the unit and check for proper
operation. Flame patterns should look similar to the
flames in
Figure 14
. Regularly check to ensure the
area around the Bari is kept free from combustible
materials, gasoline, and other flammable vapors and
liquids. Check that the flow of combustion and
ventilation air is not obstructed.
D
OOR
R
EMOVAL
P
ROCEDURE
:
1. Open the door and remove the push nut from
the upper hinge pin, and remove the pin.
2. Tilt the top of the door outward, and then lift the
door up off the lower pin. The door weighs 81
pounds (37 kg) – so use a helper if necessary.
3. Ensure the brass washer remains in place on
the lower pin.
4. Place the door face down on a padded work
surface. Use two rolled up towels, or similar,
under the door to stabilize the curved door
during maintenance.
5. When reinstalling the door, use a new push nut
on the upper hinge pin.
G
LASS REPLACEMENT PROCEDURES
:
1. Follow the instructions included with the
replacement glass kit.
2. Remove the door (see door removal procedure
above).
3. Remove the screws from the glass retainer (use
penetrating oil if necessary) – lift the retainer off
the glass. Set aside for reinstallation.
4. Remove the inner glass frame from around the
glass. Set aside for reinstallation.
5. Carefully lift the damaged glass out of the door
and discard.
6. Remove any remaining glass and old gasket
material.
7. Clean the screw holes and place a small amount
of anti-seize compound in each one.
8. Place the gasketed new glass onto the door.
24

