background image


25 

07044-2 


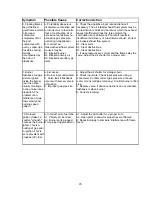
Symptom 

Possible Cause 

Corrective Action 

3. Pilot burning, no 
gas to main burner, 
valve knob in the 
"ON" position, 
thermostat and/or 
on/off/t'stat switch 
in the "ON" 
position. 

A. Thermostat switch or 
wires defective. 

A. Check thermostat/wiring for proper connections. 
Place jumper wire across terminals at thermostat. If 
burner comes on, replace defective thermostat. If not 
OK, place jumper across thermostat wires at gas valve. 
If burner comes on, tighten connections, or replace 
faulty wires. 


B. Thermopile may not be 
generating sufficient voltage.

B. Check thermopile output, using a milli-volt meter. If 
the optional on/off kit has not been installed, take the 
readings across generator terminals of the gas valve. 
TPTH and TP). With the on/off kit, take the readings 
across TH and Terminal block (which corresponds to #3 
on the switch). Milli-volt reading should be greater than 
325 mV. If not, replace the pilot assembly. If the meter 
reading is OK, but the burner does not come on, replace 
the gas valve. 


C. Plugged burner orifice. 

C. Remove and check burner orifice, clean or replace. 
Note: do not use any metal cleaning device, as this may 
damage the orifice. 

4. Pilot and burner 
come on, but go 
out after some 
warm-up. 

A. Inconsistent, of 
insufficient flame on 
thermopile. 

A. Adjust pilot flame size and assure that the flame is 
aimed directly at the thermopile. 


B. Insufficient gas pressure. B. Check line pressure to ensure that the correct inlet 

pressure is present for the type of gas being used. If 
propane pressure is inconsistent, check for water 
condensation at the regulator. 

5. Frequent pilot 
outage problem. 

A. Pilot flame may be too 
low or blowing, (high), 
causing the pilot safety to 
drop out. 

A. Clean and/or adjust the pilot flame for maximum 
impingement on the thermopile and thermocouple. 

6. Glass fogs 

A. A normal result of gas 
combustion. 

A. After the heater has warmed up, the glass should 
clear. 

7. Blue Flames 

A. A normal result during the 
first 20 minutes. 

A. Flames should begin to turn more yellowish after 20 
minutes of burning. 


B. If the blue color stays; adjust the air shutter for a 
proper burn. 


Summary of Contents for Santa Fe 8761

Page 1: ...e agency or gas supplier must perform installation and service In the Commonwealth of Massachusetts all installation of gas lines and gas fitting shall only be done by a licensed gas fitter or license...

Page 2: ...y claims if necessary Keep your original receipt in a safe place as proof of purchase Serial Number Fuel type check one Natural Gas Liquid Propane Sold by Phone Date of Purchase Installed by Phone Dat...

Page 3: ...ore use and at least annually ALWAYS VENT TO THE OUTSIDE Never vent the gas heater to other rooms or buildings Do not connect this gas appliance to a chimney flue serving a separate solid fuel burning...

Page 4: ...fic and away from furniture draperies clothing and other flammable materials Alert children and adults to the hazards of high surface temperatures and that they must stay away to avoid burns to skin o...

Page 5: ...Shut the gas control valve access door 10 Plug in the blower accessory if so equipped 11 Set thermostat to ON and set the desired temperature setting Normally if the T STAT position was selected the...

Page 6: ...the information sticker must be filled out by the installer and adhered to the appliance at the same time of conversion Cet appareil est equip pour des altitudes compries entre 0 et 2000 pieds 0 610...

Page 7: ...hutoff valve Sediment trap page 16 Tee joint Pipe wrench Phillips head screwdriver Other parts as required by local code Safety Glasses Gloves AIR SUPPLY The Santa Fe Direct vent does not require addi...

Page 8: ...ensions CLEARANCE TO COMBUSTIBLES 4 MIN 2 MIN 1 MIN Figure 3 Rear and side wall clearances The corner clearance for the Santa Fe is 2 to be measured from the edge of the top castings to the adjacent w...

Page 9: ...Input rating Btu hr 0 2000 ft 35 000 35 000 Input rating Btu hr 2000 4500 ft 35 000 33 300 Orifice size DMS 0 2000 ft 32 51 Orifice size DMS 2000 4500 ft 32 52 Man press LO setting in w c kPa 1 2 0 3...

Page 10: ...on this page and Simpson Dura Vent Direct Vent GS AmeriVent Direct EXCELDirect or Secure Vent systems Use the following instructions along with the pipe manufacturer s instructions to complete the ins...

Page 11: ...Hearthstone Quality Home Heating Products Inc SANTA FE Model 8761 10 Approved Possible Vent TERMINATION locations...

Page 12: ...ked Install the 90 elbow in similar fashion NOTE BE SURE THERE IS NO WIRING OR PLUMBING IN THE CHOSEN WALL LOCATION Move the stove and pipe assembly back until the 90 elbow is flush to the wall The 2...

Page 13: ...w and spin the locator found on the rear left side of the stove Refer to figure 7 Figure 7 II FIREPLACE VENTING INSTALLATIONS 40 maximum system height without offsets 14 maximum offset refer to Figure...

Page 14: ...Hearthstone Quality Home Heating Products Inc SANTA FE Model 8761 13 III VERTICAL TERMINATION VENTING CONFIGURATIONS 40 maximum system height without offsets Figure 8...

Page 15: ...he termination must fall within the area outlined by the shaded area shown in Figure 7 Use a vinyl siding Stand off when installing against vinyl siding Horizontal sections require a 1 4 rise every 12...

Page 16: ...This appliance is only for use with the type of gas indicated on the rating plate This appliance is not convertible for use with other gases unless a certified kit is used available through your loca...

Page 17: ...nifold gas pressure must be tested The gas control valve has built in pressure taps for test gauge connections The supply line pressure must be tested to ensure it meets the minimum pressure for the t...

Page 18: ...ast a long time however they will break easily if subjected to rough or improper handling Exact positioning of the log set is required in order to obtain a pleasing flame pattern and efficient combust...

Page 19: ...careful not to chip the enamel when fastening the door REMOVAL OF LOG SET Caution Log set and charcoal embers will retain heat and can be very hot if previously lit Allow at least 1 hour after pilot...

Page 20: ...ol knob Never use tools WARNING The control has an interlock device If the stove has been lit it will not relight immediately After shutting off all gas flow the pilot burner cannot be relit until the...

Page 21: ...accumulation of dust lint and other debris free of obstruction safe and in good working condition To clean the firebox set the switch to the OFF position and turn off the gas at the gas control valve...

Page 22: ...WIRING INSTRUCTIONS Caution Label all wires prior to disconnection when servicing controls Wiring errors can cause improper and dangerous operation Verify proper operation after servicing Attention A...

Page 23: ...CLIP 2310 850 HEAT EXCHANGER BASE 7200 351 ORIFICE BURNER HOOD LP 51 SPUD 2310 860 HEAT EXCHANGER 7211 390 3 WAY PILOT HOOD W CLIP 2310 240 EXHAUST BAFFLE 7211 009 PILOT GAS TUBE 3030 028 GLASS 17 15...

Page 24: ...23 07044 2 RATING LABEL...

Page 25: ...mmer pilot assembly may be dirty E Clean or replace the pilot assembly 2 Pilot will not stay lit after carefully following lighting instructions A Low or too high gas pressure A Check for proper inlet...

Page 26: ...ut the burner does not come on replace the gas valve C Plugged burner orifice C Remove and check burner orifice clean or replace Note do not use any metal cleaning device as this may damage the orific...

Page 27: ...uctions C If gas pressures are correct and the flames stay the same adjust the air shutter for a proper burn 9 Burner flashback Air gas mixture ignites inside the burner near the orifice usually creat...

Page 28: ...anship Firebox and firebox baffle against breakage cracking or burn through Convective heat exchanger against breakage cracking or burn through Burners air shutters and orifices against breakage crack...

Page 29: ...o comply with Hearthstone s or a Dealer s request to ship the part or the Stove to Hearthstone or a Dealer as the case may be THE WARRANTIES CONTAINED IN THIS DOCUMENT ARE EXCLUSIVE AND ARE GIVEN BY H...

Page 30: ...r after the Purchase Date Hearthstone will pay for warranty labor performed by a Dealer at Hearthstone s published labor rates in effect at the time the labor is performed Thereafter the Original Purc...

Reviews: