


HearthStone
Quality Home Heating Products
MODEL Sterling “G” Direct-Vent
21
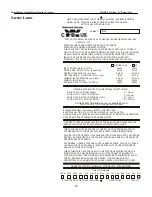
Lighting Instructions
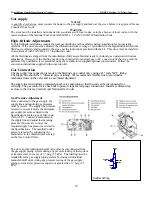
The gas control knob is located in front of the stove-inside right, front leg.
1. S
TOP
! Read the safety information above.
2. Set the thermostat to O
FF
position.
3. Unplug the fan accessory, if so equipped.
4. Push in and turn gas control knob clockwise to O
FF
.
5. Wait (5) five minutes to clear out any gas. If you then smell gas, S
TOP
! Smell all around the appliance area
for gas. Be sure to smell next to the floor because some gases are heavier than air and will settle on the floor.
If you smell gas immediately follow the
What To Do If You Smell Gas
warning. If you do not smell gas, go to
the next step.
6. Turn knob on gas control counterclockwise to "P
ILOT
".
7. Push in control knob all the way and hold in. Immediately light the pilot with the gas lighter push in and
"click"
the red piezoelectric spark ignitor button. Continue to hold the control knob in for about 20 seconds
after the pilot is lit. Release knob and it will pop back out. Pilot should remain lit. If the pilot goes out,
repeat the operation.
!
If knob does not pop out when released, stop and immediately call your service technician or
gas supplier.
!
If the pilot will not stay lit after several tries, turn the gas control knob "O
FF
" and call your
service technician or gas supplier.
8. Turn gas control knob counterclockwise to "O
N
".
9. Shut the gas control valve access door.
10. Plug in fan accessory, if so equipped. Select
“ON”
of the on/off/T-stat switch, or if
“T-stat”
is selected:
11. Set thermostat to desired setting.
To Turn Off Gas To Appliance
1. Set thermostat to
OFF
position, or select the
“OFF”
position of the on/off/T-stat switch
2. Turn off all electric power to the appliance if service is to be performed. Unplug accessory fan (if equipped).
3. If shutting the unit for the non-heating season, turn gas control knob fully clockwise to "O
FF
". Do not force.
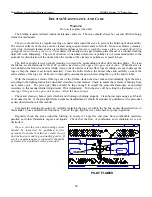
As a supplement to the above instructions: When pressing/clicking the red piezoelectric spark ignition button to light
the pilot light, watch through the glass front door of the unit. Click the red ignitor button until a flame is visible at the
pilot light and once lit, continue to press on the gas control knob for another 20 seconds, then release. Ascertain that
the pilot light is still lit by looking through the front door. If lit, then turn the gas control knob fully counterclockwise
to the O
N
position. If the pilot light failed to light or if it went out due to a premature release of the gas control knob
while pressed in the P
ILOT
position, wait 60 seconds for interlock to release, then repeat the lighting process as
described above.
W
ARNING
The control has an interlock device. After shutting off all gas flow, the pilot burner cannot be relit until the
thermocouple has cooled, allowing the electromagnet to be released (Approx. 60 Sec.). The gas control knob is
designed to be operated by hand. Do not use any tools during this operation. Damaged knobs may result in serious
injury.
Once the pilot light has been lit, the main burners are lit moving the thermostat to a high setting so that it "
calls
" for
heat (
i.e. turns the unit on
). The main burners should light immediately. Note that the on/off cycling of the main
burners are controlled by the thermostat but that the pilot light remains lit regardless of the thermostat setting. To turn
the pilot light off, turn the gas control valve fully clockwise to the O
FF
position.
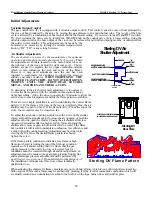
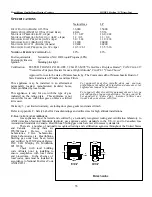
Once the unit is lit, observe the flame pattern and adjust as necessary per the following instructions while keeping in
mind the off-gassing and break-in warnings listed above.


