background image

Hearthstone Quality Home Heating Products, Inc.


Stowe DX Model 8322  


36 

Routine Maintenance and Care

Your  Stowe  requires  minimal  routine  maintenance 
and  care.  Ensure  the  unit  is  cool  and  off  when 
cleaning, or servicing. 


WARNING:


DO NOT SUBSTITUTE MATERIALS.


For replacement parts, or for information about parts 
or service, contact your local Hearthstone dealer. 

Any  safety  screen  or  guard  removed  for 
servicing an appliance must be replaced prior to 
operating  the  appliance.   

Tout  écran  ou 

protecteur  retiré  pour  permettre  l’entretien  de 
l’appareil  doit  être  remis  en  place  avant  de 
mettre l’appareil en marche.


Cleaning 


WARNING: DO NOT CLEAN THE UNIT WHEN HOT.  


The  unit  should  receive  regular  cleaning  on,  under, 
and  around  the  stove  to  prevent the  buildup  of  dust 
and  lint.  The  exterior  surfaces  of  the  unit  can  be 
cleaned  using  soap,  water,  and  a  soft  cloth.  Do  not 
use abrasive or chemical cleaners and take care not 
to scratch the glass or enamel finish (if so equipped) 
when  cleaning  the  unit.  The  use  of  chemical  wax 
based  cleaners  or  polishes  are  not  recommended 
due to the potential for discoloration of the castings, 
or  enamel  when  the  residue  of  the  cleaners  or 
polishes  is  exposed  to  heat.  Excessive  buildup  of 
dust,  spider  webs,  or  room  air  contamination  may 
cause odors when the stove is hot.  

Monthly 

(or as needed)

Glass Cleaning 

As  fuel  gas  may  contain  some  impurities;  it  will  be 
necessary  to  clean  the  inside  of  the  glass 
occasionally.  Do  not  use  abrasive  cleaners. 
Scratching  the  glass  will  weaken  the  integrity  of  the 
glass. 

Do not clean the glass when hot!

 Allow the 

glass to cool and apply a mild window cleaning fluid. 
Special  gas  appliance  window  cleaner  is  available 
from your local Hearthstone dealer. 


WARNING:  DO  NOT  OPERATE  THIS  APPLIANCE 
WITH  THE  GLASS  PANEL  REMOVED,  CRACKED, 
OR  BROKEN.  DO  NOT  SUBJECT  THE  GLASS  OR 
ITS  FRAME  TO  ABUSE,  SUCH  AS  STRIKING  OR 
BENDING.  REPLACEMENT  OF  THE  GLASS 
PANEL  SHOULD  BE  DONE  BY  A  LICENSED  OR 
QUALIFIED SERVICE PERSON.  

NE PAS UTILISER 

L’APPAREIL  SI  LE  PANNEAU  FRONTAL  EN 
VERRE N’EST PAS EN PLACE, EST CRAQUÉ  OU 

BRISÉ. 

CONFIEZ 

LE 

REMPLACEMENT 

DU 

PANNEAU À UN TECHNICIEN AGRÉÉ. 


NOTE: 

If the venting system is disassembled for any 

reason, re-install per the instructions provided in the 
venting section of this manual. 

Annually: 

Clean Firebox, Pilot, & Burner Assembly 

The firebox requires periodic cleaning to prevent the 
accumulation of dust, lint, and other debris. To clean 
the firebox

, set the switch to the “OFF” position, and 

turn off the gas supply to the valve. When the unit is 
cool, remove the front panel and glass (see page 16 
for  Firebox  Access  instructions)  and  carefully 
remove  the  decorative  ceramic  log  set,  taking  care 
not to damage the logs or chip the enamel cast iron. 
Remove all ember material. Clean the firebox baffle, 
ceramic  burner,  and  carefully  vacuum  the  entire 
surface  of  the  log  set  with  a  soft  brush  attachment. 
Thoroughly  vacuum  the  ports  (holes)  along  the  top 
of the burner, and the pilot assembly. 

With  the  decorative  ceramic  logs  out  of  the  firebox, 
reseal the firebox and briefly light the unit according 
to  the  lighting  instructions  described  on  page  32. 
Check to ensure a proper flame is burning from each 
burner  port.  The  pilot  flame  should  be  burning 
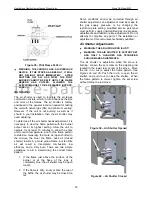
properly as shown in Figure 38.  


NOTE: Do not operate the unit for more than 
1-2 minutes without the log set in place. Turn 
the  unit  off  by  setting  the  switch  to 

“OFF”, 

and  turning  off  the  gas  supply  to  the  valve. 
Allow the unit to cool. 

Check  and  clean  any  burner  ports  that  are  not 
burning, or not burning properly. Clean  burner ports 
using  a  soft  brush  or  vacuum  cleaner.  If  the  pilot 
flame height needs adjustment, it should be adjusted 
by qualified service personnel as described on page 
32. 

Complete  the  cleaning  procedure  by  carefully 
placing the log set within the firebox as described on 
page 28. Reattach the glass and front panel to seal 
the firebox. Turn on the gas, light the unit and check 
for  proper  operation.  Flame  patterns  should  look 
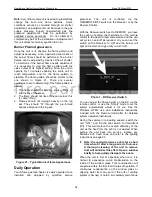
similar to the flames in Figure 41. Regularly check to 
ensure  the  area  around  the  Stowe  is  kept  free  from 
combustible 

materials, 

gasoline, 

and 

other 

flammable vapors and liquids. Check that the flow of 
combustion and ventilation air is not obstructed.  

f i r e - p a r t s . c o m

Summary of Contents for Stowe DX 8322

Page 1: ...A qualified installer service agency or gas supplier must perform installation and service of this appliance In the Commonwealth of Massachusetts all installation of gas lines and gas fittings must b...

Page 2: ...Intentionally Blank fire parts com...

Page 3: ...our original receipt in a safe place as proof of purchase Serial Number Fuel type Natural Gas Liquid Propane Sold by Date of Purchase Address Phone E mail Website Installed by Date of Installation Add...

Page 4: ...rotection 17 VENTING INFORMATION 19 Venting Components 19 Minimum Venting Installation Instructions 22 ELECTRICAL SYSTEM INFORMATION 25 GAS SUPPLY CONNECTIONS 27 Gas Connections 28 HEAT WAVE BAFFLE LO...

Page 5: ...ter draft in colder climates 7 Battery backup for functionality during power outages Control System Features 1 Proflame GTMF System a Thermostatic Remote Control i Six 6 flame levels adjustable via th...

Page 6: ...and flammable material Vent Only to the Outside Never vent the gas heater to other rooms or buildings Service Caution If you believe your Stowe is not in any way performing properly immediately disco...

Page 7: ...U UN PO LE INSTALLEZ UNE BARRI RE DE S CURIT CETTE MESURE EMP CHERA LES TOUT PETITS LES JEUNES ENFANTS ET TOUTE AUTRE PERSONNE RISQUE D AVOIR ACC S LA PI CE ET AUX SURFACES CHAUDES CLOTHING OR OTHER F...

Page 8: ...Hearthstone Quality Home Heating Products Inc Stowe DX Model 8322 8 fire parts com...

Page 9: ...20V 60Hz power outlets The Fan outlet controls the fan speed through six levels and the Auxiliary outlet either on or off There is also an additional constantly powered 120V 60Hz outlet The system has...

Page 10: ...perly grounded three prong receptacle Do not cut or remove the grounding prong from the plug Proflame DFC Ignition Module This is the command center for the appliance The DFC Module allows the pilot t...

Page 11: ...to CPI regardless of the position of the receiver switch Intermittent Pilot IPI Using the IPI mode is a more efficient use of fuel as the pilot only ignites when the thermostat calls for heat Figure 2...

Page 12: ...both Thermostat Key This is the function that sets either the Manual or Smart thermostatic control UP Down Arrow Key Adjusts the thermostat temperature range flame settings and fan speed Mode Key Tog...

Page 13: ...umbers Gasfitters 100 Cambridge Street Room 1511 Boston MA 02202 www mass gov Figure 6 Model 8322 Dimensions Specification NG LP INPUT RATING Btu hr 0 2000 ft 25 000 25 000 INPUT RATING Btu hr 2000 45...

Page 14: ...s une maison pr fabriqu e U seulement ou mobile et doit tre install selon les instructions du fabricant et conform ment la norme Manufactured Home Construction and Safety Standard Title 24 CFR Part 32...

Page 15: ...fire logs burner and Heat Wave baffle Use care when handling these parts as they are fragile and subject to damage and breakage if handled roughly See the firebox access instructions on page 16 Unpac...

Page 16: ...ace Figure 7 Grille Removal Figure 8 Top Removal 2 Release the front panel by disengaging the two spring clips at its top tilt the front toward you slightly and lift it up out of the bottom slots and...

Page 17: ...or a rear exit through the wall vent pipe Ensure you consider the need for access to the gas control valve access door on the front of the unit as well as full access for periodic cleaning and servici...

Page 18: ...Products Inc Stowe DX Model 8322 18 Figure 13 Snorkel Termination Mantle Clearance The corner clearance for the Stowe 8322 is 4 measured from the edge of the top castings to the adjacent wall Figure 1...

Page 19: ...NING IN HIGH WIND AREAS AND PARTICULARLY COLD CLIMATES IT MAY BE NECESSARY TO HEAT YOUR VENT SYSTEM WITH THE PILOT PRIOR TO IGNITION OF THE MAIN BURNER IN THESE INSTANCES IT IS RECOMMENDED THAT YOU LE...

Page 20: ...9 CSA 2 33 M99 test methods this installation has been tested and approved by Intertek Testing Services with an appropriate test The code authority having jurisdiction must be consulted prior to proce...

Page 21: ...strongly recommend 12 inches particularly where strong winds prevail H Not to be installed within 15 feet 4 5m above a meter regulator assembly within 3 feet 91cm horizontally from the center line of...

Page 22: ...nsure both of the retaining straps extend through interior wall thimble Before attaching the vent termination to the outside of the house run a bead of non hardening mastic around its outside edges so...

Page 23: ...sition until you install the Heat Wave baffle then set to the fully opened position This ensures proper flames for a wide variety of vent configurations and efficiency The restrictor plate consists of...

Page 24: ...Hearthstone Quality Home Heating Products Inc Stowe DX Model 8322 24 Figure 21 Venting Termination Diagram fire parts com...

Page 25: ...TIEN DES COMMANDES TIQUETEZ TOUS LES FILS AVANT LE D BRANCHEMENT DES ERREURS DE C BLAGE PEUVENT ENTRA UN FONCTIONNEMENT INADEQUATE ET DANGEREUX This appliance is equipped with a three prong grounding...

Page 26: ...Hearthstone Quality Home Heating Products Inc Stowe DX Model 8322 26 Figure 23 Proflame GTMF Component Specifications fire parts com...

Page 27: ...E UNIT MUST BE INSTALLED AND CONNECTED IN ACCORDANCE WITH LOCAL CODES OR IN THE ABSENCE OF LOCAL CODES WITH THE MOST CURRENT EDITION OF THE NATIONAL FUEL GAS CODE ANSI Z223 1 NFPA 54 OR CAN CGA B149 I...

Page 28: ...cted to the gas supply the supply line and manifold gas pressures must be tested The supply line pressure is tested to ensure it meets the minimum gas supply pressure as listed in the specifications f...

Page 29: ...t The ceramic logs will last a long time however they will break if subjected to rough or improper handling Exact positioning of the log set is required in order to obtain a pleasing flame pattern and...

Page 30: ...too tight 6 You are now ready to adjust the restrictor plate and install the log set Installation of the Log Set Refer to the following images in this section for log set assembly 1 Remove the packag...

Page 31: ...urfaces for additional glow as desired do not block burner ports Figure 37 Platinum Bright Embers Enlarged to Show Detail Removal of Log Set CAUTION THE LOG SET BURNER AND EMBERS RETAIN HEAT AND CAN B...

Page 32: ...and assembly of the unit Open windows to vent the room if necessary The off gassing and fumes will subside after the first 10 to 20 minutes of operation Odors and Impurities A heater of this type may...

Page 33: ...in incomplete combustion low efficiency and a dirty burn There are two simple guidelines to aid in determining the correct flame pattern 1 If the flame just above the surface of the burner or at the b...

Page 34: ...is easily operated once installed and adjusted by qualified service personnel The unit is controlled via the ON REMOTE OFF switch on the Receiver or by the Remote Control With the Receiver switch set...

Page 35: ...tact qualified service personnel To Turn off Gas and Shut Down the Appliance 1 Close the shut off in the gas supply to the valve 2 Set the thermostat to the OFF position or turn the ON OFF T STAT or O...

Page 36: ...AL EN VERRE N EST PAS EN PLACE EST CRAQU OU BRIS CONFIEZ LE REMPLACEMENT DU PANNEAU UN TECHNICIEN AGR NOTE If the venting system is disassembled for any reason re install per the instructions provided...

Page 37: ...m carpeting bedding material etc It is imperative that control compartments burners and circulating air passageways of the appliance be kept clean L installation et la r paration devrait tre confi es...

Page 38: ...27 X3 8 COMP 3160 107 GASKET REAR ORIFICE PLATE 7211 101 DFC PROFLAME CONTROL BOARD 3160 150 GASKET HEAT EXCHANGER 4 x14 5 7211 102 WIRE HARNESS DFC 3160 152 GASKET PILOT 1 75 x3 ADHESIVE BACK 7211 1...

Page 39: ...ssure B Faulty connections C Pilot dirty or plugged A Check for proper inlet pressure for the fuel gas in use B Check connections on the valve C Clean or replace the pilot assembly 3 Pilot burning no...

Page 40: ...system may be too restrictive or blocked the rate at which the exhaust leaves draft determines the rate at which the combustion air is delivered Poor draft results in insufficient air delivery or a re...

Page 41: ...Hearthstone Quality Home Heating Products Inc Stowe DX Model 8322 41 Rating Label fire parts com...

Reviews: