Section 5-3
21
MLSM2003-01-03
Procedure 5
- Timer Programming
Step 1: For oven to operate, time
of day must be set in timer.
Step 2: Press
clock symbol
Step 3: Press increase or
decrease symbols to select
time
Step 4: Press
start symbol to
set
Note: Pressing twice the clock
symbol toggles time of day
between 0-12 hrs and 0-24
hrs
®
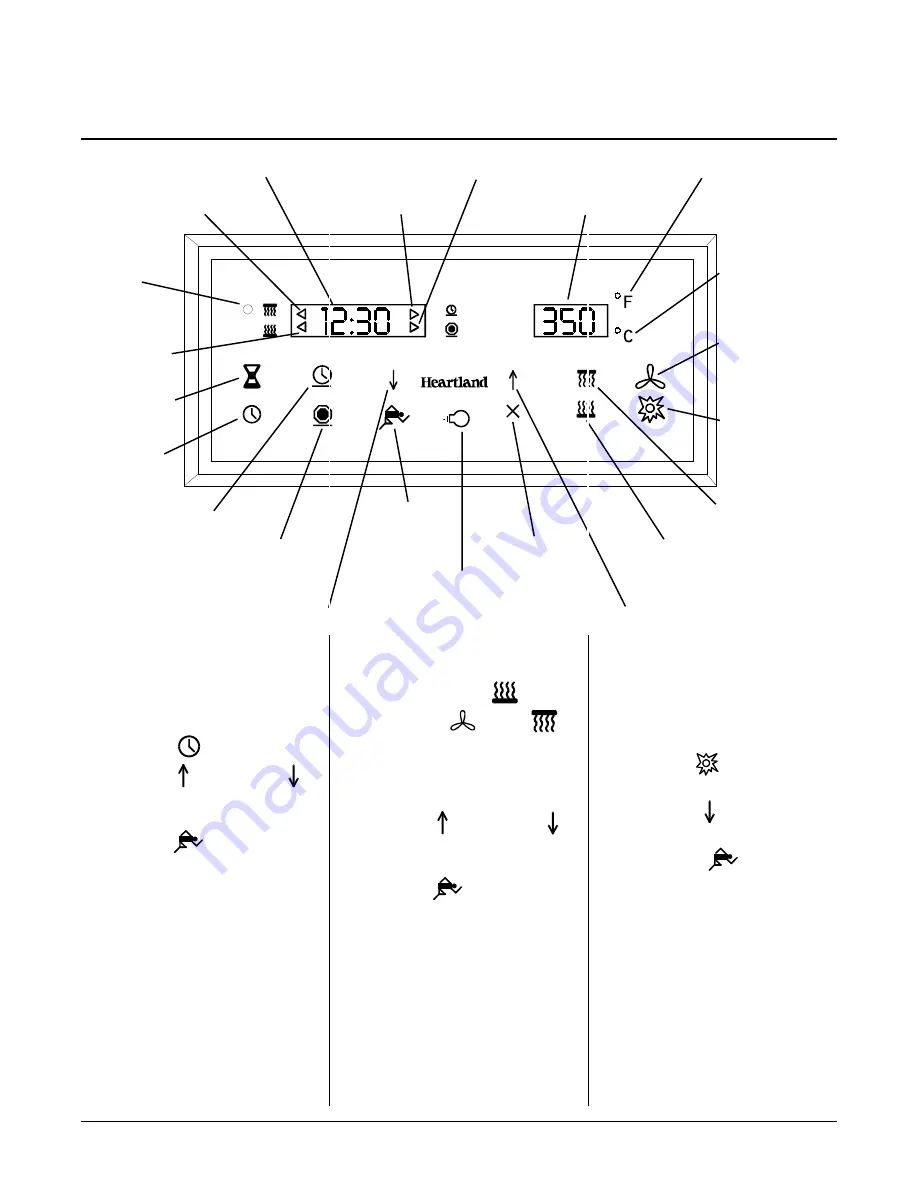
convection broil
indicator
broil indicator
time/timer display
start time indicator
stop time indicator
temperature display
fahrenheit indicator
celsius
indicator
convection button
/indicator
self clean button
/indicator
broil button
bake button
cancel button
oven light button
start button
stop time button
cook time button
clock button
minute minder
button
bake indicator
temperature / time count up button
temperature / time count down button
Step 5: To set cooking, press
desired function (bake
,
convection bake
or broil
).
Note: automatically sets to 325F for
bake and convection bake and to
550F for broil.
Step 6: Press increase or
decrease symbols to select
time
Step 7: Press
start symbol to
start.
Note: To toggle between Fahrenheit
(F) and Celcius (C), press
cooking symbol twice in a
row.
Self Clean Programming: all
cookware, racks, and rack supports
to be removed from oven during
self clean cycle to prevent them
from becoming dull and blue-gray.
Step 8: Press
self clean
symbol (automatically set for 3 hrs)
Step 9: Press decrease
cleaning time.
Step 10: Press
start symbol
to begin
self clean.
Note: A thermostatically controlled
cooling fan will start shortly
after the self clean cycle is
programmed (once the door
is locked). The fan will
automatically shut off when
the self clean cycle is
finished and the unit is
sufficiently cool
Summary of Contents for 3520
Page 4: ...4 MLSM2003 01 03 PAGE LEFT BLANK ...
Page 6: ...6 MLSM2003 01 03 PAGE LEFT BLANK ...
Page 10: ...Section 3 10 MLSM2003 01 03 PAGE LEFT BLANK ...
Page 57: ...Section 6 57 MLSM2003 01 03 Wiring Diagrams Models 3520 3525 ...
Page 58: ...Section 6 58 MLSM2003 01 03 Wiring Diagrams Models 3620 3625 ...

