Section 5-3
50
MLSM2003-01-03
Splashback Kit Replacement:
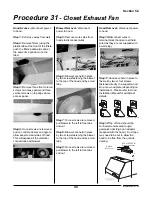
Step 13:Pull stove away from wall
Step 14:Remove support racks by
simply pressing on bottom metal
clips to loosen
Step 15:Remove screws holding
main splashback to wall near the
bottom
Step 16:Remove two upper screws
holding splashback to wood
mounting strip.
Step 17:If needed, remove 7”
extension panel
Step 18:If needed, remove wood
mounting strip
Procedure 31
- Closet Exhaust Fan
7 ” H igh
top e xte nsion
CL
H oo d
Summary of Contents for 3520
Page 4: ...4 MLSM2003 01 03 PAGE LEFT BLANK ...
Page 6: ...6 MLSM2003 01 03 PAGE LEFT BLANK ...
Page 10: ...Section 3 10 MLSM2003 01 03 PAGE LEFT BLANK ...
Page 57: ...Section 6 57 MLSM2003 01 03 Wiring Diagrams Models 3520 3525 ...
Page 58: ...Section 6 58 MLSM2003 01 03 Wiring Diagrams Models 3620 3625 ...

