Page 58
4/20/11
Heat & Glo • NorthStar EPA Fireplace • 480-1081E
TOOLS NEEDED:
Powered drill with #2 Phillips head bit; caulk-
ing gun.
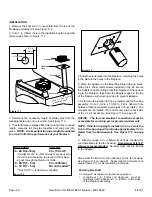
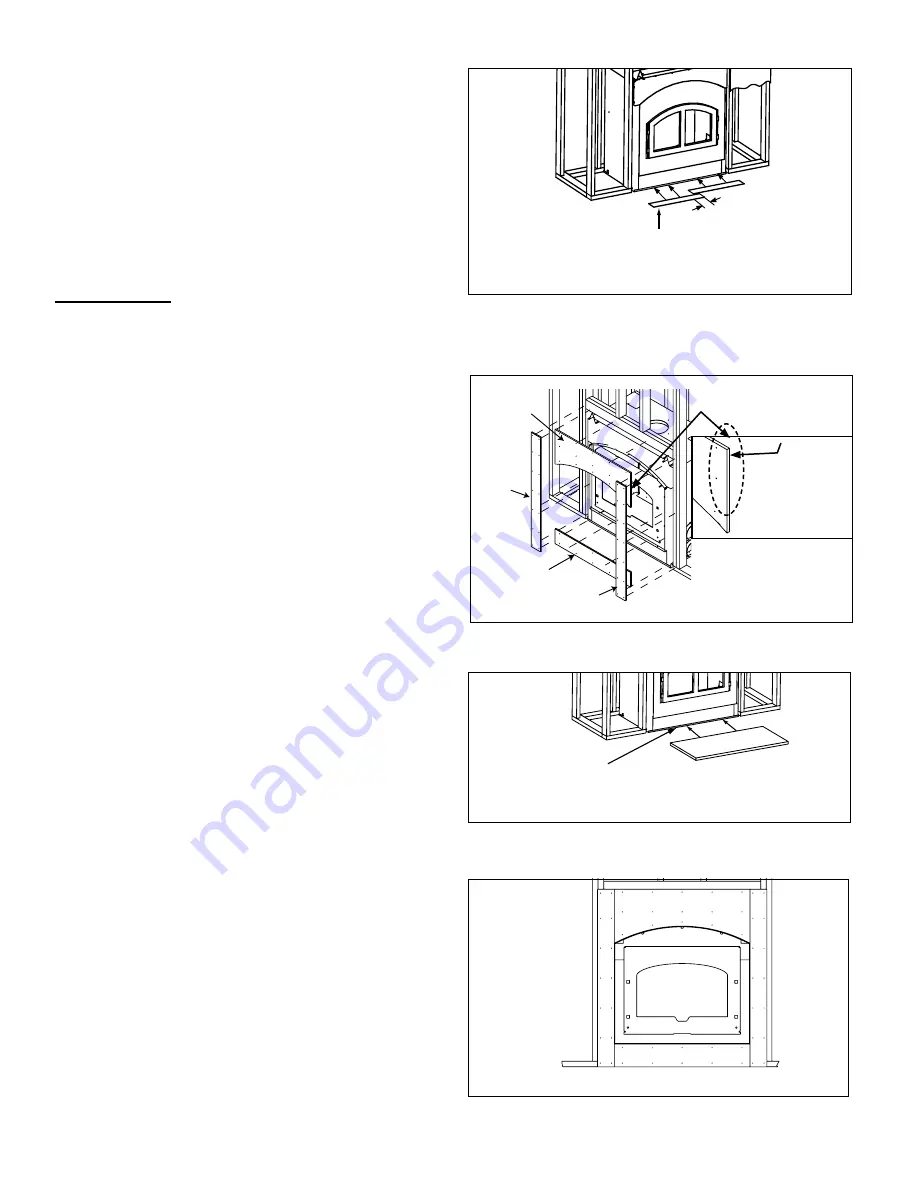
1in. (25mm) OVERLAP
Metal strips 2 in. (51mm) under edge of
Fireplace and Hearth Extension and 2 in.
(51mm) on both side of fireplace opening.
Nail or screw metal strips in place.
Seal with
non-combustible
sealant
Top
Board
Bottom
Board
Side
Board
Side
Board
Tabla superior
Tabla lateral
Tabla inferior
Tabla lateral
Aplique Super Calstick en el extremo
FIGURA A
FIGURA B Instalación completa del material
de revestimiento incombustible
#7014-063, 5 de enero de 2006 Página 1 de
1
Apply bead of
Super Calstick to
edge here
1.
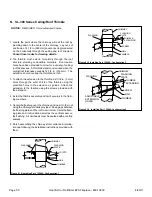
Secure the fireplace to the floor or wall framing studs
at a minimum of two attachment points to prevent fur-
ther movement of the fireplace. The same holes and L
brackets that attached the fireplace to the pallet may
be used to secure the fireplace to the sub flooring by
using a minimum of two 1/4 in. x 2 in. lag bolts or
equivalent. Refer to Figure 10.10
and install the two
metal hearth strips at this time.
NOTE: All boards are pre-drilled for your conve-
nience.
Boards mUsT be attached in the following
order: bottom, top, and then the two sides.
2.
Attach the bottom board to the bottom of the outer fire-
place can with enclosed screws, ensuring the board is
centered.
3.
Center and attach the top board to the outer can and
framing members.
4.
Using the Super Calstick, run a light bead (1/8 in. mini-
mum) on the butt edges of the top board. See Figure
10.11
5.
Ensuring the top of the side pieces and the top board
align, attach the side pieces to the outer can and fram-
ing members.
6.
Use a wet or dry towel or a soft brush to remove any
dust or dirt from facing material. Apply a non-combusti-
ble adhesive to attach tile, stone or other non-combus-
tible finishing materials per manufacturer’s instructions.
7.
The non-combustible Super Calstick may be used for
sealing between the fireplace and the hearth exten-
sion. Refer to Figure 10.12.
G. Non-Combustible Facing Material Installa-
tion
Figure 10.10
Figure 10.11
Figure 10.12
Figure10.13
Complete installation
WARNING! Risk of Fire!
Follow these instructions exactly.
Facing materials must be installed properly to prevent fire.
No materials may be substituted without authorization by
Hearth & Home Technologies

