Heat & Glo • REVO-V12, REVO-S21, REVO-H31 Installation Manual • 2273-980 Rev. J • 5/15
34
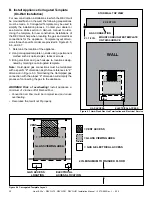
Figure 6.10. Install Firestop and Firestop Framing
APPLIANCE OUTER WRAP
WITH FIRESTOP FRAMING
FIRESTOP INSTALLED
FIRESTOP
INSTALLED
APPLIANCE OUTER WRAP
FIRESTOP INSTALLATION HOLES
FIRESTOP FRAMING
LOCATED BEHIND
OUTER WRAP AND
SHEET ROCK
FIRESTOP
CUT OUT
Figure 6.12 Outer Wrap Mounting Feature Identification
1 = FIRESTOP FRAMING HOLES SHADED
4 = VERTICAL STUD ATTACHMENT HOLES
3 = SHEETROCK ANCHOR HOLES
SEE FIGURE 6.11(B)
2 = FIRESTOP HOLES
1
2
3
4
1
2
4
4
4
3
1
5 = OPTIONAL ATTACHMENT HOLES
5
5
NOTICE:
A minimum of two screws must be
attached to the vertical wall studs
Figure 6.11 Masonry Anchors and Sheet Rock Anchors
(A)
MASONRY
ANCHORS
(B)
SHEET ROCK
ANCHORS
ANCHOR (2)
ASSEMBLED
WASHER (2)
(C)
ATTACHMENT
SCREWS (12)
8. When attaching to a brick (masonry) wall, use masonry
anchors. See Figure 6.11 (A).
9. A minimum of two screws must be used to attach the
appliance to vertical wall studs. See Figure 6.11 (C).
Use sheet rock anchors if a wall stud is not available
on either or both sides of the appliance outer wrap.
See Figure 6.11 (B).
10. Install the firebox onto the outer wrap as directed in
Section 6.D.
11. Replace the glass assembly on the appliance. Latch
the two bottom glass assembly latches and then the
two top glass latches. See Figure 12.1.
12. Attach the appliance vent system. See Section 6.A for
reference to sealing firestop. An SLP-TRAP2 will be
needed when hanging the appliance on a 2 x 6 wall.


