background image

GB

Check if the voltage indicated on the nameplate of the appliance corresponds to the local mains 

voltage before you connect the appliance.

Do not use the heater close to curtains and other combustible materials.

Do not touch the appliance. Caution! Risk of scald injury!

In case of improper use, there is a risk of electrical shock and/or fire hazard. Operation of the 

appliance must be discontinued and remove the mains plug immediately. Do not try to repair the 

appliance by your-self. Please contact with the service agent or a suitably qualified electrician for 

maintenance.

Maintenance and cleaning

Disconnect the plug from the socket before cleaning or when the product is not in use for prolonged 

periods of time.

Do not clean the product until 60 minutes after it is turned off.

When cleaning, do not spray cleaners or water directly into the product.

Apply the cleaner on a cloth and wipe the product.

Regularly check the cord for damages and ensure that the plug is clean.

If the power cord, lamp or other electrical parts needs replacing, this must be done only by a 

professional electrician.

Troubleshooting

Follow the troubleshooting steps listed below:

Make sure the power cord is connected correctly.

Check the cable for any ruptures.

Make sure the ON/OFF switch has been switched OFF.

Check whether the bulb has blown.

If the product is turned off due to overheating caused by improper use (overheat sensor), the product

must be disconnected from the socket outlet and cool off. Check the product for defects after 30 

minutes of cooling. If there are no visible defects, try to reconnect the product again. Please contact 

the place of purchase if this did not solve your problem.

Storage

Do not route the cord when heater is in storage, or the heater is not in use. 

Disposal

European directive 2002/96/EC on Electrical and Electronic Equipment Waste (WEEE), requires  

that old household appliances are not thrown into the normal municipal waste stream. The  

appliances should be collected separately to maximize the recovery and recycling of materials  

and reduce the impact on human health and the environment. The symbol of the “crossed off  

dustbin” is stamped on the product to recall the obligations of the separate collection. Consum 

ers should contact their dealer or local authorities regarding the procedure to be followed for  

the removal of their product.

Customer Service 

Repairs must be carried out by authorized specialists, thus ensuring electrical safety. 

Please contact with the service agent or a suitably qualified electrician. 

Improper repairs could lead to danger to the user.

This warranty does not cover damage of failure which results from alteration, accident, misuse, 

abuse, neglect, or improper maintenance. 

In line with our policy of continuous product development we reserve the right to change the product 

and documentation specifications without notice.

  2     3

Summary of Contents for ECO pro-line

Page 1: ...Good for you and the environment Instructions Brugsanvisning Instruktions manual Ohjeet ECO pro line 2000W 5 Year Warranty...

Page 2: ...e heater is to be permanently connected to an electrical outlet installation must be carried out by an authorized electrician The heater can only be connected to a timer that will switch off the devic...

Page 3: ...duct is turned off due to overheating caused by improper use overheat sensor the product must be disconnected from the socket outlet and cool off Check the product for defects after 30 minutes of cool...

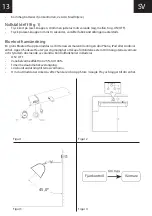
Page 4: ...lings roofs or other covers See figure 2 There must be a distance of at least 0 5 m at each side between the appliance and walls or the like See figure 2 Recommended degree to mounting surface is 45 S...

Page 5: ...gh ON OFF Press the Rest button for at least 4 seconds the heater will restore factory settings Bluetooth operation A free Bluetooth App is available to download for this heater for either your iPhone...

Page 6: ...sevarmeren n r alle kabler er tilsluttet korrekt Terrassevarmeren m kun tilsluttes en timer der slukker for enheden efter den indstillede tid Tilslut ikke terrassevarmeren til en timer der starter ter...

Page 7: ...for at ON OFF kontakten er slukket Kontroller om r ret er spr ngt Hvis produktet er slukket p grund af overophedning for rsaget af forkert brug overophednings f ler skal produktet skal kobles fra sti...

Page 8: ...l minimum v re 0 5 meter Se figur 2 Anbefalet vinkel p terrassevarmerens hoved er 45 Se figur 3 Ved ops tning tag hensyn til at terrassevarmeren placeres hvor vind og regn undg s i videst muligt omfan...

Page 9: ...Bluetooth operation En gratis Bluetooth app er tilg ngelig til download til denne terrassevarmer til enten din iPhone iPad eller Android enhed Appen Sunkare Heater giver dig mulighed for at oprette fo...

Page 10: ...stallationen utf rs ska str mmen alltid avbrytas Sl f rst p terrassv rmaren n r alla kablar har anslutits korrekt Terrassv rmaren f r endast anslutas till en timer som st nger av enheten efter den ins...

Page 11: ...rtkopplad fr n v gguttaget och svalka Kontrollera produkten f r fel efter 30 minuter av kylning Om det inte finns n gra synliga skador f rs k att teransluta produkten again V nligen kontakta platsen f...

Page 12: ...Sefigur 2 Rekommenderad vinkel p terrassv rmarens huvud r 45 Se figur 3 Vid upps ttning ta h nsyn till att terrassv rmaren placeras d r vind och regn undvikss l ngt som m jligt B rja med att montera v...

Page 13: ...etooth anv ndning En gratis Bluetooth app kan laddas ner till terrassv rmaren till antingen din iPhone iPad eller Android enhet Appen Sunkare Heater ger dig m jlighet att skapa f rbindelse externt til...

Page 14: ...torasiaan Jotta v ltytt isiin paloriskilt henkil vahinkoriskilt ja s hk iskun riskilt pit l mmitint k ytett ess aina noudattaa t m n ohjeen kaikkia turvallisuusohjeita mukaan lukien seuraavat L mmitin...

Page 15: ...o Tarkista onko infrapunal mmittimen lamppu palanut Mik li infrapunal mmitin on ylikuumentumisen takia sammunut irrota verkkojohdon pistotulppa pistorasiasta ja anna laitteen j hty Tarkista laite vaur...

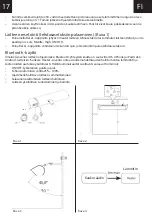
Page 16: ...kuva 2 Et isyyden l mmittimen rungosta sivusuunnassa sein n tai vastaavaan on oltava v hint n 0 5 metri Katso kuva 2 On suositeltavaa asentaa l mmittimen p 45 kulmaan Katso kuva 3 Asenna l mmitin sit...

Page 17: ...tat laitteen tehot ja virta p lle pois Low Middle High ON OFF Paina Reset n pp int v hint n 4 sekunnin ajan jotta l mmitin palaa tehdasasetuksiin Bluetooth k ytt Ilmainen sovellus laitteen ohjaamiseks...

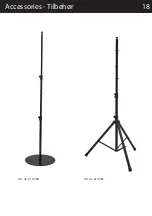
Page 18: ...18 Accessories Tilbeh r Art no 212 380 Art no 212 381...

Page 19: ...19 Tillbeh r Lis varusteet Art no 212 385 Art no 212 386 Art no 212 390 Art no 212 393...

Page 20: ...Imported by importeret af NSH NORDIC A S Virkefeltet 4 8740 Br dstrup Danmark www nshnordic com Art no 212 330...

Reviews: