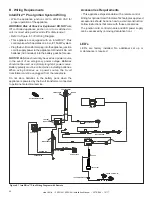

Heat & Glo • 350X-AU, 550X-AU Installation Manual • 2279-980
• 12/17
52
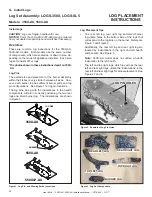
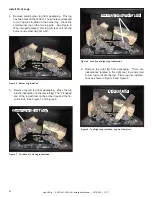
G. Install Logs
LOG PLACEMENT
INSTRUCTIONS
Install Logs
Overview
These are common log instructions for the 350X-AU,
550X-AU models. Both models use the same number
of components, which are scaled up or down in size, de-
pending on the model of appliance installed. Each size
log set consists of five logs.
*The photos shown in these instructions depict an 350X-
AU.
Log Pins
The overall size and placement of the burner assembly
within the firebox is very similar between all sizes. How
-
ever, each burner top has different burner ports and log
pin configurations. See Figure 1 for log pin locations.
The log pins, along with the indentations in the hearth
components, will aid in correctly positioning the two rear
logs and small burner log. The indentations are shown
in Figure 5.
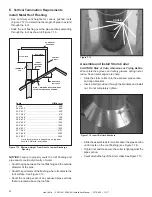
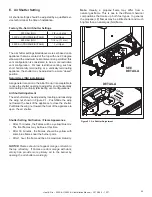
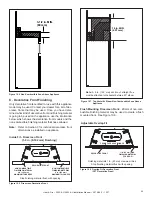
Figure 1. Log Pin and Glowing Ember Locations
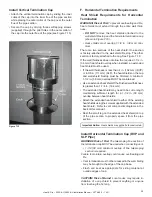
Figure 2. Example of Log Pin Holes
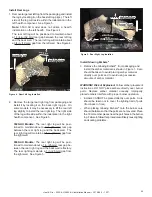
Log Placement Tips
• The rear left log, rear right log and small burner
log utilize holes in the bottom side of the logs that
correspond to the log pins on the burner. Reference
Figure 1 and Figure 2.
Additionally, the rear left log and rear right log are
located by indentations in the right and left hearth
components. See Figure 5.
Note:
350X-AU model does not utilize a hearth
indentation in the left hearth.
• Top left and top right logs, which lay across the rear
left and rear right logs, utilize the “indentations” in the
rear left and rear right logs for proper placement. See
Figures 7 and 8.
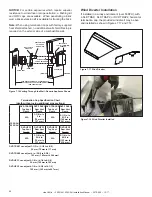
Figure 3. Log Set Components
350X-AU
550X-AU
550XLP-AU
EMBERS
LOG PINS
LOG PIN HOLES
REAR RIGHT LOG
REAR LEFT LOG
BURNER LOG
TOP LEFT LOG
TOP RIGHT LOG
CAUTION:
Logs are fragile, handle with care.
NOTICE:
Paint Touch Up Kit (2372-099) may be ordered
from your dealer to repair chips and scratches if necessary.
Log Set Assembly: LOGS-350X, LOGS-SL5
Models: 350X-AU, 550X-AU


