Page 8
Page 5
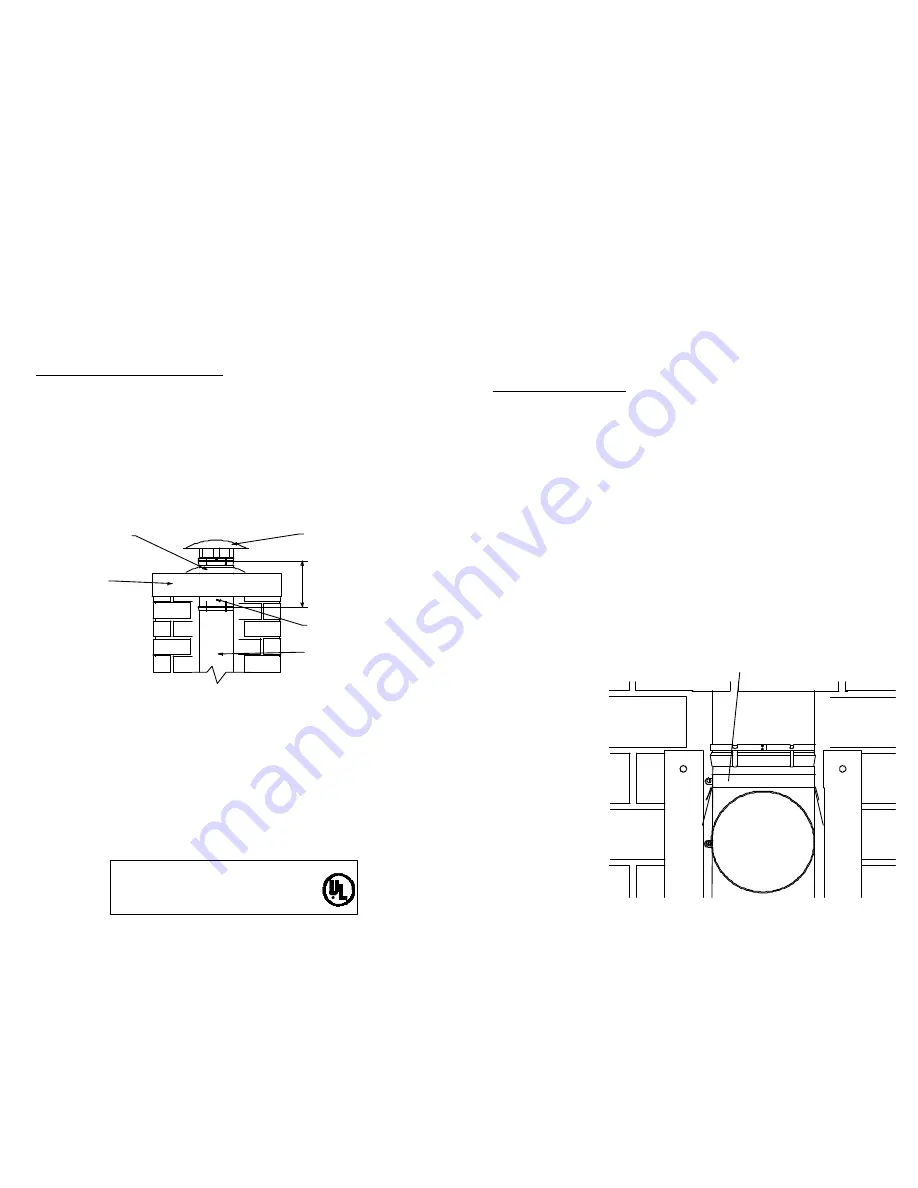
insert the small end through the cover plate and guide it into the top liner section.
Continue sliding the slip section down until the storm collar rests on the cover plate
and supports the slip section on the expanded end. Tighten the storm collar clamp.
Finally, attach the rain cap to the slip section with the locking ring and locking tabs
(Figure 6).
I. Connect Appliance To The Chimney
Both the choice of connector material and the method of installation will differ
depending on the type of appliance to be connected. Follow the appropriate
supplemental instructions to choose the proper connector and attach it to the
Saf-T Vent system.
Figure 4
too far out, or they will
tend to snag as the conduit
is lowered down the
chimney (Figure 4).
Attach the tee or elbow
(unless the elbow must be
attached from the bottom
opening) to a length of
flue gas conduit using the
locking ring and tabs (see
Preassemble Lengths
,
below). Attach the tee
cover to the bottom of the
tee.
Support Clamp
vent or chimney connector.) An additional opening may be needed for a cleanout tee.
The size of the hole will depend on the type of support system to be used with the
installation. See Heat-Fab's
Planning and Preparation Manual for Saf-T Vent
to
determine which support system, the support bracket or support legs, is most
appropriate for this installation. Use the instructions packaged with the support for
specifications on preparing the chimney and installing the support.
B. Connect the Tee or Elbow
When a tee is to be used for the appliance connection it may be preconnected to the
sections of vertical flue gas conduit and lowered down the chimney. Remove the
horizontal take-off from the tee by loosening the retractable bands.
When a 90°, 70°, or 45° elbow is to be used for the appliance connection, it may also
be possible to attach it to the liner and lower it down the chimney. The chimney flue
space must, however, be large enough to accommodate the horizontal take-off from
the elbow (which extends approximately 5 inches). If the flue space is not large
enough, the elbow will have to be attached to the bottom of the vertical conduit after
it is lowered down the chimney.
Attach the support clamp to the tee or elbow, just
below
the expanded portion at the
top
of the fitting. The tabs on the support clamp should be facing
down
, and should
be oriented
90 degrees
from the horizontal take-off of the tee or elbow. Tighten the
clamp by turning the screw clockwise with a screwdriver. To make connection of the
support clamp to the support brackets or legs easier, it is useful to pry the tabs on the
support clamp out from the side of the conduit about 1/4 inch. Avoid bending them
Crown or
Flashing
Slip Section
Storm
Collar
Rain
Cap
3 to 14
Inches
Saf-T Vent
Sections
Figure 6
SAF-T VENT LIMITED WARRANTY
Heat-Fab, Inc. warrants to the original consumer purchaser that the Saf-T Vent will be free from defects in material
or manufacturer's workmanship. Any defect arising from the improper operation or maintenance of this system and
connected appliance(s) is
not
covered by this warranty.
In order to obtain warranty service, the consumer must give prompt written notice of any defect to Heat-Fab, Inc.
within ten (10) years from the date of purchase. The sole responsibility of Heat-Fab, Inc. shall be to replace those
parts of Saf-T Vent found to be defective upon return F.O.B toHeat-Fab, Inc. 130 Industrial Blvd., Turners Falls, MA
01376. Heat-Fab, Inc shall not be responsible for the cost of inspecting, removing or reinstalling the parts subject
hereto, nor shall it be liable for any special , incidental or consequential damages or expenses incurred by the consumer
or its contractors. The warranty on any replacement parts shall be for the unexpired term of the original warranty.
This warranty gives the consumer specific legal rights, in addition to any other rights which may pertain, which vary
from state to state
This Product is Listed by
UNDERWRITERS LABORATORIES INC.
and Bears the Mark:


