background image

4

200478-02

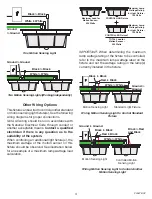
One Motion Sensing Light

Two Motion Sensing Lights (Working Independently)

Other Wiring Options

This fixture can be wired to control another standard 
or motion sensing light fixture(s). See the following 
wiring diagrams for proper connections.
Note: All wiring should be run in accordance with 
the  National  Electrical  Code  through  conduit  or 
another acceptable means. 

Contact a qualified 

electrician if there is any question as to the 
suitability of the system.
When controlling an additional light fixture(s), the 
maximum  wattage  of  the  motion  sensor  on  this 
fixture should be observed. See illustration below 
for an example of a maximum lamp wattage load 
calculation.

Black to Black

White to White

Ground
to 

Ground

Black to Black

White to White

Ground to Ground

Wiring Motion Sensing Light to Control Standard 

Fixture

Ground to 
Ground

Standard Light Fixture

Motion Sensing Light

Black to Black

White to White

Red to Black

Maximum Load for

Motion Sensor –

200 Watts

Maximum Lamp

Wattage Rating

for Light Fixture –

100 Watts

Maximum Lamp

Wattage Rating

for Light Fixture –

100 Watts

TOTAL Load for

Motion Sensor –

200 Watts

CONTROLLING Fixture

CONTROLLED Fixture 1

IMPORTANT:  When  determining  the  maximum 
lamp wattage rating of the fixture to be controlled, 
refer to the maximum lamp wattage label on the 
fixture and not the wattage rating on the lamp(s) 
currently installed in the fixture.

Wiring Motion Sensing Light to Control Another 

Motion Sensing Light

Black to Black

White to White

Ground to Ground

Black to Red 
and Black

Red to Black

Controlled Motion 

Sensing Light

Motion Sensing Light

Summary of Contents for 022246

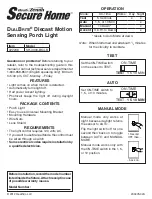
Page 1: ...trician DualBrite Diecast Motion Sensing Porch Light 2012 HeathCo LLC 200478 02A OPERATION Note Whenfirstturnedonwaitabout11 2 minutes for the circuitry to calibrate resets to Auto Mode at dawn ON TIME TEST 1 5 10 MIN TEST Set ON TIME switch to 1 5 or 10 minutes AUTO back on 1 Second OFF then Manual mode only works at night because daylight returns the sensor to AUTO Flip the light switch off for ...

Page 2: ...ersal Mounting Bracket ON TIME Switch at 1 5 or 10 minutes MODE SWITCHING SUMMARY Flip light switch off for one second then back on If you get confused while switching modes turn the power off for one minute then back on After the cali bration time the control will be in the AUTO mode MANUAL MODE AUTO TEST DualBrite DIMMER CONTROL Light comes on half bright for selected time after dusk Off 3 hr 6 ...

Page 3: ...wing dia grams CAUTION DONOTremovewireconnec tor from RED wire or connect the RED wire unless you want to control other lights from this motion sensor fixture Note Ifyouhaveametaljunctionboxusetherecom mended grounding method shown in the following illustration Ifyouareuncertainaboutthegrounding method consult your local building code 2 Twist and secure wires with wire nuts Ground Screw White to W...

Page 4: ...White Ground to Ground Black to Black White to White Ground to Ground Wiring Motion Sensing Light to Control Standard Fixture Ground to Ground Standard Light Fixture Motion Sensing Light Black to Black White to White Red to Black Maximum Load for Motion Sensor 200 Watts Maximum Lamp Wattage Rating for Light Fixture 100 Watts Maximum Lamp Wattage Rating for Light Fixture 100 Watts TOTAL Load for Mo...

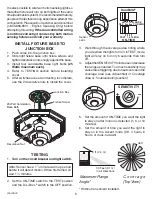
Page 5: ... this wiring If the dual controlled wiring is not done correctly it can destroy both motion sensing fixtures and void your warranty INSTALL FIXTURE BASE TO JUNCTION BOX 1 Push wires into the junction box 2 Slide light fixture base onto fixture screws and tighten decorative nuts snugly against the base 3 Install four candelabra base light bulbs 25 Watts maximum each 4 Refer to TESTING section befor...

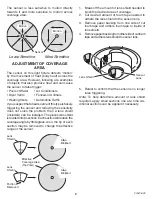
Page 6: ...eld included can be installed The plastic lens shield is divided into 6 sections Each section will reduce the coverage angle by 30 degrees Also the tip of each section may be removed to change the effective range of the sensor 1 Break off the amount of lens shield needed to block the desired area of coverage 2 Cut desired amount of foam tape needed to adhere the lens shield to the sensor lens 3 Re...

Page 7: ...de light only stays on for 5 seconds 1 Nearbylarge light coloredobjects reflecting light may trigger the shut offfeature Donotpointother lights at the sensor POSSIBLE CAUSE 1 Light switch is turned off 2 Bulbs are loose or burned out 3 Fuse is blown or circuit breaker is turned off 4 Daylight turn off is in effect re check after dark 5 Incorrect circuit wiring if this is a new installation 1 Senso...

Page 8: ...NSEQUENTIAL DAMAGES REPAIR OR REPLACEMENT SHALL BE THE SOLE REMEDY OF THE CUSTOMER AND THERE SHALL BE NO LIABILITY ON THE PART OF HEATHCO LLC FOR ANY SPECIAL INDIRECT INCIDENTAL OR CONSEQUENTIAL DAMAGES INCLUDING BUT NOT LIMITED TO ANY LOSS OF BUSINESS OR PROFITS WHETHER OR NOT FORESEEABLE Some states or provinces do not allow the exclusion or limitation of incidental or consequential damages so t...

Page 9: ...ra portal con detector de movimiento 2012 HeathCo LLC 200478 02 S FUNCIONAMIENTO Nota Cuando lo prenda por primera vez espere 1 1 2 minutos para que el circuito se calibre Se pone en Automático al amanecer ON TIME Ponga el interruptor de ON TIME DURACIÓN del detector en TEST PRUEBA TEST 1 5 10 MIN PRUEBA Ponga el interruptor de tiempo ON TIME en la posición de 1 5 o 10 minutos AUTOMATICO préndalo ...

Page 10: ...n Las funciones quedetectanmovimientocontinuaránfuncionando como se describen en este manual Si detecta mo vimiento la luz se prende con todo su resplandor por el tiempo de duración o de ON TIME 1 5 o 10 minutos y luego regresa a media luz DU AL BR ITE ON TIM E TE ST 1 5 10 MIN OF F 3 6 DU SK TO DA WN DU AL BR ITE ON TIM E TE ST 1 5 10 MI N OF F 3 6 DU SK TO DA WN DESARME EL APARATO DE LUZ 1 Retir...

Page 11: ...de alam bredelconductorrojoniconecteelconductor ROJOanoserquedeseecontrolarotrasluces desde este aparato detector de movimiento Nota Si tiene una caja de empalme metálica use el método de conexión a tierra recomendado que se indica en la siguiente ilustración Si tiene dudas del método de conexión a tierra consulte el código local de construcción 2 Tuerza y asegure los conductores con conec tores d...

Page 12: ...o de luz detector de movimiento Rojo con Negro Carga máxima para el detector de movimiento 200 vatios Potencia nominal máxima de la lámpara para el aparato de luz 100 vatios Potencia nominal máxima de la lámpara para el aparato de luz 100 vatios Carga TOTAL del detector de movimiento 200 vatios Aparato DE CONTROL Aparato CONTROLADO 1 IMPORTANTE Cuando determine la potencia nominal máxima de la lám...

Page 13: ...lar en inglés Si el cableado del control doble no es hecho correctamente puede destruir ambos aparatos detectores de movimiento e invalidad su garantía INSTALE LA BASE DEL APARATO A LA CAJA DE EMPALME 1 Empuje los conductores hacia la caja de empalme 2 Deslice la base del aparato por los tornillos del aparato y apriete bien las tuercas decorativas contra la base 3 Instale cuatro bombillas con base...

Page 14: ...ción del encendido 1 5 10 minutos Temporizador DualBrite Apagado 3 6horas del atardecer al amanecer REGULACIÓN DEL ÁREA DE COBERTURA El detector de este aparato de luz detecta movi miento gracias al movimiento del calor calor cor poral a través del área de cobertura Sin embargo lo que sigue son ejemplos de objetos que pueden también producir calor y hacer que el detector se active erróneamente Cha...

Page 15: ... 1 Objetos cercanos grandes y de colores brillantes que reflejan luz puedenactivarlacaracterísticade apagado No apunte otras luces hacia el detector POSIBLE CAUSA 1 El interruptor de luz está apagado 2 Las bombillas están flojas o que madas 3 El fusible está quemado o el cor tacircuitos está apagado 4 La desconexión de luz del día está en efecto Compruébelo al anochecer 5 Alambrado incorrecto si é...

Page 16: ...regido sin cargo para Ud No cubierto Servicio de reparación ajuste y calibración debido al mal uso abuso o negligencia bombillas baterías u otras partes fungibles no están cubiertas por esta garantía Los Servicios no autorizados o modificaciones del producto o de cualquier componente que se provee invalidarán esta garantía en su totalidad Esta garantía no incluye reembolso por inconveniencia insta...

Page 17: ...RITÉ MANUELLE ON TIME TEST 1 5 10 MIN Placez le commutateur ON TIME à la position TEST Article Modèle 022246 SH 4300 BK4 B Des questions ou problèmes Avant de vous rendre chez le détaillant consultez la section Dépannage de ce guide ou communiquez avec le service technique au 1 800 858 8501 en anglais seulement du lundi au vendredi entre 8 h 00 et 17 h 00 HNC CARACTÉRISTIQUES Allume l éclairage lo...

Page 18: ...UMÉ DU MODE DE COMMUTATION Mettre l interrupteur hors circuit pendant une seconde puis le remettre en circuit Si vous ne savez plus dans quel mode se trouve l appareil couperl alimentationpendantuneminute puis la rétablir Après le temps d étalonnage la commande reviendra au mode AUTO PRIORITÉ MANUELLE AUTO TEST MINUTERIE DualBriteMD La lumière s allume à mi intensité pour le temps choisi après le ...

Page 19: ...RETIREZPASleconnec teur du fil ROUGE et ne raccordez pas le fil ROUGE à moins que vous ne désiriez rac corder d autres luminaires à ce luminaire à détecteur de mouvement Note Si vous utilisez une boîte électrique métalli que suivez la méthode de mise à la terre indiquée dans l illustration suivante Si vous n êtes pas certain de la méthode à utiliser consultez le code du bâtiment local 2 Torsadez l...

Page 20: ...erre à fil de terre Noir à noir Blanc à blanc Fil de terre à fil de terre Raccordement d un luminaire à détecteur de mou vement pour la commande d un luminaire standard Fil de terre à fil de terre Luminaire standard Luminaire à détecteur de mouvement Noir à noir Blanc à blanc Rouge avec noir Puissance maximum pour le détecteur de mouvement 200W Puissance maximum des ampoules du luminaire 100 W Pui...

Page 21: ...câblage veuillez contactnotreServiceàlaclientèle 1800858 8501 serviceenanglaisseulement Sileraccordement d un système à double commande n est pas effectué correctement cela risque de détruire les deux luminaires et d annuler la garantie INSTALLATION DU SOCLE DU LUMINAIRE SUR LA BOÎTE ÉLECTRIQUE 1 Repoussez les fils à l intérieur de la boîte électrique 2 Faites glisser le socle du luminaire sur les...

Page 22: ...lentille en plastique est formé de 6 sections Chaque section réduit l angle decouvertured environ30 Deplus ilestpossible d enleverlapointedechaquesectionpourmodifier la portée efficace du capteur 1 Séparez le nombre de sections dont vous avez besoin pour cacher la zone de couverture 2 Découpezlaquantitéderuban moussenéces saire pour coller le protecteur sur la lentille du capteur 3 Retirez la pell...

Page 23: ...e est en modeManuel faites lapasserau mode Auto 3 La commande d éclairage est en mode DualBriteMD 4 Leréglagedeportéeesttropélevé Réduisez la portée 1 Le capteur est en modeTEST En mode TEST l éclairage demeure allumé seulement pendant 5 secondes 1 Un grand objet de couleur pâle se trouve à proximité et reflète la lumière ce qui déclenche la fonction d arrêt Évitez de diriger d autres lumières sur...

Page 24: ...RECTS OU SECONDAIRES LE REMPLACEMENT OU LA RÉPARATION CONSTITUENT LE SEUL RECOURS DU CLIENT ET HEATHCO LLC NE POURRA ÊTRE TENUE RESPONSABLE DE TOUS DOMMAGES SPÉCIAUX DIRECTS INDIRECTS OU SECONDAIRES Y COMPRIS SANS S Y LIMITER LES PERTES COMMERCIALESETPERTESDEPROFIT QU ELLESSOIENTPRÉVISIBLESOUNON Certaines provinces n autorisent pas l exclusion ou la limitation des dommages indirects ou secondaires...

Reviews: