2
598-1344-00
teSt anD aDJuStMent
NOTE: Sensor has a 30 second warm up period before
it will detect motion. When switching modes wait 30
seconds.
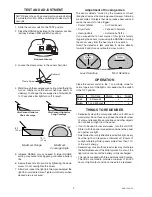
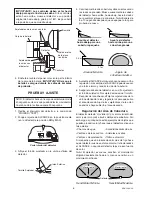
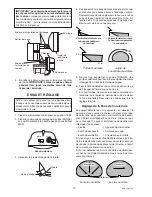
1. Slide the sensor switch to the TEST position.
2. Place the RANGE adjustment in the medium position
(halfway between MIN and MAX position).
Least Sensitive
Most Sensitive
Sensor
Motion
70 ft.
(21 m)
8 ft.
(2.4 m)
Maximum Range
Maximum
Coverage Angle
MAX
MIN
RANGE
ON-TIME
TEST 1 5 OFF
MINUTES
Bottom of Sensor
Aim Sensor Down for
Short Coverage
Aim Sensor Higher for
Long Coverage
Ball Joint
Clamp Screw
adjustment of coverage area
The sensor detects “motion” by the movement of heat
(body heat) across the coverage area. However, following
are examples of objects that also produce heat and can
cause the sensor to false trigger:
• Pools of Water
• Air Conditioners
• Dryer Vents
• Fenced-In Animals
• Heating Vents
• Automobile Traffic
If you suspect that a heat source of this type is falsely
triggering the sensor, try reducing the RANGE or aiming
the sensor away from the heat source in question.
Note: The detector is less sensitive to motion directly
towards it and more sensitive to across motion.
Motion
OPeratiOn
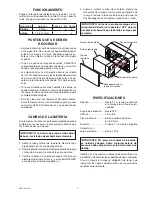
Place the sensor switch in the 1 or 5 minute mode for
normal operation. If the light is not needed, put the switch
in the OFF position.
Mode:
On-Time
Works:
Day
Night
test
5 Seconds
x
x
auto
1 or 5 Minutes
x
thingS tO reMeMber
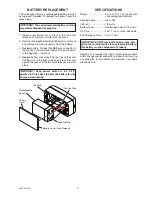
• Periodically clean the solar panel with a soft cloth and
warm water. Do not hose spray. Keep the collector clear
of snow and leaves. Make sure trees and other objects
do not block sunlight from the panel.
• If not to be used for several weeks, turn the unit OFF.
Store it with the panel connected and where the panel
can gather sunlight.
• Solar collection is only effective in direct sunlight. Every
hour the light is on requires a minimum of 16 hours of
sunlight charging. Solar panels collect less than 10%
of the sun’s energy.
• Several days of use with overcast skies may discharge
the battery. Because of the battery protection circuit, the
light will not work until the battery is fully recharged.
• This light is supplied with three permanent LED lamps.
The LED’s are rated to provide a minimum of 40,000
hours of light output and do not need to be replaced.
3. Loosen the clamp screw in the sensor ball joint.
4. Walk through the coverage area noting when the lights
turn on. Gently move the sensor head up, down, or
sideways to change the coverage area. Note: Wait 5
to 10 seconds after light turns off to retest.
5. Increase RANGE only as needed. A larger RANGE
setting may cause false triggering and reduce battery
life.
6. Secure the sensor into position by tightening the clamp
screw. Do not overtighten the screw.
7. After dark, loosen the light joint clamps and adjust the
light to cover desired area. Tighten joint clamps when
desired area is covered.
180°


