background image

3

598-1324-01

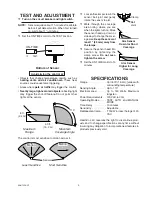
SPECIFICATIONS

Range . . . . . . . . . . . . . Up to 50 ft. (15.2 m); [varies with 

surrounding temperature]

Sensing Angle . . . . . . . Up to 110°
Electrical Load . . . . . . . Up  to  150  Watts  Maximum 

tungsten

Power Requirements . . 120 VAC, 60 Hz
Operating Modes . . . . . TEST,  AUTO  and  MANUAL 

MODE

Time Delay  . . . . . . . . . 10 minutes
Sensitivity  . . . . . . . . . . Adjustable
Replacement lamp . . . . T 150W (or less) halogen 120 

VAC 

HeathCo LLC reserves the right to discontinue prod-
ucts and to change specifications at any time without 
incurring any obligation to incorporate new features in 
products previously sold.

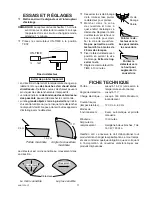
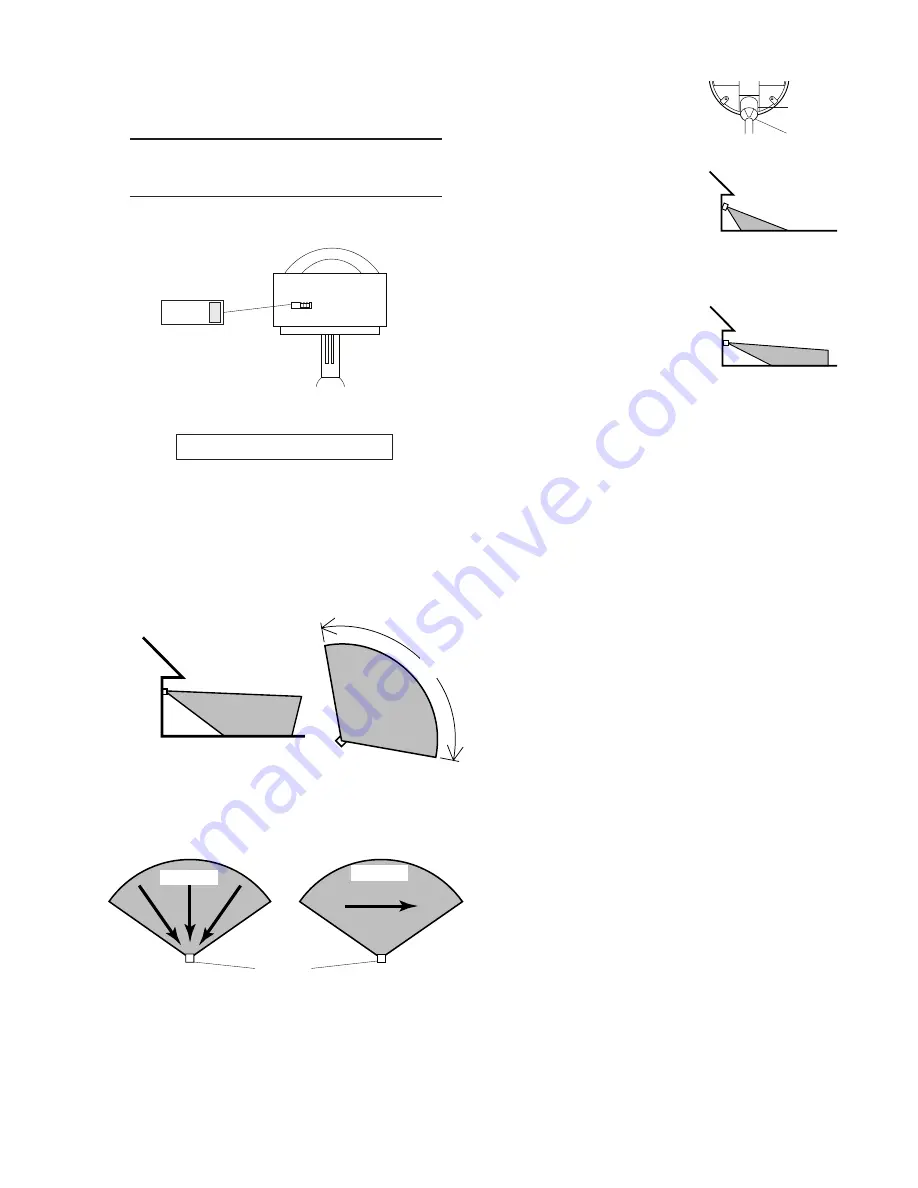
TEST AND ADJUSTMENT


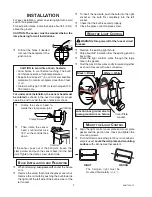
Turn on the circuit breaker and light switch.

Maximum 

Range

Maximum

Coverage Angle

NOTE:  Sensor requires about 1 

1

/

2

 minutes to calibrate 

before it will detect motion. When first turned 
on, wait about 1 

1

/

2

 minutes.

Avoid aiming the control at:

•  Objects  that  change  temperature  rapidly,  such  as 

heating  vents  and  air  conditioners.  These  heat 
sources could cause false triggering.

•  Areas where 

pets or traffic may trigger the control.

•  

Nearby large, light-colored objects reflecting light 
may trigger the shut-off feature. Do not point other 
lights at the sensor.

50 ft. 

(15.2 m)

The control is most sensitive to motion across it. 

Least Sensitive 

 Most Sensitive

Motion

Sensor

Motion

  Loosen the clamp screw in the 

sensor  ball  joint  and  gently 
rotate the sensor to aim.

  Walk  through  the  coverage 

area  noting  where  you  are 
when the lights turn on. Move 
the sensor head up, down, or 
sideways to change the cover-
age area. 

Keep the sensor at 

least 1" (25 mm) away from 
the lamps.

  Secure the sensor head into 

position  by  tightening  the 
clamp  screw. 

Do  not  over-

tighten the screw.

  Set the ON-TIME control to 10 

minutes.

Bottom of Sensor

8 ft. 

(2.4 m)

110°

  Set the ON-TIME control to the TEST position.

Aim Sensor 

Down for Short 

Coverage

Aim Sensor 

Higher for Long 

Coverage

Clamp

Ball 
Joint

ON-TIME

10  

TEST

Summary of Contents for BL-5511

Page 1: ... intended for use with the enclosed gasket and with a junction box marked for use in wet locations The backplate has knockouts so the sensor can be mounted on most junction boxes In some applications a universal adaptor plate may be needed Adaptors are available at Home Centers and Electrical Supply Stores If you get confused while switching modes turn the power off for one minute then back on Aft...

Page 2: ...screw that holds the glass cover shut Remove the old bulb by pushing the bulb towards the right until the left side of the bulb is clear of the left socket CAUTION to avoid fire or burn hazards Allow fixture to cool before touching The bulb and fixture operate at high temperatures Keep fixture at least 2 5 cm from combustible materials Do not aim at objects closer than 3 feet 1 m Re lamp with type...

Page 3: ...emperature rapidly such as heating vents and air conditioners These heat sources could cause false triggering Areas where pets or traffic may trigger the control Nearby large light colored objects reflecting light may trigger the shut off feature Do not point other lights at the sensor 50 ft 15 2 m The control is most sensitive to motion across it Least Sensitive Most Sensitive Motion Sensor Motio...

Page 4: ...ed Repair service adjustment and calibration due to misuse abuse or negligence light bulbs batteries and other expendable items are not covered by this warranty Unauthorized service or modification of the product or of any furnished component will void this warranty in its entirety This warranty does not include reimbursement for incon venience installation setup time loss of use unauthorized serv...

Page 5: ...odalidades del interruptor Apague el interruptor por un segundo y préndalo de nuevo Mueva el interruptor de tiempo ON TIME a 10 minutos El modo manual funciona sólo por la noche porque la luz del día pone al detector en modo AUTOMATICO Apague el interruptor por un segundo y vuélvalo a prender El modo manual funciona sólo cuando el interruptor de tiempo ON TIME está en la posición de 10 minutos PRU...

Page 6: ...de empalmes con losalambresdelcontroldeluz Unalosyasegúrelos con un conector de alambre Instalación y Cambio De Bombilla Elcabledeconexiónatierradelacajadeem palmes al tornillo verde de conexión a tierra del aparato o al cable verde si lo tiene Instale El Control De Luz Alinee la placa cubertora del control de luz y el empaque de la placa cubertora y los agujeros de la caja de empalmes Asegúrelos ...

Page 7: ...tor en su posición ajustando el tornillo de la grampa No apriete de masiado el tornillo Fije el control de DURA CIÓN ON TIME a 10 minutos Angulo Máximo de Cobertura Alcance Máximo Lo menos sensible Lo más sensible Detector Movimiento El detector es más sensible al movimiento lateral Movimiento NOTA El detector tiene un período de cerca de 1 1 2 minutos de calentamiento antes de detectar movimiento...

Page 8: ...egido sin cargo para Ud No cubierto Servicio de reparación ajuste y calibración debido al mal uso abuso o negligencia bombillas baterías u otras partes fungibles no están cubiertas por esta garantía Los Servicios no autorizados o modificaciones del producto o de cualquier componente que se provee invalidarán esta garantía en su totalidad Esta garantía no incluye reembolso por inconveniencia instal...

Page 9: ...jour remet le capteur en mode AUTO Mettre l interrupteur hors circuit pendant une seconde plus en circuit pour alterner entre les modes AUTO et MANUEL Le mode manuel ne fonctionne que lorsque l interrupteur ON TIME est aux positions 10 PRIORITÉ MANUELLE AUTO TEST Luminairehalogènecom pact de 150W à détecteur de mouvement Le luminaire de sécurité au quartz à détecteur de mou vement déclenche un écl...

Page 10: ...t dans la douille gauche S assurer que l ampoule est bien insérée et appuyée Replacer le couvercle de verre Aligner la plaque de garde de la commande d éclairage la garniture de la plaque de garde et la boîte de jonction Insérer et serrer les vis de montage Si le luminaire n est pas monté sur une boîte de jonction étanche aux intempéries ou si une plaque d adaptationestutilisée calfeutrerlaplaquem...

Page 11: ...cher le dispositif d arrêt Ne pas pointer d autres appareils d éclairage vers le détecteur 15 2 m 2 4 m REMARQUE Le capteur doit se réchauffer 1 1 2 minute avantdepouvoirdétecterlemouvement Lorsque l appareil est mis en circuit ou changé de mode attendre 1 1 2 minute Bas du détecteur ESSAIS ET RÉGLAGES Mettre en circuit le disjoncteur et l interrupteur d éclairage Portée maximale Angle de couvertu...

Page 12: ...e main d oeuvre sera corrigée gratuitement Exclusions de la garantie Réparations réglage et calibrage dus à une mauvaise utilisation un mauvais traitement ou à la négligence Les ampoules les piles et des autres articles non durables ne sont pas couverts par cette garantie Le service non autorisé ou la modification du produitoud unoul autredesescomposantsfournisinvalideratotalementlaprésentegaranti...

Reviews: