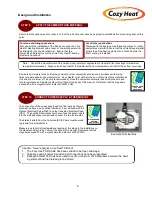
STEP 4 LAYOUT AND PREPARE FLOOR SENSOR
If a floor temperature sensor is being used, mark the sensor position between two Cozy Heat® Heating Element runs, ap-
proximately 10 inches away from the wall, and as close as possible to the thermostat.
Design and Installation
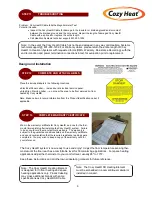
STEP 5 INSTALL SENSOR CONDUIT
When using a conduit for an in-floor sensor, install
it between the thermostat wall box and the sensor
location. It may be necessary to countersink the
conduit into the wood or concrete subfloor.
Cover the end of the conduit with tape so that the
cementitious material cannot enter it. Use a quick
drying glue or hot glue to hold the sensor conduit in
the groove and prevent it from floating up while the
cementitious material is installed.
STEP 6 MEASURE & RECORD RESISTANCE
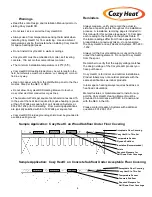
Note: The sensor conduit must be centered
between two runs of Cozy Heat® Heating
Element, and must extend out at least 10
inches away from the wall.
Warning: Do not allow the sensor conduit to cross the Cozy
Heat® Heating Element. Do not allow the sensor head to touch
the Cozy Heat® Heating Element.
6
Cozy Heat®
Heating Element
Thermostat
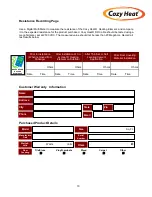
Remove the Cozy Heat® SR Heating Element from the box. Using a
megohmmeter tester set at 2500 Vdc, check the insulation resistance
of the Cozy Heat® SR Heating Element to make certain it is greater
than 20MΩ. Confirm the megohmmeter result by measuring the re-
sistance with a Digital Multimeter and record the value measured on
Resistance Recording Table a
t the back of this manual.
Resistance measurement and megohmmeter testing must
be taken several times during the installation process:
Immediately upon removal from the packaging, after in-
stallation of the heating element, and after cement, or
asphalt application. Cozy Heat® SR Cable should also be
checked for electrical continuity.
MEASURE AND
RECORD
RESISTANCE
Floor
Temperature
Sensor


