HEATIZON.COM
23
• The following mounting/wiring instructions assume that a relay panel is
NOT being used and power is coming from a single 240 volt circuit. For
all other installation instances, please consult the complete installation
manuals for the M326A and panels for other installation/wiring
instructions.
NOTE:
• During warmer times of the year, the heating element may not heat enough to be
able to determine if it is working properly, therefore the test run is to merely check
to see if the activator powers on according to it’s operating procedures. Running
another test or checking settings once snowfall has occurred is advisable.
NOTE:
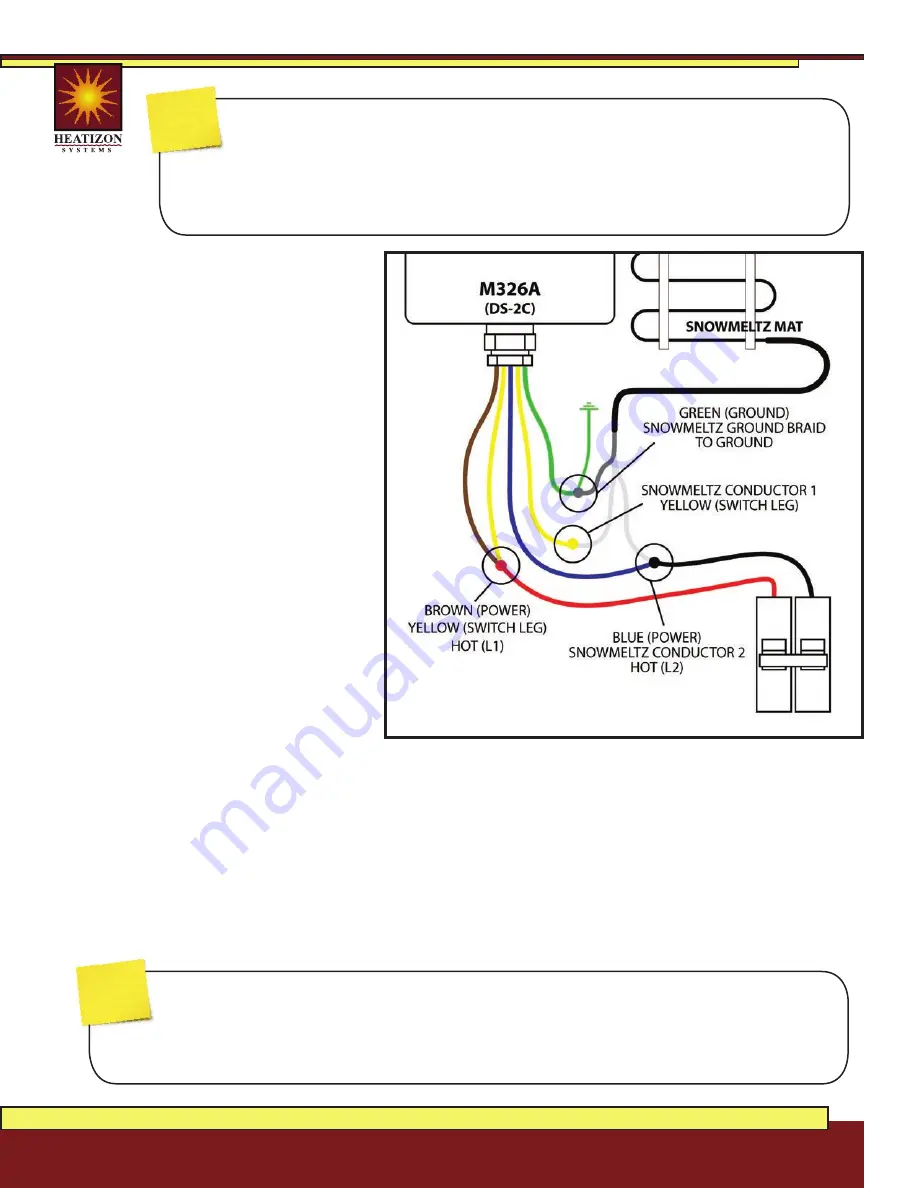
13.2.3 MOUNTING/WIRING
1. Choose a location that will
receive the same snowfall as the
SnowMeltz® system(s) and that will
not be obstructed.
2. Best practice is to mount the M326A
on top of a weather-proof junction
box to make the connections to
power and the SnowMeltz® mat(s).
3. Be sure to follow local code for the
correct gauge of wire for a dual-pole
30 amp 240v circuit.
4. Power to the M326A must be off
before wiring the unit.
5. Wire the green ground wire from the
M326A to the silver ground shield
from the SnowMeltz® mat and to a
suitable grounded wire.
6. Take one yellow wire and the brown
wire and attach them to one leg of
the incoming circuit from the breaker.
7. The other yellow wire from the
M326A will be wired to one of
the copper conductors on the
SnowMeltz® mat.
8. The blue wire and wire it to the other leg of the incoming power and the other copper conductor from
the SnowMeltz® mat.
9. Ensure all connections are tight and secure and close the junction box and power up the system.
10. The light on the front of the M326A should be solid green, incating power is being supplied to the unit.
11. Test the system to switch the power to MANUAL using the switch on the side of the M326A, the status
light should be blinking, incating the M326A is providing power to the SnowMeltz® mat.
12. Return the switch to AUTOMATIC, the installation is now complete.


