6
5.0 COMMISSIONING
5.1 DO NOT switch on the electrical supply until the unit and ice bank have
been filled with water and checked for leaks.
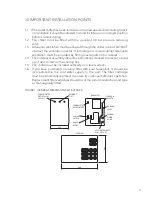
5.2 Fill ice bank as follows. Push the supllied 8mm tube (water supply) into
connection marked “FILL ICE BANK” turn water supply on, this will let
water enter in the ice container. As container fills you will see the clear
tube at the rear of unit will start to fill, when it reaches the level notch (L)
close tap. Remove 8mm tube and insert red ‘T’ cap, push 8mm tube water
supply into connection marked “IN WATER BTM”.
5.3 Check that all installation, electrical and plumbing requirements have been
met.
5.4 Check that all water and electrical connections are tight.
5.5 Turn on the water supply and operate the outlet tap until water flows
smoothly from the outlet. Flow will initially be erratic as air is purged from
the cooling coil. It is recommended that the water is allowed to flow for
a few minutes to flush through the filter, internal pipes, tank and fittings
of any air, dust or debris that may have accumulated during transit or
installation.
5.6 Check that the filler spout is positioned at an angle that does not cause
water to over-spill the sink or drip tray.
5.7 The flow of the water from the outlet can be adjusted if necessary. To do
this unscrew the hexagonal nut locating the push button and remove.
Remove the push button to reveal a slotted adjustment screw. Rotate
the adjustment screw anti-clockwise to increase the flow or clockwise to
decrease the flow. When the required flow is achieved, replace the push
button and secure using the hexagonal nut.
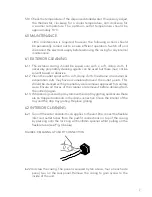
5.8 Adjust the thermostat by turning the adjustment screw clockwise with a
small screwdriver (thermostat located on rear panel of unit) to position 3
or 4.
FIGURE 3: THERMOSTAT ADJUSTMENT
5.9 Switch on the electrical supply, check the compressor and cooling fan
come into operation. Allow the unit to run for several minutes to cool the
stored water (time will depend on thermostat setting and temperature of
mains water and the surrounding air).
COLDER
1 2 3
4
5
6
7
OFF


