background image

HEBB

Industries, Inc.

Manufacturers of Fitness Equipment

5

O

O

O

O

P

P

P

P

E

E

E

E

R

R

R

R

A

A

A

A

T

T

T

T

II

II

O

O

O

O

N

N

N

N


G

G

G

G

U

U

U

U

II

II

D

D

D

D

E

E

E

E


1

1

1

1

6

6

6

6

0

0

0

0

0

0

0

0

..

..

1

1

1

1

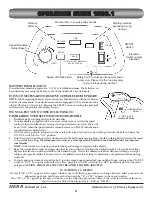
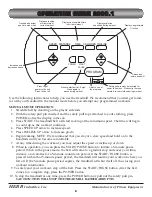
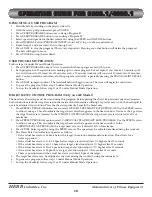
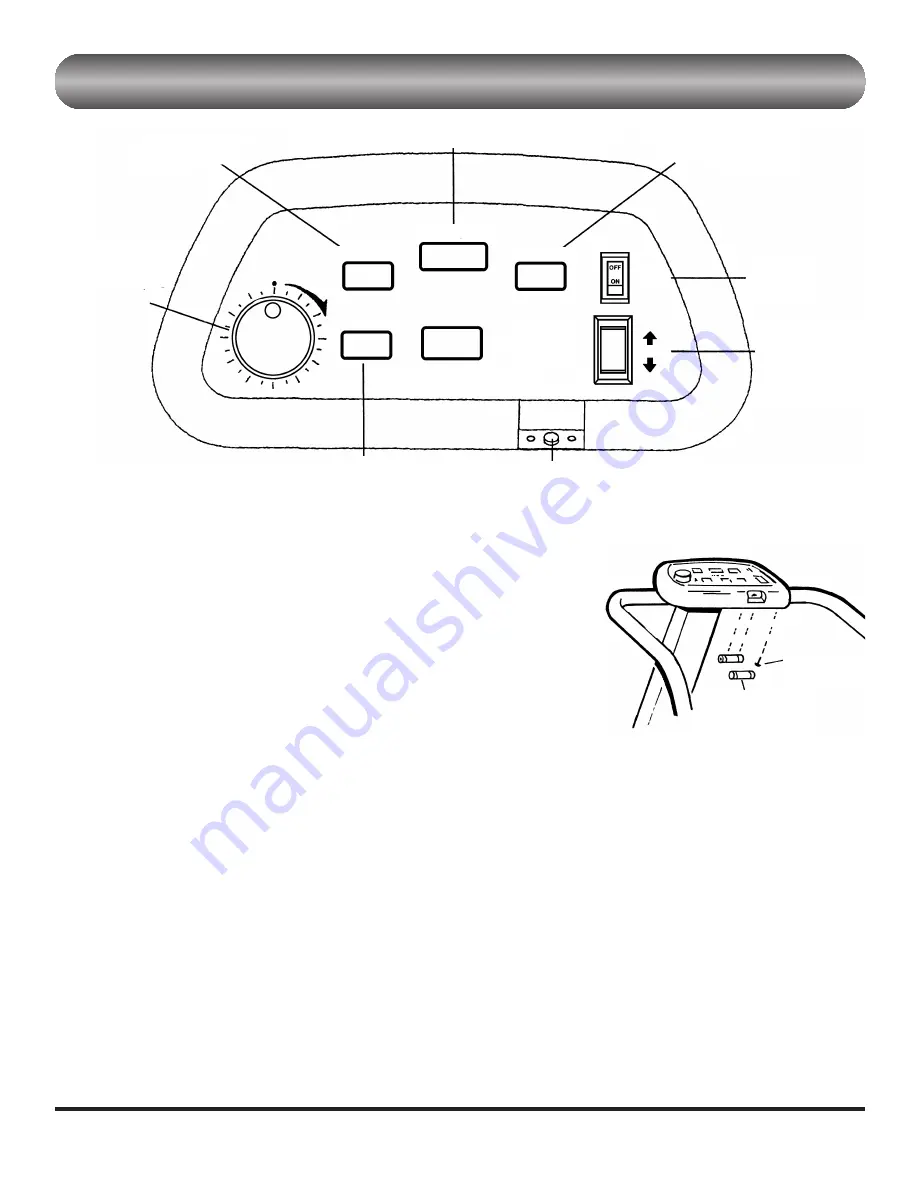
Workout time in minutes and seconds

Displays calories
expended during

workout

Safety Pull Pin must be inserted for power

to come on; Please clip the rope securely

to your clothes during workout.

ON/OFF 

Switch

Elevation

Switch–Adjust 

elevation 

Speed Rheostat–

Adjust Speed

Workout 

Distance

Speed of Walking Belt

SPEED

TIME

RESET

DISTANCE

INCLINE

TO START, SET MAXIMUM 

SPEED TO ZERO

POWER

SPEED

BATTERY INSTALLATION

Your electronic monitor requires two ‘AA’ 1.5 volt alkaline batteries. The batteries can
be installed by removing the battery cover on the underside of your console.

IT IS NOT NECESSARY TO REMOVE CONSOLE FROM UPRIGHT.

NOTE:

When replacing batteries you must replace both batteries with new batteries

that are the same brand. Your electronic monitor is equipped with an automatic shut-
off and all values will reset to 0. Pressing the RESET button or starting the treadmill
will reactivate the monitor and display screens.

WE SUGGEST YOU DO THE FOLLOWING TO 
FAMILIARIZE YOURSELF WITH THIS TREADMILL:

1.

Straddle belt by standing on the plastic side rails.

2.

Your treadmill is equipped with a zero reset (safety) feature within the speed 
control so the belt will not start moving when power is first turned on. There will
be no “click” when the speed control is zeroed or reset, so GENTLY turn the knob
counterclockwise until it stops.

3.

With the safety pull pin inserted and the safety pull rope attached to your clothing, straddle the belt and press the 
ON/OFF switch to the “ON” position.

4.

Turn the speed control knob slowly clockwise until the belt begins moving. Step onto the walking belt and adjust the speed
to a comfortable setting. 

We recommend you stay at a slow speed and hold onto the handrails until you become     

comfortable. 
NOTE:

It takes from two to four seconds for the speed change to register on the display.    

5.

Raise the treadmill elevation  by depressing the elevation switch and hold to the desired height. To lower the elevation, 
depress the elevation switch and hold to the desired height.  Notice the difference in effort between walking on a slight 
incline and a greater incline. You may want to try different elevation settings to determine your preferred incline during 
workouts.

6.

To safely end your workout, step off the belt , turn the speed knob counterclockwise until belt stops, and press the ON/OFF
switch to “OFF.” To stop the treadmill at any time, press the ON/OFF switch to the “OFF” position or pull out the safety 
pull pin. 

CAUTION: THIS WILL STOP THE TREADMILL RATHER ABRUPTLY.

CONVERSION TO METRIC

If a small “M” or “K” appears in the speed window, use the following procedure: to change between miles per hour and

kilometers per hour, hold the reset button until the “K” or “M” appears in the speed window.

If no “M” or “K” appears in the speed window, use the following procedure:  remove the console and manually move

the switch on the back of the electronics to “KM” or “MILES”.

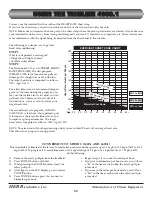
Battery Door 

Screw

2 ‘AA’ 1.5 Volt

Alkaline Batteries

Summary of Contents for Trimline 1600.1

Page 1: ...arefully before using this product Retain this owner s manual for future reference ASSEMBLY USE MAINTENANCE WARRANTY PART ORDERING SERIAL NUMBER DECAL HEBB Industries Inc Manufacturers of Fitness Equipment 1 1 1 16 6 6 60 0 0 00 0 0 0 1 1 1 1 2 2 2 26 6 6 60 0 0 00 0 0 0 1 1 1 1 3 3 3 36 6 6 60 0 0 00 0 0 0 1 1 1 1 4 4 4 46 6 6 60 0 0 00 0 0 0 1 1 1 1 O O O OW W W WN N N NE E E ER R R R S S S S M ...

Page 2: ...lt adjustments and 4 normal maintenance functions Some states do not allow the exclusion or limitation of incidental or consequential damages so the above limitation or exclusion may not apply to you If you would like to speak to a factory representative call 800 499 4322 or email service hebbindinc com M M M MA A A AN N N NU U U UF F F FA A A AC C C CT T T TU U U UR R R RE E E ER R R R S S S S L ...

Page 3: ...t the treadmill while you are standing on the walking belt After turning the power on and adjusting the speed control there may be a pause before the walking belt begins to move Always stand on the foot rails on the sides of the frame until the belt is moving 5 Wear appropriate clothing when exercising on the treadmill Do not wear long loose fitting clothing that could become caught in the treadmi...

Page 4: ... against the bottom of the console plate Using the provided holes bolt loosely to the console plate using two 1 4 20 X 2 hex head bolts and two 1 4 lock washers See figure 2 Insert 2 shoulder washers into each hole on the lower end on the handrail Insert 5 16 X 3 hex head bolt through the shoulder washers and then through the provided hole on the treadmill frame Attach the 5 16 Nylock nut to the 3...

Page 5: ... or reset so GENTLY turn the knob counterclockwise until it stops 3 With the safety pull pin inserted and the safety pull rope attached to your clothing straddle the belt and press the ON OFF switch to the ON position 4 Turn the speed control knob slowly clockwise until the belt begins moving Step onto the walking belt and adjust the speed to a comfortable setting We recommend you stay at a slow s...

Page 6: ... will come to a gradual stop and saves your time distance and calories for a 5 minute countdown period If the START PAUSE button is pressed within that 5 minute pause period the treadmill will resume your workout where you left off If the 5 minute pause period expires the treadmill will shut itself off thus losing your workout information 9 To safely end your workout step off the belt Press the ST...

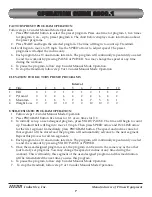
Page 7: ... 2 4 6 4 2 3 Mountain 0 1 3 5 7 8 7 5 3 1 4 Weight Loss 0 0 10 10 0 0 10 10 0 0 USER DESIGNED PROGRAM OPERATION 1 Follow steps 1 2 under Manual Mode Operation 2 Press PROGRAM button five times for U1 or six times for U2 3 To initially set up a user designed program press START PAUSE The time will begin to count up Treadmill belt will begin to move 1 0 mph Then press SPEED arrow and INCLINE arrow f...

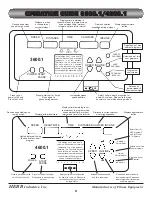
Page 8: ...n program mode scans workout time workout interval and time left in interval PRESET PROGRAM WORKOUT TIME WORKOUT INTERVAL INTERVAL TIME Desired and actual speed in mph or kph START PAUSE POWER SPEED HEART RATE DISTANCE CALORIES Displays time remaining in cur rent workout In program mode scans workout time workout interval and time left in interval Lights displayed if using the heart rate control p...

Page 9: ...untdown period If the START PAUSE button is pressed within that 5 minute pause period the treadmill will resume your workout where you left off If the 5 minute pause period expires the treadmill will shut itself off thus losing your workout information 11 To safely end your workout step off the belt Press the START PAUSE button After the belt comes to a complete stop press the POWER button 12 To s...

Page 10: ... chest strap around your chest moisten both conductive electrode straps located on the inside of the transmitter Although tap water may work the best liquid to use is hard contact lens solution Place the chest strap directly beneath the breast area 1 Press PRESET PROGRAM button once to select WEIGHT LOSS HEART RATE PROGRAM Use the SPEED arrows to adjust your age This also adjusts the target heart ...

Page 11: ...round your chest in contact with your skin NOTE Make sure you moisten the back part of the chest strap where the pick up electrodes are located Also make sure your treadmill is six feet away from strong electromagnetic sources TV microwaves computers etc These devices may cause interference with the signal being transmitted from the chest band to the console CONVERSION TO METRIC 3600 1 AND 4600 1 ...

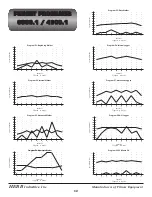
Page 12: ... and Grade Program P2 Interval Walker Interval Speed Grade 0 1 2 3 4 5 6 7 8 9 10 1 2 3 4 5 6 7 8 9 10 Speed and Grade Program P3 Advanced Walker Interval Speed Grade 0 1 2 3 4 5 6 7 8 9 10 1 2 3 4 5 6 7 8 9 10 Speed and Grade Program P5 Race Walker Interval Speed Grade 0 1 2 3 4 5 6 7 8 9 10 1 2 3 4 5 6 7 8 9 10 Speed and Grade Program P8 Hill Jogger Interval Speed Grade 0 1 2 3 4 5 6 7 8 9 10 1 ...

Page 13: ...HEBB Industries Inc Manufacturers of Fitness Equipment 13 This page intentionally left blank ...

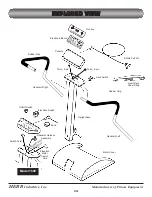
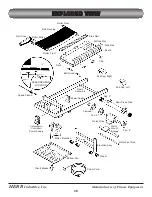
Page 14: ... E EW W W W Console Telco 6 pin Overlay Limit Switch Rubber Grip Upright Assy Motor Cover Safety Pull Pin Electronic Board On Off Switch Elevation Switch Knob Rheostat Harness Assembly Elevation Motor Switch Cord Switch Cord Model 1600 Speed Pickup Extension Telco 8 pin Handrail Left Heart Rate Chest Strap Rubber Grip Handrail Right ...

Page 15: ...oller Pulley Deck Belt Guide Frame Assembly Speed Pickup Controller or Controller Power Supply Power Supply Motor Elevation Flywheel Fan 4 Motor Drive Wheel Elevation Assy Bottom Pan Circuit Breaker Power Cord Motor Pivot Rod Motor Mount Assy Cap 3 Rear Cross Tube End Cap Left Fan 6 End Cap Right Clip Side Rail Board SofTrak Mat 1 4 SPEED SENSOR LOCATION Roller Front Roller Rear ...

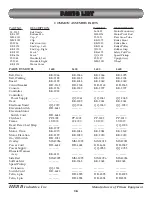
Page 16: ... 2185 KK 2185 KK 2123 KK 2124 Board KK 2125 KK 4038 KK 2060 KK 2060 Circuit Breaker HH 2165 HH 2165 HH 2165 HH 2065 Console KK 2196 KK 2189 KK 2197 KK 2197 Controller KK 2018 Controller Power Supply QQ 2061 QQ 2061 QQ 2065 Deck KK 2009 KK 2061 KK 2061 Electronic Board QQ 2019 QQ 2063 QQ 2060 QQ 2050 Elevation Switch HH 4641 Elevation Motor Switch Cord HH 4642 Flywheel PP 3002 PP 3002 PP 3002 PP 20...

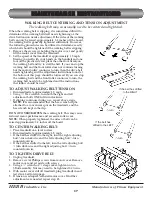
Page 17: ...e front roller continues to turn the walking belt needs to be tightened and the instructions that follow should be used TO ADJUST WALKING BELT TENSION Run treadmill at approximately 3 5 mph Using 3 16 Hex wrench turn both the right and left adjustment bolts ONE full turn clockwise If slipping continues during use repeat above steps NOTE It is recommended that the hex wrench clip be attached to a c...

Page 18: ...cover At least once a year remove the motor cover and vacuum under the motor cover WALKING BELT AND DECK LUBRICATION This treadmill is equipped with a pre lubricated low maintenance deck system The belt deck friction may play a major role in the function and life of your treadmill thus requiring periodic lubrication We recommend a periodic inspection of the deck If the deck appears worn contact ou...

Page 19: ...om magnet in front roller pulley see exploded view for location 4 Heart rate not displayed model 4600 1 Transmitter not making good contact with skin 2 Electromagnetic interference 1 Moisten skin contact area on the transmitter strap or turn transmitter strap upside down 2 Turn off any television microwave or computer within 6 feet of treadmill 5 Treadmill will not elevate or decline 1 Wires loose...

Page 20: ... set the low speed and high speed and will also set the incline from top to bottom 8 When the calibration process is finished the Cal displayed in the distance window will begin flashing also the walking belt will begin moving again While the Cal is flashing press any button to end the calibration process 9 Your treadmill is now ready to use Calibrate the elevation 1 Plug treadmill into wall outle...

Reviews: