background image

13

The upper rack is designed to hold more delicate and lighter

dishware, such as glasses, cups and saucers, plates, small

bowls and shallow pans (as long as they are not too dirty).

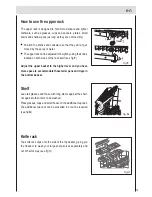
How to use the upper rack

Shelf

Lean tall glasses and those with long stems against the shelf-

not against other items to be washed.

Place glasses, cups and small bowls on the additional cup rack.

The additional cup rack can be swivelled in or out as required

(see fig.G).

fig.G

Adjust the upper basket to the higher level and you have

more space to accommodate those taller pans and trays in

the bottom basket.

Position the dishes and cookware so that they do not get

moved by the spray of water.

The upper rack can be adjusted for height by using the knobs

located on both sides of the rack itself (see fig.F).

fig.F

en

Knife rack

The knife rack clips onto the side of the top basket, giving you

the freedom to wash your large sharp knives separately and

out of harm’s way (see fig.H).

fig.H

Summary of Contents for HEC12EFM Series

Page 1: ...Dishwasher HEC12EFM Series Instructions for Use 0120505895 en ...

Page 2: ......

Page 3: ... container and the rinse aid dispenser How to fill the detergent dispenser Not suitable for the dishwasher Arranging crockery glasses etc in the dishwasher Programme overview Washing dishes How to keep your dishwasher in shape Care and maintenance Fault finding Technical data Important information 2 4 7 8 9 11 12 13 15 16 18 19 20 23 24 ...

Page 4: ...dishwasher when barefoot or with wet hands or feet We discourage the use of extension cords and multiple sockets If the appliance is not operating properly or maintenance must be performed disconnect the appliance from the power supply Site the dishwasher and connect it up in accordance with the installation instructions The dishwasher must not be connected to the electricity supply while installa...

Page 5: ...horised to make repairs If the supply cord is damaged it must be replaced by the manufacture its service agent of similarly qualified persons in order to avoid a hazard To maintain the EFFICIENCY and SAFETY of this appliance we recommend call only the Service Centers authorized by the manufacturer always use original Spare Parts When disposing of old appliances Appliances which are no longer being...

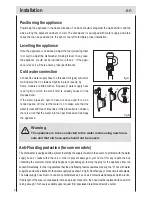
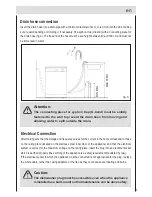
Page 6: ...ed end If the water pipes are new or have not been used for an ex tended period of time let the water run to make sure that the water is clear and free of impurities If this precaution is not taken there is a risk that the water inlet can get blocked and damage the appliance Anti Flooding protection for some models The dishwasher is equipped with a system that stops the supply of water in the even...

Page 7: ...aking sure that the voltage and frequency values for the current in the home correspond to those on the rating plate located on the stainless steel inner door of the appliance and that the electrical system is correct for the maximum voltage on the rating plate insert the plug into an electrical socket which is earthed properly the earthing of the appliance is a safety requirement mandated by law ...

Page 8: ... amp and approved to BS1362 The plug contains a removable fuse cover that must be refitted when the fuse is replaced In the event of the fuse cover being lost or damaged the plug must not be used until a replacement cover has been obtained If the moulded mains plug is unsuitable for the socket outlet in your home or is removed for any other reason then the fuse should be removed and the cut off pl...

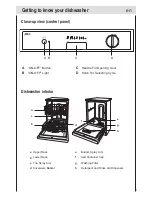
Page 9: ...interior C D Handle For Opening Door Knob For Selecting Cycle A B ON OFF Button ON OFF Light Upper Rack Detergent and Rinse Aid Dispenser a b c d e f g h Top Spray Arm Salt Container Cap Silverware Basket Bottom Spray Arm Washing Filter Lower Rack en A B C D a d e f g h b c ...

Page 10: ...icator located on the control panel lights To prevent the formation of rust load the salt just before beginning a wash cycle Adjusting salt consumption The dishwasher is designed to allow for adjusting the amount of salt consumed based on the hardness of the water used This is intended to optimize and customize the level of salt consumption so that it remains at a minimum To adjust salt consumptio...

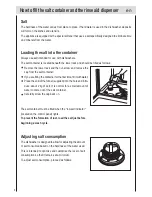
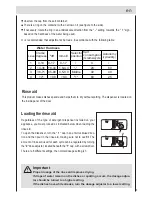
Page 11: ...oading the rinse aid To open the dispenser turn the 1 cap in an anti clockwise direc tion and then pour in the rinse aid making sure not to overfill The amount of rinse aid used for each cycle can be regulated by turning the 2 dose adjustor located beneath the 1 cap with a screwdriver There are 6 different settings the normal dosage setting is 3 Important Proper dosage of the rinse aid improves dr...

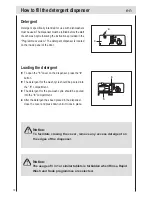
Page 12: ...detergent on the edges of the dispenser To open the 3 cover on the dispenser press the 4 button The detergent for the wash cycle should be poured into the 5 compartment The detergent for the pre wash cycle should be poured into the 6 compartment After the detergent has been placed in the dispenser close the cover and press down until it clicks in place How to fill the detergent dispenser Loading t...

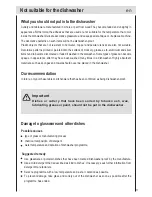
Page 13: ...een washed many times in a dishwasher Highly absorbent materials such as sponges and towels should never be placed in the dishwasher Our recommendation In future only purchase table or kitchenware that has been confirmed as being dishwasher proof Important Dishes or cutlery that have been soiled by tobacco ash wax Iubricating grease or paint should not be put in the dishwasher Possible causes type...

Page 14: ...dishes and lids on the sides of the racks in order to avoid blocking the rotation of the top spray arm Pots serving bowls etc must always be placed face down see fig D Deep pots should be slanted to allow the water to flow out Silverware should be placed in the silverware basket with the handles at the bottom if the rack has side baskets the spoons should be located individually into the appropria...

Page 15: ...itional cup rack can be swivelled in or out as required see fig G fig G Adjust the upper basket to the higher level and you have more space to accommodate those taller pans and trays in the bottom basket Position the dishes and cookware so that they do not get moved by the spray of water The upper rack can be adjusted for height by using the knobs located on both sides of the rack itself see fig F...

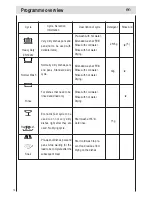
Page 16: ...of dishes pots and pans while waiting for the load to be complete after the subsequent meal Very dirty dishes pots and pans not to be used with delicate items Normally dirty dishes pots and pans Standard daily cycle Short cold wash to pre vent food residue from drying on the dishes Pre wash with hot water Extended wash at 55 C Rinse with cold water Rinse with hot water Drying Extended wash at 55 C...

Page 17: ...he values can vary consider ably according to different amounts of dishes temperature of mains water supply pressure of mains water supply ambient temperature fluctuations in mains voltage machine related factors e g temperature water volume Turning on the Appliance Starting a wash cycle Make sure that the plug for the appliance is inserted into the wall socket Make sure that the water supply is t...

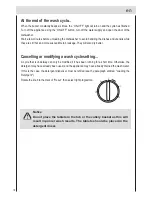
Page 18: ...s finished Turn off the appliance using the ON OFF button turn off the water supply and open the door of the dishwasher Wait a few minutes before unloading the dishwasher to avoid handling the dishes and utensils while they are still hot and more susceptible to breakage They will also dry better Cancelling or modifying a wash cycle setting At the end of the wash cycle Rotate the knob to the mark o...

Page 19: ...ater and a little while vinegar or cleaning product made specifically for dishwashers Moving the Appliance If the appliance must be moved try to keep it in a vertical position If absolutely necessary it can be positioned on its back Seals One of the factors that cause odors to form in the dishwasher is food that remains trapped in the seals Periodic cleaning with a damp sponge will prevent this fr...

Page 20: ...the filters When the appliance has finished washing check the fil ters for particles of food and if required clean After undoing the coarse micro filter 7 the filter unit 8 can be removed Remove any particles of food and rinse the filters under running water Insert the filter unit 8 and tighten the coarse micro filter 18 en Inspect the nozzles in the spray arms for blocked holes due to remnants of...

Page 21: ...Do not forget that repairs should only be carried out by a qualified specialist Improper repairs can lead to considerable equipment dam age as well as danger to the user Fault finding 19 en If you take all these checks and the dishwasher still does not function or your dish washer have any other error display you can power the dishwasher OFF and wait a few minutes You can power the dishwasher on t...

Page 22: ...as been poured into the rinse aid container Appliance stops suddenly while washing is taking place Cut off electricity supply to appliance Water supply has been interrupted Knocking sound can be heared while washing is taking place A spray arm is knocking against the dishes inside the appliance Rattling sound can be heared while washing is taking place Crockery has not been stacked properly inside...

Page 23: ...ining a chemical bleaching agent Plastic items are discoloured Not enough detergent was added to dispenser compartment Amount of rinse aid was set too low Although water is quite hard no salt has been put in appliance Water softener was set too low Lid on salt container is not screwed tight If you used a phosphate free detergent try a detergent containing phosphates and compare results White stain...

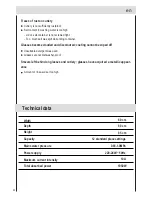
Page 24: ... be wiped off Amount of rinse aid set too high Smears left behind on glasses and cutlery glasses have acquired a metallic appear ance Lid on salt container is not screwed tight Too much salt was spilt while filling container Technical data 12 standard place settings Width Depth Height Capacity Mains water pressure Power supply Total absorbed power 60 cm 0 03 1 0MPa 220 240V 50Hz 1950W Maximum curr...

Page 25: ...o not allow children to play with any parts of the packaging There is a risk of suffocation by the cardboard boxes and the plastic wrapping Up to date information concerning options for disposal can obtained from your retailer or local munici pal administration General information Measures must be taken to ensure that built under and built in units that are subsequently re sited as free standing a...

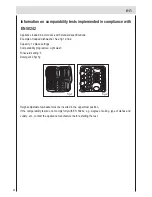
Page 26: ...es and cutlery etc contact the appliance manufacturer before starting the test Information on comparability tests implemented in compliance with EN 50242 Appliance loaded in accordance with standard specifications Example of loaded dishwasher See fig 1 and 2 Capacity 12 place settings Comparability programme Light wash Rinse aid setting 5 Detergent 25g 5g en fig 1 fig 2 ...

Page 27: ...ctronic equipment By ensuring this prod uct is disposed of correctly you will help prevent potential negative consequences for the environment and human health which could otherwise be caused by inappropriate waste handling of this product For more detailed information about recycling of this product please contact your local city office your household waste disposal service or the shop where you ...

Page 28: ......
Reviews: