38
3.
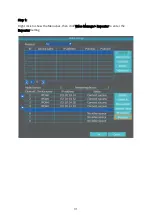
Sender: enter your email address.
4.
Password: enter the correct password of your email address.
5.
Click Test to check whether you can receive the test email. If yes, the setting is
successful; if not, please check the box before More Parameter to continue
the following steps.
6.
Port: enter the corresponding port of your email service provider. You can
refer to the following list.
SMTP server
Port
Encryption
Gmail
smtp.gmail.com
465
Hot-mail
smtp.live.com
587
Yahoo mail
smtp.mail.yahoo.com 465
7.
Encryption Type: select SSL or TLS.
Tip: You can obtain the Port and Encryption Type from your email service
provider. Or contact us for help.
8.
Sendee 1
: it’s the same as the
Sender by default. You can change to another
email address to receive the notifications, then click Apply to complete the
setting.
9.
Click Test again to check if you can receive the test email. Explanations of
other options:
•
Sendee 2: It is not necessary to fill in. But you can enter another email
address to receive notifications when your family member wants to know as
well.
•
Subject: you can change as needed or just leave it like this.
•
Interval: set the time interval to receive the alarm message. The default
setting is 30 seconds. Please avoid setting the time interval too short, as it
may cause the insufficient space of your email.
•
Health email enable: check the box to enable it, then you will receive emails
that tells you the NVR works normally.
•
Health email interval: set the time interval of email for telling you that the
NVR works well.


