background image

med 0315  2015-03-25

med 0315  2015-03-25

5/28

ENGLISH

HEINE EL3 LED Examination Light

Please read and follow these instructions for use of and keep them 
for future reference.

Intended Use
The EL3 LED is a mains operated medical examination light for illuminating 
the body’s surfaces and cavities during medical examinations in closed  
examination rooms.

The device is intended only for medical examinations in which failure 
of the light will not pose a risk to the patient. A main source of lighting 
must always be switched on.

For U.S. only:

Federal law restricts this device to sale by or on the order of a 
Physician or Practitioner.

Warnings and Safety Information

CAUTION! 

Indicates potential hazardous situations. Ignoring the 

corresponding instructions may lead to dangerous situations of 
mild to moderate extent. (Background color yellow; foreground color 
black).

NOTE!

 Note indicates valuable advice in terms of installation, 

operation, maintenance or repair. Notes are important, but not related 
to hazardous situations.

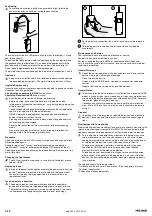
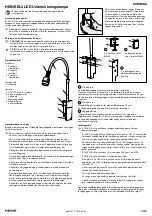
Product overview
Gooseneck:
 1 Gooseneck 
    (flexible component)
 2 Gooseneck
    (rigid component)
 3 Gooseneck
    (flexible component)

Lamp head:  
  4  Hand grip

Lamp base:
  5  ON/OFF switch (system)
  6  Connection socket for 
    the power cable
  7  Installation cover
  8  Connection for the 
    mounting systems

Installation instructions
When mounting the accessories, please follow the enclosed mounting 
instructions for the mounting systems.

To avoid risk of electric shock, this equipment must only be connected 
to a supply mains with protective earth.
To ensure all-pole disconnection from the mains at all times, the ME 
device must be installed so that the power cord is accessible and 
disconnectable.
When using the examination light with a stand, clamp or wall mount, 
ensure the examination light is standing or stably attached. Check that 
the attached examination light is stable and secure before each use.
Use the accessories supplied with the examination light to ensure the 
examination light is held securely and properly in the respective 
mount.
When moving the lamp, ensure that the power cable is not taut. 
Unplug the power cable when moving the lamp over longer distances.
When mounting the lamp to the wall, ensure that the subsurface is
able to bear the mechanical stress.
The wall plugs supplied with the product are universal wall plugs 
and suitable for most building materials (e.g. concrete, solid brick, 
plasterboard or gypsum cardboard). Before mounting the device, 
check whether you need to use a special wall plug for the subsurface 
of your wall. 
Before mounting the device to the wall, check that there are no cables 
or pipes running under the planned drill holes that could get damaged.

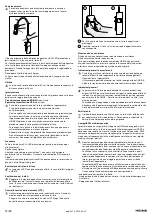
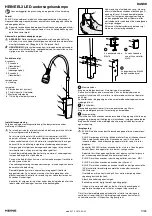
For mounting the mains adaptor to the wall, 
clamp or stand mount, push up the cover (7) 
and take it off. Use the screws supplied with 
the product to fasten the examination light 
to the respective mounting system (clamp or 
stand mount) or use the wall plugs supplied 
to mount the lamp to the wall.
The screws for the mounting systems are 

located in the corners of the mounting unit.

       Clamp mount:
Please use the screws enclosed with the product to attach the clamp mount 
to the base of the lamp. 
This can be fastened to an even surface (e.g. table top) with a maximum 
thickness of 40 mm or to a circular tube with a maximum diameter of 30 mm. 
Please check that the mounted lamp is securely in place before using the 
lamp.
       Stand mount:
This mount system is designed for tubes with a diameter of 25 mm. 
Please use the screws enclosed with the product to attach the stand mount 
to the base of the lamp.
       Wall mounting:
The rubber mat can be used as a drilling template for marking the holes on 
the wall and is intended to level out uneven areas on the wall for the mains 
adaptor. 
Please use the screws in combination with the wall plugs supplied with the 
product when mounting the device to a suitable wall.
Setting up

The EL3 LED must not be used for eye examinations or as a surgical 
light.
The EL3 LED is intended for use in closed spaces. It is not designed 
for mobile use or for use outdoors. Improper use can result in damage 
to the device or pose a risk to the user.
Prior to each use, check that the EL3 LED is functioning properly as 
intended. Do not use the device if visible damage is apparent.
The device does not have an application part and therefore care must 
be taken to ensure that the examination light does not come into 
contact with the patient!
The EL3 LED must not be used in strong magnetic fields such as 
within the vicinity of MRI equipment.
The EL3 LED must not be used in oxygen-enriched environments.
The EL3 LED must not be used in an environment of flammable 
anaesthetic agents (class AP) or with oxidising agents (class APG).
Keep a minimum distance of 20 cm between the examination light and 
the examined object (patient).
Do not cover the examination light.
Ensure that the device is handled properly and carefully.
Do not let the power cable become taut as this could damage the 
device or pose a tripping hazard.

Only after the device has been securely mounted, should the power cable 
supplied with the device be connected by plugging it into the mains 
connection socket (6). To use the device, switch it on by pressing the 
power switch (5) so that the switch is in the ON position  I  and the switch 
lights up green.

1

2

3

4 x rear panel screws 
M4x45 with appropriate 
wall plug

 4 x self-cutting screws 
for plastic 40x20

4 x lens-head 
screws M4x16

1

2

3

7

Summary of Contents for EL3

Page 1: ...HEINE EL3 LED Examination Light HEINE Optotechnik GmbH Co KG Kientalstr 7 82211 Herrsching Germany Tel 49 0 8152 38 0 Fax 49 0 8152 38 202 E Mail info heine com www heine com med 0315 2015 03 25 ...

Page 2: ...med 0315 2015 03 25 HEINE EL3 LED Examination Light DEUTSCH 3 ENGLISH 5 FRANÇAIS 7 ESPAÑOL 9 ITALIANO 11 SVENSKA 13 NEDERLANDS 15 DANSK 17 SUOMI 19 PORTUGUÊS 21 ...

Page 3: ...tage des Netzteils an Wand Klemm oder Stativhalterung schieben Sie die Abdeckung 7 nach oben auf und heben diesen ab Verwenden Sie die mitgelieferten Schrauben um die Untersuchungsleuchte an die jeweilige Halterung Klemm oder Stativ halterung oder mittels mitgelieferter Dübel an der Wand zu befestigen Die Schrauben für die Halterungssysteme be finden sich in den Ecken der Montageeinheit Klemmhalte...

Page 4: ...lektrischen Prüfung muss zuerst die Montageabdeckung abgenommen werden Die Prüfstelle liegt auf der linken Seite und ist dementsprechend gekennzeichnet Wartung und Service Das Gerät ist wartungs und servicefrei Eine Veränderung des Geräts ist nicht erlaubt Senden Sie das Gerät zur Reparatur ausschließlich an HEINE oder autorisierte Service Partner um die Gefahr von elektrischen Schlägen Verbrennun...

Page 5: ... under the planned drill holes that could get damaged For mounting the mains adaptor to the wall clamp or stand mount push up the cover 7 and take it off Use the screws supplied with the product to fasten the examination light to the respective mounting system clamp or stand mount or use the wall plugs supplied to mount the lamp to the wall The screws for the mounting systems are located in the co...

Page 6: ...cted for damage and that they are in good working order at regular intervals The technical safety inspection must be carried out every two years in accordance with the generally accepted rules of technology For the electrical inspection the installation cover must be removed first The testing point is located on the left hand side and is labelled accordingly Maintenance and Service The instrument ...

Page 7: ...d être endommagés ne passent au droit des perçages prévus Pour le montage du bloc d alimentation sur la fixation murale sur la pince tous supports ou sur un pied à roulettes pousser le couvercle 7 vers le haut et le soulever pour l ôter Utiliser les vis fournies pour fixer la lampe d examen sur chaque type de fixation pince tous supports ou fixation sur pied à roulettes ou sur un mur au moyen des ...

Page 8: ...intenance Ces appareils ne nécessitent aucune maintenance particulière Aucune modification de l appareil n est admise Envoyer l appareil pour réparation exclusivement chez HEINE afin d éviter le risque de chocs électriques de brûlures ou de blessures par suite d une réparation ou d une manipulation non conformes Consignes générales Verifier avant chaque utilisation le bon fonctionnement de l appar...

Page 9: ...rir bajo el muro Para el montaje de la fuente de alimentación en el soporte mural soporte por apriete o sobre trípode deslice la cubierta 7 hacia arriba y levante ésta Utilice los tornillos incluidos en el suministro para fijar la lámpara de reconocimiento médico en el correspon diente soporte soporte por apriete o sobre trípode o en la pared mediante los tacos incluidos Los tornillos para los sis...

Page 10: ...as Para la comprobación eléctrica se debe primero extraer la cubierta de montaje El punto de comprobación se encuentra en el lado izquierdo y está señalizado de forma correspondiente Mantenimiento y servicio técnico Los aparatos están exentos de mantenimiento y servicio técnico No se permite modificar el aparato Enviar el aparato a reparar a la casa HEINE o a un servicio autorizado con el fin de e...

Page 11: ...on si trovino cavi o condutture e che non vengano danneggiate Per il montaggio dell alimentazione al supporto a parete a morsa o stativo fare scorrere e rimuovere la copertura 7 verso l alto Utilizzare le viti in dotazione per fissare la lampada diagnostica al relativo supporto supporto a morsa o stativo o alla paretecon i tasselli forniti in dotazione Le viti per i supporti si trovano ai bordi de...

Page 12: ... il controllo elettrico rimuovere prima di tutto la copertura di montaggio Il punto di controllo si trova sul lato sinistro ed è opportunamente contrassegnato Manutenzione e assistenza Gli apparecchi non necessitano di manutenzione e assistenza Non è ammesso alterare l apparecchio Fare riparare l apparecchio esclusivamente da HEINE o da partner di assistenza autorizzati per evitare il pericolo di ...

Page 13: ...tt det inte går några kablar eller ledningar under de avsedda borrhålen som kan skadas För att montera nätdelen i vägg klämeller stativhållare skjuter du kåpan 7 uppåt och lyfter av denna Använd de medföljande skruvarna för att fästa undersökningslampan i respektive hållare kläm eller stativhållare eller med medföljande dymlingar i väggen Skruvarna för hållarsystemen finns i monte ringsenhetens hö...

Page 14: ...rvice Instrumenten är underhålls och servicefria Det är inte tillåtet att förändra apparaten Vid reparationer för att undvika risk för elektriska stötar brännskador och andra personskador skall instrumentet endast skickas till HEINE eller en auktoriserad servicepartner för reparation för att undvika felaktiga reparationer eller manipulationer Allmänna varningar Kontrollera innan varje användning a...

Page 15: ...abels of leidingen lopen die beschadigd kunnen worden Voor de montage van de voeding aan wand klem of statiefhouder schuift u de afdekking 7 naar boven open en neemt u die eraf Gebruik de meegeleverde schroeven om de lamp voor medisch onderzoek aan de betref fende houder klem of statiefhouder of met behulp van de meegeleverde pluggen aan de wand te bevestigen De schroeven voor de houdersystemen be...

Page 16: ...verwijderd De plek die gecontroleerd moet worden ligt aan de linkerkant en is dienovereenkomstig gemarkeerd Onderhoud en service De apparaten zijn onderhouds en servicevrij Het is niet toegestaan het instrument te veranderen Stuur het instrument uitsluitend voor reparatie naar HEINE of een bevoegde service partner om het risico van elektrische schokken verbrandingen en verwondingen op grond van on...

Page 17: ...e løber kabler eller ledninger som kan blive beskadigede Ved montering af netdelen på væg klemme eller stativholderen skubbes afdækningen 7 opad og løftes af Anvend de medfølgende skruer til at fastgøre undersøgelseslampen på den pågældende holder klemme eller stativholder eller ved hjælp af de medfølgende dyvler på væggen Skruerne til holdersystemerne befinder sig i hjørnerne af monteringsenheden...

Page 18: ...nteringsafdækningen først tages af Kontrolstedet sidder på venstre side og er afmærket i overens stemmelse hermed Vedligeholdelse og service Apparaterne er vedligeholdelses og servicefrie Det er ikke tilladt at foretage ændringer på apparatet I forbindelse med reparationer sendes apparatet udelukkende til HEINE eller til en autoriseret servicepartner for at undgå risikoen for elektriske stød forbr...

Page 19: ...ityskohdan alla kulje johtoja jotka saattavat vaurioitua Verkkolaitteen asennus seinä puristustai jalustakiinnikkeeseen Työnnä peitelevyä 7 ylöspäin ja nosta se Kiinnitä tutkimusvalaisin kiinnikkeeseen puristus tai jalustakiinnik keeseen toimitukseen sisältyvillä ruuveilla tai kiinnitä se seinään toimitukseen sisältyvillä tulpilla Kiinnitysjärjestelmän ruuvit ovat asennusyksikön kulmissa Puristusk...

Page 20: ...ivussa ja se on merkitty sen mukaisesti Kunnossapito ja huolto Laitteet ovat kunnossapito ja huoltovapaita Laitetta ei saa muuttaa Laitteen saa lähettää korjattavaksi ainoastaan HEINElle tai valtuutetulle huoltokumppanille jotta voidaan välttää vääristä korjauksista tai luvattomista toimenpiteistä aiheutuvat sähköiskut palovammat ja loukkaantumiset Yleiset varoitukset Tarkasta ennen jokaista käytt...

Page 21: ... montagem do cabo de ligação na fixação com grampo na parede ou em tripé empurre a cobertura 7 para cima e desprende a Utilize os parafusos fornecidos para fixar a lâmpada de exame no respectivo suporte fixação por grampo ou em tripé ou para montá la na parede usando as cavilhas fornecidas Os parafusos para os sistemas de fixação encontram se nos cantos da unidade de montagem Fixação com grampo Pa...

Page 22: ...om as normas técnicas de reconhecimento geral Para a verificação elétrica deve se primeiro retirar a cobertura de montagem O ponto de verificação fica ao lado esquerdo e está identificado em conformidade Manutenção e assistência Os aparelhos não necessitam de manutenção e de assistência Não são permitidas alterações no aparelho Para evitar o risco de choque elétrico queimaduras ou ferimentos deriv...

Page 23: ...likely that any interference in nearby electronic equipment RF emissions CISPR 11 Class B The device is suitable for use in all establishments including domestic establishments and those directly connected to the public low voltage power supply network that supplies buildings used for domestic purposes Harmonic Emissions IEC 61000 3 2 Class A Symmetrical three phase devices and other devices Volta...

Page 24: ...1 2008 28KY MEDICAL GENERAL MEDICAL EQUIPMENT AS TO ELECTRICAL SHOCK FIRE AND MECHANICAL HAZARDS ONLY IN ACCORDANCE WITH UL60601 1 CAN CSA C22 2No 601 1 ANSI AAMI ES60601 1 2005 CAN CSA C22 2 No 60601 1 2008 28KY Erläuterung der verwendeten Symbole Auf dem Gerät bzw der Verpackung finden sich folgende Symbole Explanation of utilized symbols The following symbols are used on the device or on the pa...

Page 25: ...ljetuslämpötilan F Limite de Temperatura permitida em F para armazenamento e transporte Zulässige Luftfeuchtigkeit für Lagerung und Transport Humidity limitation for storage and transport Humidité admise pour le stockage et le transport Humedad del aire permitida para almacenar y transportar el producto Umidità atmosferica ammessa durante il trasporto e la conservazione Tillåten luftfuktighet för ...

Page 26: ...med 0315 2015 03 25 26 28 ...

Page 27: ...med 0315 2015 03 25 27 28 ...

Page 28: ...Manufacturer HEINE Optotechnik GmbH Co KG Kientalstr 7 82211 Herrsching Germany www heine com ...

Reviews: